Paint

Chalk Paint on Fabric

Although I would not always recommend using chalk paint on fabric, it does work!  I’m sharing a tutorial for using chalk paint on fabric.

{If you’re new here, you may want to follow me on Facebook, Twitter & Pinterest.}

I’m still painting things…

Tutorial for using chalk paint on fabric

Tutorial for Using Chalk Paint on Fabric

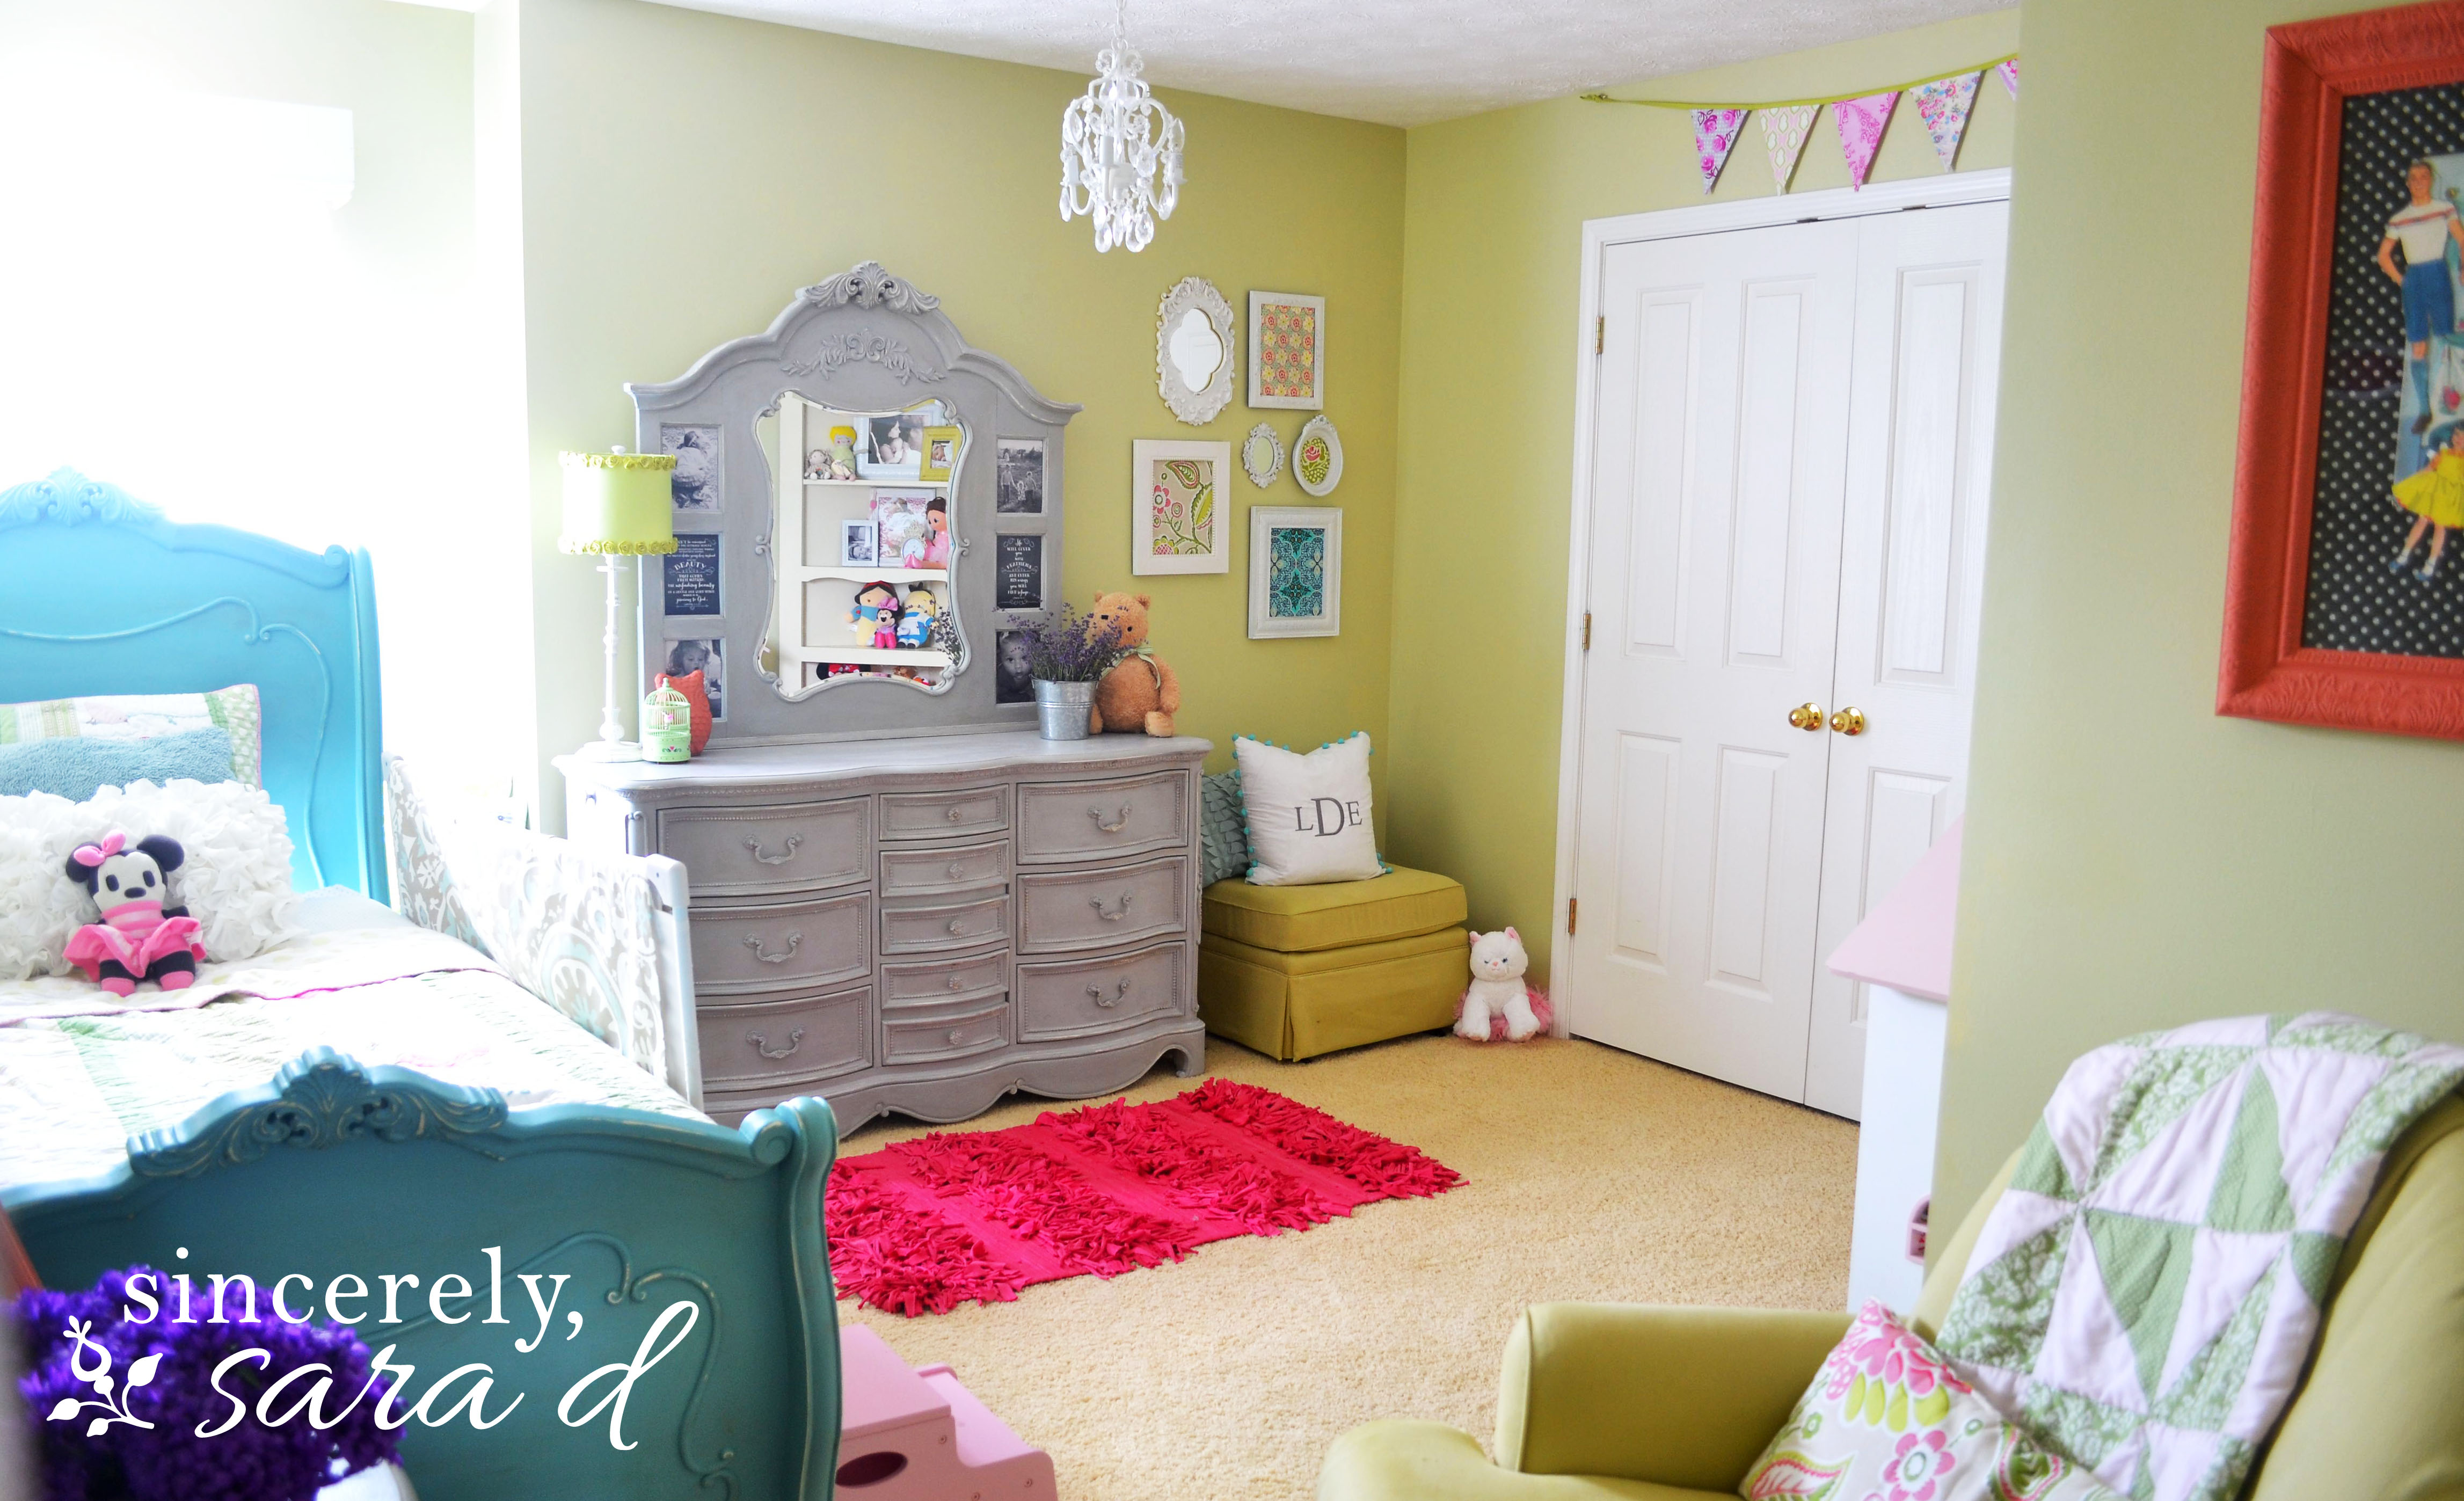
I found this amazing headboard at a flea market last summer.  It was love at first sight.  Seriously, my heart skipped a beat.

I love old furniture, but I do get a little creeped out by used fabric pieces.  The velvet upholstery was in perfect condition (despite the green color which did not match my decor), but I didn’t know where this headboard had been and it smelled pretty bad.  And, I was asking MY GUESTS to lay their heads next to a used (stinky) fabric headboard.  So, before I tried reupholstering it, I decided to try paint!

I painted the frame of the headboard in Annie Sloan Paris Gray chalk paint.  To see more about how to use chalk paint, click HERE.

I also painted the upholstery with Annie Sloan Paint, but I used Pure White and clear Annie Sloan soft wax.

PaintedHeadboard8

The first step is to water down the paint for the fabric.  I did a 1:1 ratio – 1 part paint to 1 part water.  (I did clean the upholstery before I painted it by washing it down with Mr. Clean.  I’m not sure how much that did, but at least I tried.)

PaintedHeadboard9

After you have your watered down paint ready, start painting!

PaintedHeadboard10

I have painted an upholstered fabric chair (to see more about that project, click HERE), but this velvet was new to me.  It really SOAKS up the paint.  I painted layer after layer after layer…

I was lazy on the last layer and used straight, chalk paint. Do not get lazy like me.  Keep watering the paint down to avoid the paint from cracking.

By the time I was done, I painted between 4-5 coats of paint.  I used almost my entire quart of paint to complete this project.

PaintedHeadboard11

PaintedHeadboard12

PaintedHeadboard13

Once I had (finally) completed the painting portion, I let it dry.  Drying takes a while since you soak the upholstery in the process.  I had to wait a full 24 hours before I began the next step.

I lightly sanded the paint before I waxed.

PaintedHeadboard

After I sanded, there was chalk paint dust everywhere.  I used a hand vac to sweep it up before I began waxing.

PaintedHeadboard2

I added two layers of wax, and then I took my lint free cloth (an old tshirt) and rubbed in/buffed the wax.

PaintedHeadboard3

I let the wax set a couple days, and then I set the headboard up in my guest room.

tutorial for using chalk paint on fabric

Are you new to my blog? Go HERE to see my home tour and HERE to shop for items I use in our home.

Find me on Facebook | Instagram | Twitter | Pinterest

Paint

Paint a Fabric Chair with Chalk Paint

Today I’m sharing how to paint a fabric chair with chalk paint.

I’m not afraid to paint things.  My motto is: it’s just paint – you can always repaint!  However, I was a little skeptical of the recent popularity of painting upholstered furniture.  But, I can now add it to my list because I painted a fabric chair!

Paint a fabric chair with chalk paint

The chair I painted was 10 years old, and I actually had it in my Goodwill pile.  It looks much better in the photo, but it has seen some wear and tear.

PaintedChair1

Lena had drawn on it, there was a hole in the upholstery, and the seat was pretty grimy – despite my numerous attempts to clean the seat.  Honestly, this picture does the chair way too much justice. Anyway, I had seen lots of Pinterest pins on people painting upholstered furniture, and I decided this was the perfect opportunity to test it out. So, I pulled out my Annie Sloan Chalk paint (Duck Egg, Old Ochre, and clear wax) and got to work!

PaintedChair6

I painted the fabric in Annie Sloan Duck Egg and the wooden legs and arms in Annie Sloan Old Ochre. For my first coat of paint on the fabric (I did two coats), I dipped the brush in water before I dipped it in the paint.  It helps the fabric absorb the paint better.  The first coat took a while, but it wasn’t hard.  Just a little time-consuming.

PaintedChair2

It was a little boring at this point, so I decided to give it some stripes – inspired by the beach towel I was painting on…

PaintedChair  

PaintedChair3

Or inspired by Lena’s little striped socks sticking out in the top right of the photo? 😉 Anyway, I taped off the stripes.  I didn’t measure, but I attempted to visually make them straight and even. PaintedChair5

I used frog tape, and it worked great!  I really think frog tape is worth the extra money.

PaintedChair11

Next, I sanded down everything.  I usually sand after I remove the wax, but I find that I go through so much sandpaper this way.  The wax really gunks up the sandpaper fast.  So, sanding before the wax worked well, but I did have to blow off all the dust before I added the wax.

PaintedChair8   PaintedChair9

I used a bigger wax brush for this project.  It helps the waxing process go so much quicker! (By the way, I need some lotion on those hands!)

PaintedChair10

Then, I used a lint-free cloth (t-shirt) to buff the wax. I was seriously impressed at how easy it was to paint fabric.  And, the fabric still can move.  The paint doesn’t crack – at least not yet! I wouldn’t do this on a “tv watchin'” chair, but it will make the best office chair!

PaintedChair12

Would you paint a fabric chair with chalk paint?

Are you new to my blog? Go HERE to see my home tour and HERE to shop for items I use in our home.

Find me on Facebook | Instagram | Twitter Pinterest

DIY

Painted Kitchen Cabinets

Painting kitchen cabinets with chalk paint is a great option because it eliminates the need to sand, strip or prime.  It does, however, have a more rustic look and brush lines are more visible with this type of paint.

When I first decided to take on my kitchen cabinets, I decided to take on the small section under the stove.  Then it turned into one wall of the uppers which led to the next wall of cabinets.  Well, this week I painted the lower cabinets too.  I blame all this on two friends who were painting (all) their cabinets.  I  didn’t want to be left behind, so I painted what I had left. But first, here is the kitchen before:

Painting Kitchen Cabinets with Chalk Paint

And the after:

kitchen.2
painting kitchen cabinets

kitchen.3

kitchen(1)

I painted all the cabinets in Annie Sloan’s Chalk Paint.  The Uppers are painted in Annie Sloan Old Ochre and the lowers are painted in Annie Sloan Versailles.  To see a more detailed look at how I did it, you can check out my (step by step!) tutorial on painting cabinets with chalk paint HERE or check out my DIY feature on About.com.

**IMPORTANT UPDATE** I hated the wax sealer on my kitchen cabinets and ended up repainting them all.  To see that process (and photos of why I hated the wax) click HERE.  Save yourself the time and trouble and don’t use wax as your sealer in the kitchen!

Go create something!

Are you new to my blog? Go HERE to see my home tour and HERE to shop for items I use in our home.

Find me on Facebook | Instagram | Twitter Pinterest

***UPDATE*** I had several of you ask where my stove was.  It’s on a separate wall – directly across from the wall my dishwasher is on.  To see more click HERE or on the pic below. BeforeANDafter

Four years after moving into this house, we remodeled the kitchen.  To see the newly updated space, click HERE!

Paint

Painting Cabinets with Chalk Paint

Last year, I painted my bathroom cabinets, and it was a REALLY long process.  See how I cut out a lot of time by painting my cabinets with chalk paint.

slider-cabinets

I did it the “traditional” way, and you can take a look at that post HERE. However, considering my kitchen has (what feels like) a thousand more doors, I knew that process may not be the best solution for my kitchen.  Or my sanity. kitchenBEFORE

So, I decided to give the chalk paint method a try.  Chalk paint doesn’t require prep work or sanding.  (Although I did clean my doors considering there are 15 years of kitchen grease layered on them.)

Here’s my (I don’t claim to be a chalk paint pro) 9 step chalk paint cabinet tutorial:

1) Remove the cabinet doors and all the hardware.

This is my second to the least favorite part of the process.  My least favorite part is putting the hardware back on.  There is always a cabinet door that ends up hanging funny.


 cabinets.before.11  

2) Clean the wood with a cleaner to remove any dirt/grime.

cabinets.before.5  

3) Tape off any areas where you don’t want to get paint.

cabinets.before.14  

3) Start Painting!   Forget about sanding and pull out the paint.  I used Annie Sloan’s “Old Ochre.”  I did two coats of paint on everything.

cabinets.before.12

cabinets.before.13 copy  

4) Wax. Once the two coats of paint are dry, you can begin to wax.  Since I was doing kitchen cabinets, I applied three coats of Annie Sloan’s clear wax on everything.  It’s much quicker than it sounds.

**March 2015 UPDATE**  

Although my wax has held up well, it isn’t the easiest to clean.  If you scrub too hard, the wax can be removed.  If I were to do this over again, I would use a polycrylic for a finish instead of the wax.  The reason I didn’t do this the first time around was because I was afraid of yellowing the paint.  However, the more I research, the more I find that there is polycrylic that really is clear and doesn’t yellow!

cabinets.before.17 cabinets.before.18

 5) Buff the wax. Use a lint free cloth to rub in the wax and remove any clumps. (I use old t-shirts for this.)  

6) Sand. If you want to distress the cabinets some, use sandpaper after you’re done waxing.  I lightly sanded the edges of the cabinets and doors.

cabinets.before.19  

7) (optional) Buff. 24 hours after the final wax, you can go back and buff the wood if you want more of a sheen.  

8) Put back the hardware and cabinet doors.  

9) Enjoy your “new” cabinets!

kitchen

Would you try painting cabinets with chalk paint?

I did my kitchen in stages to preserve my sanity.  I did a few groupings a week until I have what you see above.  

*Also, I’m keeping the lower cabinets wood – for now. 😉

*UPDATE (2/21/14): The unpainted lower cabinets didn’t last long.  They have been painted.  Check out how they look HERE.  

Also, if you still want to see more about painting cabinets, this tutorial was featured in the DIY section of About.com.

*UPDATE (7/24/16): I ended up repainted my cabinets because I did not love the wax as a sealer.  To see why click HERE.

Go create something!

Are you new to my blog? Go HERE to see my home tour and HERE to shop for items I use in our home.

Find me on Facebook | Instagram | Twitter Pinterest

Paint

Chalk Paint Tutorial

Chalk Painting Tutorial | Painting a Mirror I’ve done a chalk paint tutorial in the past, but I thought it may be helpful to do a more detailed one. I love to garage sale shop, and I found this mirror at a sale recently for $30. (?!!) It’s hard to tell in the pictures, but it’s HUGE! Mirror BEFORE When painting a mirror, always tape off the mirror itself. If possible shove paper between the frame and mirror. Then, tape the paper in place. Mirror BEFORE* Next, prepare your supplies. For this mirror, I used Annie Sloan products: chalk paint (I actually mixed 1:1 Paris Grey and Florence) and wax (clear and dark). Cahalk Paint Supplies The great thing about chalk paint is that there is no sanding or other prep work (well, minus taping off the mirror). Just go for it! Chalk Painting Chalk paint dries pretty fast. Once it’s dry (20-30 mins for this project), you can add the wax. Chalk Paint on Mirror Chalk Paint on Mirror* Chalk paint dries pretty fast. Once it’s dry (20-30 mins for this project), you can add the wax. I recommend the wax brush. It’s expensive, but it makes the waxing a much easier process. I brush on the wax and then go back through with a lint-free cloth (aka: my husbands old t-shirts) and rub away the extra. Chalk Paint - Waxing waxing chalk paint For the dark wax, you just repeat the same process as before: brush on the (dark) wax and rub it away. Chalk Paint Dark Wax Adding Dark Wax Chalk Paint - Dark Wax **If you are going to use the dark (antiquing) wax, it is a MUST to use the clear wax first. The clear wax provides a coating between the dark wax and the paint. If you don’t use the clear wax first, your dark wax will stick to everything, and you won’t be able to wipe it away very easily. I like to distress my projects, so I sand. You sand AFTER the wax. I know it’s strange, but that’s what you do. You don’t have to wait for the wax to dry, but it can quickly cake up your sand paper. I went through a lot of sand paper for this project… Chalk Paint - Sanding And I had several helpers: Little Sanding Helper My little helpers I found that wax residue got stuck in the beautiful details. I used a Q-tip to remove as much of this “residue” as possible. Cleaning Wax You can add another clear wax layer after sanding if you want, but I find that I can just rub over the entire project and spread out the wax I added before. Also, if you want a more buffed project, wait 24 hours and use your lint-free cloth to buff the entire project. It will give it a nice sheen. FINAL mirror Mirror - AFTER Mirror AFTER Good luck!
Are you new to my blog? Go HERE to see my home tour and HERE to shop for items I use in our home. Find me on Facebook | Instagram | Twitter Pinterest   Click HERE or on the photo below to see more chalk paint tips and download FREE chalk paint tips printable! ChalkPaintTipsPic
Home

Big Girl Room Makeover

Big Girl Room Makeover The nursery is gone. But I’ve had so much fun decorating Lena’s new room, that I’ve forgotten I was once mourning its loss. Here’s Lena’s new room: Room

Unfortunately, the furniture placement (the bed against the wall) is not exactly how I’d like it due to the fear of Lena rolling out of bed. However, it works for now. Also, if you’d like to see how I did the bed rail cover, you can check out my recent blog post here: https://sincerelysarad.com/2013/06/10/the-almost-no-sew-bed-rail-cover/ We found this bedroom set on Craigslist:

Bed DSC_0046

And although the white wood was pretty, my vision for it was even better. So, I painted it!

You can see how I painted it in this blog post: https://sincerelysarad.com/2013/04/11/saying-goodbye-to-the-nursery/ I used Annie Sloan’s “Provence” chalk paint for the bed:

Bed

And Annie Sloan’s “Paris Grey” for the nightstand and dresser:

Detail

nightstand

Dresser closeup

The mirror above the dresser has cute frames for pictures. I also added a few great verses. You can find the prints at my shop on Etsy: https://www.etsy.com/listing/125066323/1-peter-33-4-bible-verse-print-digital https://www.etsy.com/listing/126410195/psalm-914-bible-verse-print-digital?ref=shop_home_active I used this bunting at her birthday party and found a cute spot for it above her closet: bunting

The frames from her nursery made a reappearance. I just updated a few of the fabric pieces with some remnants I bought off Etsy:

Frames

I’ve had this old paper doll set (from the ’60s?) since I was pretty young. I bought it at the local annual book fair in my hometown, and I’ve somehow managed to hang on to it through the years. I placed the dolls on a piece of oilcloth to keep with the retro vibe:

Frame

I’ll keep you updated with new additions and changes!

Are you new to my blog? Go HERE to see my home tour and HERE to shop for items I use in our home.

Find me on Facebook | Instagram | Twitter Pinterest