Home

DIY Light Pole Planter

light pole planter

I am excited to be partnering with Enbrighten Café on a patio makeover.

enbrighten cafe LED Cafe Lights

Enbrighten Cafe’s LED Café Lights deliver warm white light, are energy efficient, and never need to be replaced!

Cafe Lights in Day

Cafe Lights for Patio

And with the GE Bluetooth Smart Outdoor Smart Switch, you can wirelessly program and control the lights with your smartphone or tablet!

GE Outdoor Smart Switch

Control lights with app

These lights are impact resistant and will not break if dropped (I accidentally tested this out)!

Backyard Patio at Dusk These commercial-grade lights can be out year-round.

Patio String Lights I used 36 feet of lights for my patio area.

Backyard Patio Makeover Pretty Patio I love the ambiance the LED Café Lights add to our patio.

Patio in Evening The lights are really easy to hang since each bulb has a hook, and I hung most of my lights with screws on our covered patio.  However, I also wanted the lights to stretch across our patio table, so I created a DIY planter light pole.

DIY Patio String Light Holder

Please note that this planter works for a small number of lights.  Since these lights are commercial grade, they are heavy.  The pole started to bend under the weight of too many lights.  However, if you just want a string a few, this DIY flower pot light pole is a great solution. Here is what you will need:

  • Dowel Rod (8 foot)
  • Decorative Top for Dowel Rod
  • Outdoor Paint
  • Flower Pot
  • Concrete
  • Gravel
  • Hook
  • Potting Soil
  • Closet Rod Flange Set (optional)

I began the project by drilling a hole into the top of the pole for the decor piece.

Drilling Hole

After the hole was drilled, I added the topper.

Adding Pole Topper

After the top was on, I painted the entire piece with several coats of outdoor paint.

Painting Pole

Once the paint was dry, I drilled another hole into the topper.

Drilling Hole for Hook

This was for the hook which would hold the light strands.

Adding Hook to Pole

Once the pole was complete, it was time to cement it into the flower pot.

Closet Rod Flange Kit

I began with my little closet rod flange set and used the completely round one as a brace for the rod.  This is optional, and I am not really sure how much it helped. I added my pole to the brace and centered it in the flower pot.

Setting Pole in Place

This is definitely a two-person job.  One person will need to hold the rod in place while the other pours the concrete.

Quikret Concrete

I mixed about 30 pounds of concrete for my flower pot (More concrete would have been helpful, but I had to balance how much room was needed for my flowers).

Adding Concrete to Flower Pot

I created a brace to hold the rod in place while the concrete dried using boards and bricks.

Setting the Pole in Concrete

DIY Outdoor Light Pole I allowed the concrete to dry 24 hours and then I added holes for the flower pot drainage using a drill.

Adding holes to flower pot I tried to evenly space them so they looked pretty and drilled them right above the concrete line.

Adding Gravel to Flower Pot I added gravel to help with the drainage before adding my potting soil.

DIY Patio String Light Holder And that was it!  I now have a moveable light pole if I want to change where I hang the lights.

Decorating with Patio String Lights  

Check out the video below to see the lights in action!


Go create something!

Are you new to my blog? Go HERE to see my home tour and HERE to shop for items I use in our home.

Find me on Facebook | Instagram | Twitter Pinterest

*This post contains affiliate links and is a sponsored post by Enbrighten Cafe. I take pride in reviewing only products that fit my brand and will be beneficial to my readers. And while this post is sponsored, all the opinions are my own.   Patio Lights

Home

Spring Cleaning

This is a sponsored post written by me on behalf of Endust for IZEA. All opinions are 100% mine.

Cleaning Blinds

Now that the weather is finally warming up here in the midwest, I feel the urge to spring clean.

In Indiana, the giant uni-cloud settles over us during the winter months, and the blue skies and sunshine that can accompany spring is such a treat!  That beautiful bright sun is wonderful until I realize that it is highlighting all the dust that has settled all over my house – including EVERY SINGLE SLAT on my blinds.  Here is an easy cleaning tip for you: Endust works great on blinds (as well as cabinets, vinyl, stainless steel, car interiors, paneling, and window sills).  I love how universal this dusting spray is, and it is a great addition to my spring cleaning lineup.

Cleaning with Endust

Spray down a rag – or even better – a sock.  Start saving all those socks that lost their mates because they work perfectly for cleaning blinds!

Using Endust on Blinds

Spray Endust Lemon on the sock, wipe down the blinds, and the spray will quickly and easily pick up dust and remove allergens.  It will leave them clean, and I love its wonderful lemon scent.  And it is a fantastic chore for children if they can reach the blinds.

Cleaning Blinds

I was absolutely mortified when I saw how much dust came off a couple of sets of blinds:

Cleaning with Endust

Check out my blinds after I cleaned them.  They look brand new!

Cleaning blinds with Endust

Endust (where to buy) can be found at any grocery store, jet.com, Amazon, and Walmart.

Now that your blinds are clean and dust-free, it is time to give the windows the attention they deserve.  I am a huge window treatment fan.  I love curtains and how they instantly transform a space through texture and color.

Here is an example of how window treatments transformed the space in my office.  When we first moved in, I hung bold, floral patterned curtains:

Office 9

I decided recently I needed something calmer in my office, so I hung these neutral gray curtains:

Office Makeover

I love curtains but refuse to pay a fortune for them.  Obviously, I am not great at committing to anything with decor too long, so I want something that looks nice without breaking the bank.

Print

Here are six great sources for affordable window treatments:

1) West Elm – Cotton Canvas Scroll Medallion Curtain in Feather Gray

West Elm Curtain Panels

2) World Market – Coral & Pink Eva Concealed Tab Top Curtains

World Market Curtains

3) Walmart – Better Homes and Gardens Textured Faux Silk Grommet Curtain Panel

Walmart Curtain Panels

4) Target – Nate Berkus Linen Weave Curtain Panel

Target Curtain Panels

Threshold Bold Stripe Curtain Panel

Target Curtains

5) Pier 1 – Flocked Geometric Curtain – Black

Pier 1 Curtain Panels

6) IKEA – WERNA Block-Out Curtains

IKEA curtain panels

I would love to hear your favorite spring cleaning tip and/or favorite source for window treatments!

Go create something!

Are you new to my blog? Go HERE to see my home tour and HERE to shop for items I use in our home.

Find me on Facebook | Instagram | Twitter Pinterest

Home

DIY Kitchen Sink Organizer

Today I’m sharing a DIY kitchen sink organizer using thrift store finds and paint.

This is a sponsored post written by me on behalf of Kohler for IZEA. All opinions are 100% mine.

Kohler Worth Kitchen Faucet

I was excited at the opportunity to work with Kohler and even more excited when I saw their Kohler Worth Kitchen Faucet in oil-rubbed bronze.  I have always thought a darker faucet would be perfect in my kitchen since it would fit my vintage style and look better with our darker appliances.

Kohler has an array of beautiful faucets that fit any decor like the Kohler Trielle Kitchen Faucet and the Kohler Sous Kitchen Faucet.

Kitchen Faucet Before

We had a nickel faucet before and plenty of kitchen clutter next to the sink.

Kitchen Faucet Makeover

The new Worth kitchen sink has the handle on the faucet, so you can put a soap (or lotion) dispenser where the handle once was.  Besides removing my soap containers, I also created a DIY kitchen organizer for my scrubber and dish soap.  I love the more organized cleaner look!

Worth Kitchen Faucet from Kohler

I found my Kohler Worth Kitchen Faucet at Home Depot.

Installing Kohler Kitchen Faucet

It was easy to install, and we moved our old faucet and installed the new one in under one hour.

Kohler Kitchen Faucet Sprayer

This faucet has so many great features including the 2-function spray head which features stream and sweep – a wide forceful spray that makes cleanup easier.

Kitchen Faucet Sprayer

And the spray head stays in place through Kohler’s signature magnetic docking system.

Kohler Faucet and soap dispenser

I am a huge fan of the soap dispenser I mentioned earlier.  Less clutter is always good!

Kohler Kitchen Faucet

Besides loving our new faucet, I love the look and functionality of the raised dishes next to the kitchen sink.  They look pretty and organize essentials.

DIY Kitchen Organizer

I decided I could easily DIY my own kitchen sink organizer using old plates and candlestick holders.

Reusing old dishes

Thrift stores and garage sales are full of random dishes.  I found all of these at Goodwill for around $5.

To DIY your own kitchen sink organizer, find a plate (I used a smaller salad plate) and a candle holder.  I decided I needed two – one for my kitchen and one for my bathroom!

Thrift store finds

Creative ways to use old dishes*

Next, find a strong glue.

Ceramic Glue

Add glue to the top of the candle holder.

Creative Upcycle

Set the plate on top of the candle holder and glue.

Gluing plates and candlesticks

Allow drying according to the glue’s instructions.

How to reuse old dishes

Once the glue is dry, you can paint.

Spray paint garage sale finds

And once your paint dries, you can use your pretty organizer(s)!

I have one in my kitchen:

DIY Kitchen Organizer

And the other in my bathroom:

DIY Bathroom Organizer

Go create something!

Are you new to my blog? Go HERE to see my home tour and HERE to shop for items I use in our home.

Find me on Facebook | Instagram | Twitter Pinterest


Seasonal Decor

Personalized Gift Ideas

Personalized Gift Ideas

Staples Holiday Gift Ideas

My parents live out of state, but I usually try and help my mom with her Christmas card every year.  This year, we used Staples, and the process was SO easy. Earlier this year, I took a photo of my parents with all the grandchildren.  My parents wanted to use that photo on their Christmas cards.  I uploaded the photo to Staple’s site, and I inserted the photo into several of my favorite designs. 

Staples Holiday Cards

I sent the designs to my parents, and they decided on the blue “most wonderful time of the year” design.

Wonderful Time

Staples Christmas Card - Front

We were able to personalize the front and change the text.

Staples Christmas Card - Back

Our design also had a back, and we personalized it with our own greeting.  And, there are also several font options!  

Staples Christmas Cards

The cards are beautiful with quality textured card stock and rounded corners.

Holiday Cards Staples

I could ship them directly to my mom, and in just a few days, she had her Christmas cards!  It was convenient, fast, and inexpensive.

Staples Puzzle

I also threw in a couple of fun little surprises for my parents.

 Staples also offers photo gifts!  

My family puts puzzles together when we get together for Christmas, and I know the grandkids will be thrilled to see themselves on a puzzle!

Ornaments Staples

I discovered these pretty porcelain ornaments.  They have a front and back design and are great keepsakes. Check out Staples for your Christmas cards and cross off those on your list with their fabulous selection of photo gifts!

Go create something!

Are you new to my blog? Go HERE to see my home tour and HERE to shop for items I use in our home.

Find me on Facebook | Instagram | Twitter Pinterest

I was selected for this opportunity as a member of Clever Girls and the content and opinions expressed here are all my own.

Seasonal Decor

How to Set the Table

If you’re wondering how to set the table, then you’ve come to the right place.

With Christmas just weeks away, the entertaining season officially here!  I have a few tips for making your event a little more special. My mom and mother-in-law both set beautiful tables, and it makes the guests (including me!) feel so loved and appreciated.

Setting a beautiful table also serves those of us who aren’t great in the kitchen.  A pretty setting can distract from not-so-great food.  (Which can really benefit someone like me!) There is a proper way to set a table, and there are two general settings: casual and formal.  The casual setting is definitely more popular, and it’s a great thing to learn because you build off the casual setting and extend it for the formal setting.

CASUAL SETTING

Casual Place Setting

Plate  – Place the dinner plate directly in front of the seat – a couple of inches from the edge of the table.

Napkin – Most of the time, the napkin is placed to the left of the plate.  The napkin can be under the fork or to the left of the fork.  Also, you will sometimes see the napkin on the plate.

Flatware – The fork always goes to the left of the place.  Place the knife to the right of the plate.  The cutting edge should be facing the plate with the knife pointing away from the diner.  A little reminder for which side the knife goes on, think about how a right-handed person would cut their food.  They would use the fork in their left hand, and the knife in their right.  Place the spoon to the right of the knife.

Glass – The water glass goes on the upper right, and the tip of the knife should be pointing to the glass. You can get as fancy as you want and add a lot more plates, glasses, and flatware.  This is often used in meals where more than one course is served.  Use the casual setting as a base and go bigger and better for the formal setting!

FORMAL SETTING

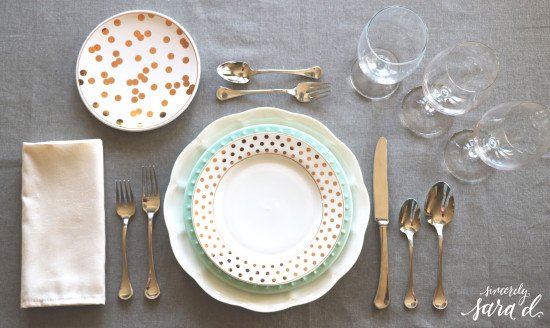
Plates –  The plates still go in the middle, but you stack them with the smallest on top.  (If you have a soup bowl, stack this on the plates.)  By stacking the plates, each plate can be cleared upon completion of the course, and a clean new place will be below.  The bread plate goes above the forks.  Place a small knife horizontally across the plate with the blade facing the left.

Napkins – As in the casual setting, the napkin can be under the forks, next to the forks, or on the plate.

Flatware –  As before, the forks always go to the left of the plate.  Place the dinner fork very close to the plate without touching the plate.  The salad fork goes just to the left of the dinner fork.  You eat from the outside in, so you will eat your salad first which is why the salad fork is on the outside.  You will work your way to the plate towards the end of the meal.  Place the teaspoon to the right of the knife.  Traditionally the teaspoon is used for stirring coffee or tea and the end of a meal.  Place the soup spoon next to the teaspoon and the fruit spoon can go to the left of the soup spoon.  The soup spoon will be larger than the teaspoon in more formal settings.  If you have a dessert fork & spoon.  a small fork and spoon will be placed just above the small plate (1/2 inch) horizontally.  The fork will face right and the spoon will face left. (If guests were to pull the handles of the dessert fork and spoon towards them, the fork would be on the left and the spoon on the right.)

Glasses – If you’re serving wine, the wine glass goes to the right of the water glass.  If you want to set multiple wine glasses (you’re serving red and white wine),  then the white wine glass will be closer to the guest with the red wine glass slightly above and to the left of the white wine glass.  Guests should move from white to red wine.

If you’re like me and need visuals, I’ve created a printable for you so you know how to set the table.

Print

Click here to open a PDF of the printable –> Proper Table Setting

Entertaining Ideas and Tips

Besides setting a beautiful table, music adds ambiance and is the final touch to a perfect evening of entertainment.

Tivoli Audio with Bluetooth

I recently began using Tivoli Audio’s Model One Bluetooth radio (also available without Bluetooth), and I can honestly say that I am IN LOVE.  Not only is the sound amazing, but I love the way it looks.  I have struggled for years with Bluetooth radios/speakers because they are so ugly and don’t fit with my decor.  The Tivoli Model One has a beautiful wood veneer cabinet which is available in multiple colors and finishes to match any decor!

Entertaining with Tivoli

You can utilize the classic AM/FM tuner to listen to your favorite stations, or you can customize your soundtrack and listen to your own music, by switching to auxiliary mode and using the Bluetooth Technology to listen wirelessly.  I’ve been listening to the Christmas playlist on my phone over and over…

Entertaining Tips

The Model One Radio is simple to use and there is no complicated set up which makes it so easy to move.

Tivoli Audio Model One

When we’re not entertaining in our formal dining room, we keep our Tivoli Audio Model One Radio on our bar cart in-between our kitchen and living room.

Tivolia Audio for the home

Tivoli Audio

The Tivoli Audio would make a great Christmas gift for the design or music enthusiast in your life!  Go to TivoliAudio.com to order online or find local dealers. As you plan to entertain this holiday season, don’t forget to set a pretty table and add music.  Throw in some delicious food, and you’ll have the perfect event!

Go create something!

Are you new to my blog? Go HERE to see my home tour and HERE to shop for items I use in our home.

Find me on Facebook | Instagram | Twitter Pinterest

This is a sponsored post written by me on behalf of Tivoli Audio for IZEA. All opinions are 100% mine.

Seasonal Decor

Christmas Tree Decor

This is a sponsored post written by me on behalf of At Home for IZEA. All opinions are 100% mine.

At Home Christmas Tree

We have always been real tree people, but this past month I have had the honor of working with At Home Christmas Decor on several posts.  (To see my dining room Christmas makeover click HERE and to see my fireplace Christmas makeover click HERE.) During both of those shopping trips, I couldn’t help but notice the Christmas Trees.  At Home has a separate section devoted entirely to artificial trees – 101 varieties. I was quickly won over when I started thinking about how these trees could be used year after year, required no watering, wouldn’t make a mess, and I wouldn’t have to stand in the freezing cold to select a Tree for Me.  I was all in – especially with At Home’s everyday low prices.!

At Home Christmas Tree

At Home has 15 different themes that you can use on their own or group to make your perfect look: Seas & Greetings, Holiday Hoedown, Lavish and Luxe, Peppermint Jazz, Berry Platinum, Forest Fairy Tales, Crystal Chateau, Cherished Memories, Heaven and Earth, Midnight Plume, Regal Renaissance, Snowcapped Scene, Handcrafted from Around the World, Dem Darlings, and Handcrafted.   I used several different themes to get the perfect look:

    • Tree (7.5 foot pre-lit Laurent spruce tree)
    • Shatter Proof Ornaments
    • Burlap Tree Skirt
    • Burlap Ribbon
    • Scentsicles scented ornaments (because I LOVE the fresh tree scent!

Shatter Proof Ornaments

Shatterproof ornaments are a must for us.  I have kids and I have wood floors.  Not a great combination of glass ornaments.


At Home Christmas Decor.

At Home has aisles of ornaments.

At Home Shatterproof ornaments

I loved these geometric-shaped gold ornaments.  They added just a little something special to my tree.

Christmas Tree - lights off

You can turn on the tree lights with the press of a button…

Christmas Tree - Lights On

Christmas Decorating

Want to see more of my Christmas decor?

Decorating for Christmas Ideas

Click HERE to see my dining room Christmas makeover.

Christmas Fireplace Decor

And HERE to see my fireplace Christmas makeover. What’s your favorite At Home Christmas theme?

Are you new to my blog? Go HERE to see my home tour and HERE to shop for items I use in our home.

Find me on Facebook | Instagram | Twitter Pinterest

Seasonal Decor

Dining Room Christmas Makeover

I’m excited to share my dining room Christmas makeover today. This post brought to you by At Home.

The content and opinions expressed below are that of sincerely, sara d..

  Decorating for Christmas Ideas  

My dining room now looks like a Christmas wonderland.

At Home Christmas Decor.  

Are you familiar with At Home?  It is the one-stop-shop for Christmas Decor – and the store where I found all my holiday decor.  (And they have much more than just Christmas decor.  They have enough stuff for you to design your entire house – every single room.) The Christmas section is unbelievable.  At Home has a separate section devoted entirely to artificial trees – 101 varieties.  And they have holiday decor – both indoor and outdoor. I filled my cart full of so many pretty things thanks to At Home’s everyday low prices.

At Home Christmas Decor Ideas

Here’s my supply list of decor items from At Home for my dining room:

  • Sparkling Tree Branches
  • Vintage Looking Ornaments
  • Fluffy Feather Bunches
  • Burlap Ribbon
  • Burlap Embellished Leaves
  • Pine Wreaths
  • Pine Mantel Swag
  • Pine Garland
  • Simple Candles
  • Ceramic Bowls

Here’s what my dining room looked like last week…

Dining Room*

…before the Christmas wonderland took over.

At Home Christmas Wonderland

And if their Christmas collection could get any more amazing, At Home has 15 different decorative Christmas themes.  My personal favorites include Crystal Chateau:

Crystal Chateau

And Lavish & Luxe:

Lavish & Luxe

I combined Crystal Chateau and Lavish & Luxe to create the perfect look for my dining room.  It has some natural elements with a touch of vintage and glam. On the table, I put feathers in the bowls and added the candles.  Pine garland, sparkling tree branches, and the embellished accents surround the three candles.

Table Decor copy

The mantle garland went on the buffet along with the embellished pieces and the ornaments.  I hung the wreaths with the burlap ribbon.

Dining Room Christmas Decor

At Home offers plain wreaths as well as a large variety of decorated wreaths.

At Home Wreath Decor

I am so in love with these vintage-looking ornaments.

Pretty Christmas Decor

Decorating for Christmas Ideas

You can see all of At Home’s Christmas Collections HERE.  Which one is your favorite?

At Home Christmas  

Go create something!

Are you new to my blog? Go HERE to see my home tour and HERE to shop for items I use in our home.

Find me on Facebook | Instagram | Twitter Pinterest

Christmas Dining Room Decor Ideas