DIY

RTA Cabinet Pros and Cons

We have used RTA (ready-to-assemble) cabinets in our kitchen, and our home office. There are definite RTA Cabinet Pros and Cons, and I wanted to share a full review so you can help decide if this is the route you want to take for your next remodel.

RTA Cabinet Pros and Cons

RTA Cabinet Pros and Cons

PROS

  • Cost-Efficient: RTA cabinets come in a variety of options, but since you do the assembly, the cost is lower than traditional cabinets.
  • Quality Construction: Most RTA cabinets are solid wood with dovetail drawers. Mine are also soft-close, and the construction is very solid.
  • Customer Service: I have had two very separate experience with this. My first experience (with our kitchen cabinets) was very good – great customer service, video tutorials, and printed instructions.
  • Customization: Although they’re not 100% custom, RTA cabinets provide several options – color, cabinet style, and trim.
  • Easier/Quicker to Ship: RTA cabinets take up much less space than pre-assembled cabinets and can ship as soon as the order is taken.

CONS

  • Customer Service: Although we had a fantastic experience with this on our kitchen remodel, we have a very different experience with our office cabinets. There were no instructions and no video tutorials to be found. Thank goodness this wasn’t our first time with RTA cabinets.
  • Time: Building RTA cabinets takes time. We averaged around 1 hour for each cabinets and our kitchen has 20 cabinet units (although many RTA sources will claim 30 minute assembly).
  • No Guarantees: Most RTA cabinets do not come with guarantees since you do the assembly.
  • Added Expense: In the rare case that assembly is to difficult, you may need to hire a professional which adds to the cost.

It is overwhelming at first when you see your entire kitchen in a group of small, flat boxes. Steve and I spent all our nights and weekends assembling cabinets in the garage (notice the tv we brought out to help make the process a little less tedious).

For us, the assembly time was worth the savings, and we actually enjoy taking on projects.

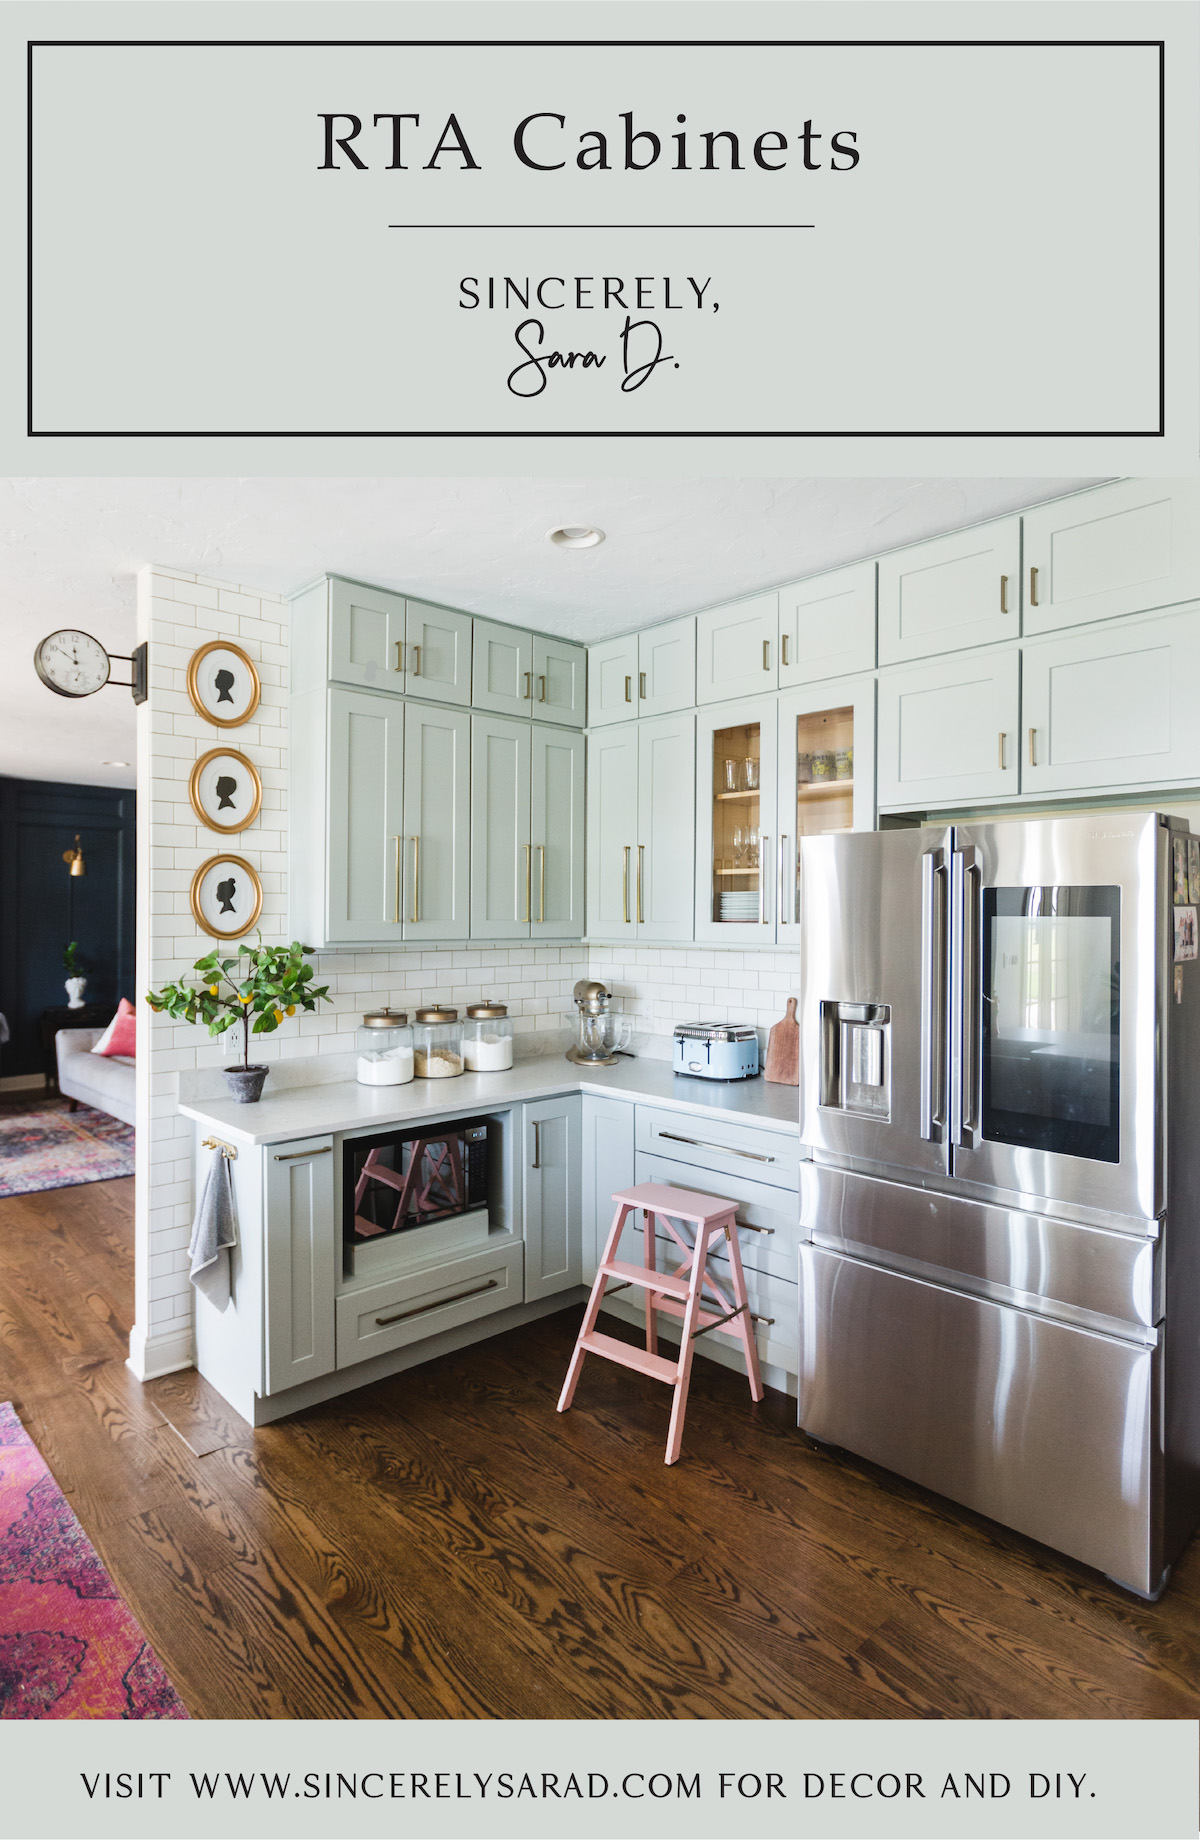
Our kitchen cabinet turned our gorgeous, and we are so pleased – two years later. Our only frustration is some of the drawers don’t close all the way, and some of our drawer fronts are just a little off (due to our assembly). You can see more on our RTA kitchen cabinets HERE.

RTA Cabinet Pros & Cons

TIPS

  • Order sample doors. It is very helpful.
  • Wait for a sale (and if you find a great sale, you can buy your cabinets ahead of time and store them easily since they don’t take up much room).
  • It may be worth to pay a little more for cabinets from a reputable company. Customer service will be better and as a result, the building process will be much smoother for you.
  • Use wood glue for added reinforcement.
  • Use brackets for additional support. Some cabinets came with the L brackets and some didn’t, but we bought some and added them to all.
  • Use a cordless screwdriver. You don’t want to risk stripping the screws, so opt for a cordless screwdriver over an electric drill.
  • Watch cabinet assembly videos. Although some RTA cabinets come with detailed instructions, not all do. Search for cabinet assembly videos for additional help.
  • Assemble on a flat surface. Don’t try to assemble cabinets on carpet – it is important that the cabinets are square.
  • Assemble similar cabinets at once. Save time by assembling similar cabinets together. Assemble all the top cabinets and then the base cabinets. Save the harder cabinets (like drawer and lazy Susans) for last as you build up your expertise and confidence.

After our experience with RTA cabinets in our kitchen, we decided to use them again in our office remodel (see more on the office cabinets here). Unfortunately, our customer service experience was MUCH different from our previous one.

The first order contained the wrong cabinets, and we had to ship them back. When we received our cabinets, there were no instructions to be found. It was a frustrating assembly process. However, once assembled, the quality was great.

Watch this video for a little more info on RTA cabinets:

Hopefully, this post helps you decided whether RTA cabinets are right for you. Overall, we’re pleased with the quality and would recommend RTA cabinets but encourage buying them from a reputable, helpful company.

Are you new to my blog? Go HERE to see my home tour and HERE to shop for items I use in our home.

Find me on Facebook | Instagram | Twitter Pinterest

DIY

RTA Cabinets

RTA ready-to-assemble cabinets

I partnered with Best Online Cabinets and am sharing how we added storage and more functionality to our home office using RTA ready-to-assemble cabinets.

RTA (ready-to-assemble) cabinets

We used RTA cabinets in our kitchen remodel, and we like them because you can receive quality cabinets at a less expensive price since they require assembly.

I share the first phase of our home office in this post, and I am so excited to share phase two of the COMPLETED home office!

This home office will be mine during the day and my husband will be able to use it evenings and weekends. We wanted a long desk in the back for my desktop computer and decided to add a wet bar as well.

The designers at Best Online Cabinets created a rendering for us:

After seeing the rendering (which was so helpful), we were excited and ready to move forward with our cabinets!

Once the cabinet plan was determined, the order was placed. Soon after, our cabinets arrived. Unfortunately we had to ship them back because the wrong cabinets were delivered. We shipped those cabinets back, and they quickly sent the correct cabinets.

We selected Driftwood Grey Cabinets, and they are made by InnoCraft and exclusive to Best Online Cabinets.

Since we have (successfully) attempted RTA cabinets before, we were ready for the challenge. However, these cabinets came with no instructions or online tutorials. We were lucky we had assembled RTA cabinets before.

Here’s a little video of me assembling a simple top cabinet:

When assembling RTA cabinets, here are a few helpful hints:

Use Wood Glue.

The cabinets won’t come with wood glue, but we suggest using wood glue to reinforce the base of the cabinet.

Use Brackets.

Some of our cabinets came with brackets but some didn’t. We bought additional L brackets and uses them for additional reinforcement on all our cabinets.

Use a Cordless Screwdriver.

You don’t want to risk stripping the screws, so opt for a cordless screwdriver over an electric drill.

Watch Cabinet Assembly Videos.

Although some RTA cabinets come with detailed instructions, not all do. Search for cabinet assembly videos for additional help.

Assemble on a flat Surface.

Don’t try to assemble cabinets on carpet – it is important that the cabinets are square.

Assemble Similar Cabinets at Once.

Save time by assembling similar cabinets together. Assemble all the top cabinets and then the base cabinets. Save the harder cabinets (like drawer and lazy Susans) for last as you build up your expertise and confidence.

RTA cabinets require some time and energy, but the results can be beautiful. We love all the storage they provide in our home office.

We used butcher block for the counters, and I love the contrast between the lighter counters and the darker cabinets.

The base cabinets allow for a workspace and a place for my desktop (I use the desk chair and raise the height work at the counter).

We added a little mini bar to the corner of the room – complete with sink and fridge!

We love the addition of the cabinets and all the beauty and functionality they bring to our home office!

This is a sponsored post written by me on behalf of Best Online Cabinets. All opinions are 100% mine.

Are you new to my blog? Go HERE to see my home tour and HERE to shop for items I use in our home.

Find me on Facebook | Instagram | Twitter Pinterest

DIY

RTA Cabinets

DIY KITCHEN REMODEL AND RTA CABINETS

We used RTA (ready-to-assemble) cabinets in our DIY kitchen remodel.  RTA cabinets can provide a 50% savings from big-box store cabinets and turnaround is fairly quick – usually within two weeks!

DIY Kitchen Remodel and RTA Cabinets

Oh my goodness.  We are DONE with our DIY kitchen remodel and could not be more thankful.  To see more on the reveal I shared last week (and a funny behind-the-scenes video), go HERE.

Our newly designed kitchen functions much better than our old design, and we are in LOVE with how gorgeous the new space is – mainly thanks to our new cabinets from Custom Service Hardware. Our old kitchen was dark, and we hated the layout (not to mention our really old appliances).

I did the best I could updating the space using paint…

However, we love to host big groups in our home and the layout was so frustrating.  The kitchen was closed off from the living room, and there was only one way in and one way out (resulting it lots of traffic issues). When we remodeled the kitchen, we tore down part of the wall between the kitchen and the family room.  Unfortunately we couldn’t remove as much of the wall as we intended due to some water lines we didn’t know were there.  Due to timing and our budget, we kept the wall a little longer than we had originally planned.  I had already ordered my cabinets from Custom Service Hardware, so we just added another base cabinet to fill the space and make it look more intentional.  My plan for the upper space was to add open shelving, but my husband and I panicked at the last minute about drilling into the tile AND possibly hitting the water lines that we now know are there.  I actually like the relief in the extra space, and it provides a little decorating space…

Our lower cabinets in the original kitchen design connected to the sink area in an “L” design.

We opted for an island this time around and moved the dishwasher next to the sink.

The range and stove were separate in the old design.

We added a new stove/range combo using the same hood from before (only painted to look like wood).

We are in love with the new space, but the entire space was DIYed, so it was a process to get to where we are.

I partnered with Custom Service Hardware on the kitchen cabinets and I cannot say enough good things about this company and their people.  I have worked with them in the past and had such an amazing experience with their rolling library ladder.

RTA (READY-TO-ASSEMBLE) CABINET PROCESS

  • Sizes are limited to what is in stock, but the large variety allows for a great layout.
  • The cabinets are delivered via a truck shipment.
  • There are no instructions in the box, but there are plenty of online video tutorials.
  • Assembly takes time, and the first one is always the hardest.  We figured out an assembly groove pretty quickly.
  • Use lots of glue and add a few screws for the best solid cabinet assembly.

I was surprised how quickly my cabinets arrived – I had them within a week of ordering them. Once they arrived, I was asked to check for damage with the delivery driver, and we didn’t find any damage.

After the delivery man left, I freaked out a bit looking at all those (very flat) boxes.

However, my husband and I set up a staging area in the garage and spent our evenings working on the cabinets (thanks to Steve’s parents for helping us assemble some).

The first cabinet really is the hardest, and you will create a system that works for you that makes the process go faster.  We spent just under an hour per cabinet on average – which would have been faster if Steve didn’t spend so much time organizing the screws…

Here’s a video showing the assembly process on one of the upper cabinets:

My parents came to help with the actual hanging of the cabinets.  It’s amazing how not level your home is.  It took some time, but the cabinets were hung over a long weekend.  You can see the process in this video:

RTA (READY-TO-ASSEMBLE) CABINET PRODUCT

  • The color availability is limited, but you can see the product before you buy by ordering sample doors.
  • The finish is very nice, and there are touch-up kits available for any scuffs or dents.
  • The quality is amazing!  We were pleasantly surprised with all the features and sturdiness of the cabinets.
  •  

We did find that hardware was necessary for the cabinets in securing the faceplates of the drawers.  However, we prefer the added touch the hardware provides the cabinets. We went with two separate cabinet series for our kitchen (although they are both shaker in style).  The gray cabinets are the NORWICH SERIES and the white cabinets (the island) are the ESSEX SERIES.

The RTA cabinets offer several fun features such as a hidden trash can.

We love the out-of-site microwave shelf.

And pull-out spice rack.

All the hours spent assembling and hanging the cabinets were time well spent because the finished result is absolutely gorgeous!

Custom Service Hardware also provides matching trim and molding pieces with their various cabinets series.

We are in love with our new kitchen and grateful to Custom Service Hardware on their partnership with this DIY kitchen remodel. Custom Service Hardware provides amazing service, and everyone I spoke with was pleasant and helpful.  However, I have to give a special shout-out to James who walked me through every step of this RTA cabinet process.

Go create something!

Are you new to my blog? Go HERE to see my home tour and HERE to shop for items I use in our home.

Want to follow the kitchen remodel journey? Start here: Week 1 – Demo

*This post is a sponsored post by Custom Service Hardware.  I take pride in reviewing only products that fit my brand and will be beneficial to my readers. And while this post is sponsored, all the opinions are my own.