Have you ever wondered if you can paint a faucet? Our house was built in the ’90s. The ’90s = shiny brass. Unfortunately, we didn’t have the budget to replace the faucets, so I decided it was worth a try to paint them…

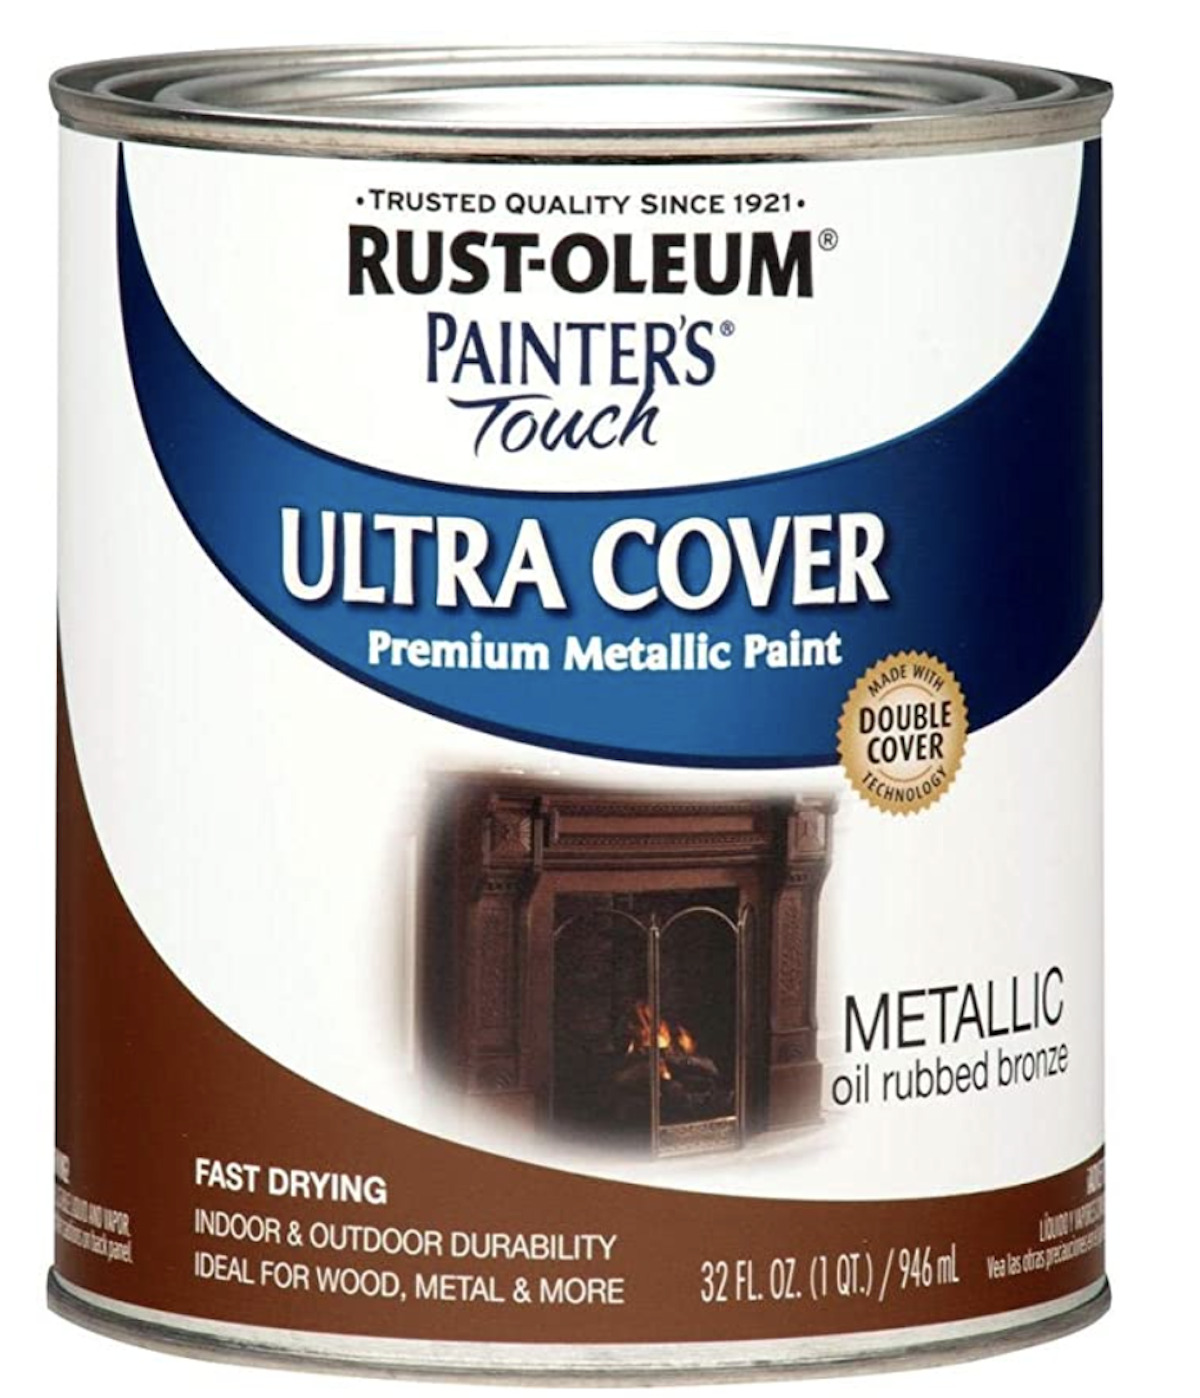
I used Rust0leum’s Painter’s Touch Ultra Cover paint in Metallic oil rubbed bronze, and this bathroom project barely put a dent in the can.
To begin, you will want to prep your faucet and/or fixtures. Make sure to clean the surface you will paint and rub it down with steel wool or 220-grit sandpaper. The steel wool and/or sandpaper will roughen the surface so the paint has something to stick to.
I realized after I had started to tape off my faucet that I didn’t have a primer. I was too excited to stop my project and run and get a top coat. Now, although I strongly recommend that you use a coat of primer, I didn’t. I will be the guinea pig for this little experiment, and we’ll see how the faucet holds up without a primer.
I figure it’s a win-win situation. If it holds up – great! I now have an oil bronze faucet instead of a brass faucet. If it doesn’t, I guess I will “have” to buy a new faucet for the sink. I know which scenario my husband is rooting for…
Now, it would have been SO much easier to spray paint the faucet (Rust-Oleum also offers the same product in spray paint as well as a spray primer), but I did not want to have to remove the faucet. So, I taped it off with painters tape and got to work.
The key to oil-based paint (canned and spray paint) is to avoid heavy coats. Too much paint will drip and take forever to dry. Also, make sure the first coat is dry before adding the second coat of paint.

It took around three light coats of paint and the drying process was VERY long. I painted the faucet and drain over a course of 2-3 days. I also had to pull out q-tips to paint some of the hard-to-reach crevices.
You can add a clear topcoat, but I opted not to.

I haven’t had much experience using oil-based paint, and it is a pain! It is SO hard to clean off anything – your hands, brushes, the sink. I went through a lot of mineral spirits.
When I pulled off the tape, the paint had seeped through some areas of the tape – especially at the base of the handles. I actually used the chiseled end of a wooden kabob stick to scrape the extra paint off (but a razor blade would work as well).
Overall, I think the project went okay. I’m not sure how it will hold up, but I do like the way it looks! It was MUCH more time-consuming than I had expected, but I know a can of paint and time is MUCH cheaper than a new bathroom faucet.

I’ll keep you posted on how it looks in a few months and may attempt painting our other brass bathroom faucets.
UPDATE:
In my experience, painting bathroom fixtures is a temporary fix. If you’re looking for a less expensive solution to switching out the faucet, this is a great way to buy some time until you’re ready.
To see how the faucet looks 3 months after the transformation, click HERE, and for an update 2.5 years later, click HERE.
Have you tried painting bathroom faucets?

Are you new to my blog? Go HERE to see my home tour and HERE to shop for items I use in our home.
Find me on Facebook | Instagram | Twitter | Pinterest


You painted a faucet!?! That is crazy cool, looks fantastic!!
Thanks, Leah! I hope it still looks fantastic in a couple months. Time will tell!
My only concern (and I’m doing it anyway) is how did you keep the handles from being (permanently) stuck and unable to turn (on the water), etc. Otherwise, love it and as I stated doing it and going for the paint in just a few. It’s just beautiful.
That is a valid concern, but I didn’t have problems with my handles getting stuck. I think the key is LIGHT coats of paint. You have to do several coats over several days. Good luck!
How did it hold up over time? I’m looking at possibly doing this as well.
Unfortunately it was a temporary fix for me – a couple years.
What paint brush did you use to paint with?
Wow! If that holds up, Rustoleum should pay you to make a commercial 😉
I wish they would. 😉
It looks great – I am really curious if it holds up too. But in the meantime wondered if you’d mind sharing how you prepared the faucet etc to be painted — did you use anything special to clean them? Did you sand?
It’s only been a couple weeks, but so far so good! No, I didn’t sand. The only thing I did was clean them with normal bathroom cleaner (Mr. Clean) before I painted. I should have used a primer, but I didn’t. I’ll keep you posted on what they look like after a few months of use. Also, if you can remove your faucet, spray painting would be MUCH easier. I just didn’t want to remove it, but I spent a lot more time painting (by hand) as a result. Thanks for stopping by, Tina!
I spray painted all my faucets and inside and outside light fixtures! Hubby removed them and I scuffed them up with med. grade steel wool before spraying them with 1 coat of primer and 2 coats of polished nickel! All looks awesome
I spray painted all my faucets and inside and outside light fixtures! Hubby removed them and I scuffed them up with med. grade steel wool before spraying them with 1 coat of primer and 2 coats of polished nickel! All looks awesome
He removed all your faucets and fixtures? You have a great hubby! I’m so glad yours worked out well. It’s so much cheaper than buying new faucets and fixtures!
I just tried this (without removing of course) and the over spray is everywhere! Did you have this too? If so, what did you use to remove it?
Hi Tonya, I’m so sorry! I didn’t use spray paint, I used a brush and hand-painted mine since I didn’t remove the faucets. You can try mineral spirits to remove the overspray, but I wouldn’t use spray paint unless I removed the faucets. I hate that you have this problem!
We are redoing our house and used this paint so far on door and cabinet hinges.. towel rings… Cabinet pulls. It all looks great!
Oh, I’d love to see it Barbara. Now you really have my wheels turning…there’s so much more I could paint! 😉
I love this! My next project. Wondering if I am brave enough to try the brass on the shower stall…
I know – me too! I have several brass showers, and would love to “oil bronze” them!
Have you ever painted in the sink. I have a rusty spot and thought about painting over it. You did a great job with the faucets!
Hi Jan! I haven’t ever painted a sink, but I think you should go for it! You can only make the rust spot better, right? I would try and paint the spot only, and if it looks funny, you can always attempt the entire sink. Start small and go from there. I looked it up on eHow, and buying the right paint is what’s most important.
http://www.ehow.com/how_4869757_paint-white-bathroom-sink.html
I painted a quarter size spot on my sink. it was a few months ago. so far still holding up. I got a small bottle at lowes. about the size of fingernail polish
Hey Judy! I hope it continues to hold up. My sinks have been painted for over 18 months, and they have held up pretty well. I do have to do the occasional touchup, but it’s been pretty minor. Good luck!
Two suggestions – for the person with the rust stained sink try toilet bowl cleaner. My daughter’s college apartment sink – yuck! – cleaned up nicely!
For the pain of painting and cleaning with oil based paint over several days, put your brushes etc in a plastic bag and store in the freezer during the overnight paint drying time. Works for both oil and latex paints. Rollers and brushes are fine after a few minutes of thawing time.
Thanks so much for the wonderful suggestions! I appreciate your advice – and I’m sure the other readers do too!
I just painted my kitchen sink with epoxy for appliances. I scrubbed sanded and used another cleaner that give the surface better grip. I will update once it is reinstalled. It looks fantastic on the floor.
I know you said you skipped the primer, but what kind would you recommend? Anything special or specific since you were painting on metal? Zinser BIN? Something else?
No, I don’t have a particular primer that I would recommend. I have used Zinser BIN in the past on other projects, and it works well. Honestly I would probably look for a paint and primer in one next time. I know it hasn’t been very long, but so far the paint is adhering great to the faucet as is. Rust-Oleum does make an amazing product! (And I’m not being paid to say that.)
Thank you! Can’t wait to try this!
I like it. Looks like a brand new sink. Bravo! Great job
Thanks, Corrin! I’m crossing my fingers that it still looks good a year from now! 🙂
It looks beautiful! I will be watching for updates on how it holds up. I have the exact same faucet in my bathroom and might give this a try myself. Thanks for sharing!!,
Hi Helen! I’ll definitely keep you posted on how it holds up. Thanks for stopping by!
What a terrific idea. I have a 90’s ranch house..full of brass. I’m going to do this..worse thing that could happen is that I’ll get new fixtures as was the original plan.
Go for it Virginia! 🙂
I am definitely going to try this! I had been thinking about this and a little too scared to try!!!
So far, mine has really held up well! Best of luck to you, Susie!
I love this idea!! My faucets have calcium buildup on them. What could I use to get this of before I paint them? Ne ideas
Hi Lynette! My faucet actually had some (not much!) calcium buildup on it too, and I just painted right over it. However, this is probably not the correct thing to do. 😉 I googled it, and there are all kinds of remedies to remove calcium buildup. I’m not sure if any of them work, but there are a lot of solutions out there – various chemicals, vinegar, water softeners… But whether or not you use a solution to try and remove the buildup, I would try sanding or using steel wool before I painted the faucets. Good luck!
I was wondering how it has held up on the drain part of your sink? We just bought a house in January that was built in 1998 and the master bath is all brass. It has a jacuzzi tub with the brass fittings and I HATE them lol I was thinking of painting them but not sure how it would hold up to the water jets…
I think our house was built the same year, and we have the same jacuzzi tub you’re talking about. 😉 You know, the drain has actually held up well, and I was fully expecting it to be chipping quickly. Really the only paint coming off is around the section where the faucet handles turn. There’s just a little bit of paint coming off because of the constant moving of the faucets on and off, but not enough that anyone else would probably notice. I say go for it – and let me know how it works. Good luck!!
I painted my trailer plastic master bath sinks with the stone paint then used the stone paint sealer. Now they look like an expensive stone sink. Been on for 6 months now. I love it
That’s awesome and REALLY impressive, Ronda!
HI
this looks so great. How has it held up after 1 year?
Hi Lisa. It’s only been a few months, but it’s held up pretty well. There are a few scratches, but not enough to be concerned. I’ll give a six month update soon!
I actually just did this with mine but I used rustoleums oil rubbed bronze spray paint with primer! Worked good so far!!
Keep me posted on how it holds up! I think going the spray paint route was WAY smarter!
Do it!! (But…I wonder if the paint would dull the blade?)
I’m very curious how your facet will hold up with cleaning – they look fantastic!!! I have used the same product to paint all my gold light fixtures and my gold cabinet pulls. I also chose to hand paint it on as I didn’t want to remove the ceiling light fixtures – time consuming, but well worth every minute. Keep us posted on the stay power with cleaning of your facets!!!
Hi Cindy! I’m actually posting a 3 month blog update on the faucets tomorrow, so come back and check it out! They have held up pretty well, and I’m a *little* paranoid of germs, so they’ve been cleaned with some pretty hard cleaning agents – including bleach. 😉 I love that you painted all your fixtures and pulls. I’ve got a lot more work to do around my house…
so, it’s been a year since, are you still pleased?? I am literally about to start painting a light fixture when I this post. Please let me know any tips or tricks!!!
I am still pleased! I have had to do quick touch ups twice since I originally painted this faucet – and these were 5 minute touch ups where I just used a q-tip. I doubt you’ll have to do any touch ups with your light fixture since it doesn’t get touched. Good luck with your project, Carla!
I just recently spray painted all my 12 door knobs, 66 door hinges rubbed bronze.
They turned out great. Next to do the faucets, glad to find out about the brush on paint.
You’ve been busy, and I’m so impressed that you even sprayed the hinges! Way to go! Good luck on your faucets!
Oh, I wish I ha know about that paint 3yrs ago! I bought the spray an it was a major pain to get off the fixers. Some are still NOT painted because I did NOT want to take them off. Now, I don’t have any more excuses. Yes, I did prime my shower head first. Still looking great.
Beth – I haven’t tried our shower head yet. I’m so glad to hear it’s held up well. Good luck with finishing your projects!
Love your blog, Sara, and have been popping over every so often. 😉 My husband and I live overseas and the only paint we’ve found is oil based! I didn’t realize it when we purchased the paint but when I went to wash my hands I totally realized! (Should have been tipped off by the “slight” odor when I opened the can!) Anyway, what has really saved me for getting it off my hands, brushes, and accidental little spills (even my clothes from a little splatter!) was rubbing my hands down with regular old cooking oil first (until the paint starts smearing), THEN washing them with traditional liquid dish soap! It comes off SO easily!! I was SHOCKED!! And in some ways I actually prefer it over latex for getting it off since I feel like I’ve usually had to scrub and scrub when I’ve gotten those itty bitty paint splatters on myself. Anyway, sorry for the long comment but this little regimen has been such a game changer for me, I thought I’d share! Beats using a screwdriver to chip it off! 😉 Thanks for blogging!
Lisa, Thanks so much for popping over to see me – keep coming back! Thanks also for the tip! I generally stay away from oil based paint because it’s so hard to clean up, but I love this tip and it could be a game changer. Thank you!
I’m curious, what kind of brush did you use?
I just used a regular sized paintbrush with a short handle. I’m sure there are better options out there, but that’s what I had on hand!
Sara: We just got thru upgrading (somewhat) our master bath and I replaced some things, but as far as the light fixtures, towel holders and all the cabinet pulls, I decided to spray paint a dark brass color. That worked just fine. However I have not yet replaced my faucets and am seriously considering doing what you have done to yours. They look awesome. I’m just wondering how well it would hold up especially when the faucets need to be cleaned? Any comments?
Hi Margaret! The faucets have held up fairly well. I am a germ-a-phobe, so I used pretty harsh cleaners. I usually use Mr. Clean’s Scrubbing Bubbles, so I am hard on my faucets. I painted them over a year ago, and I’ve done two touch ups since then. The touch ups were quick little 5 minute touch ups using a q-tip. However, although small, they do require little touchups from time to time. I hope this helps!
I am going to try painting the shower doors. What do you think? They are chrome. Do you think it would work on them as well?
I know I’ve seen people on Pinterest do it, so it can be done. It will just require a lot of painters tape and time, but I’m sure you can do it! My only concern would be all the wear the door will see. You could possibly see some peeling where the door shuts. Good luck!!
i guess I would use Rub’n’Buff that you rub on and not worry about primers, sealers. It’s found on Amazon. You don’t have to worry about spray particles or chemicals in the air or sink. I have only used it on pulls for dressers and legs for a treadle sewing machine and sold all of them so haven’t followed. I would however use disposable gloves when using it so prevent staining your
hands altho mineral spirits or even Criso cleans oil base paint up.
I love Rub’n’Buff, but I have found that the longevity isn’t great. I have a friend who did her cabinet pulls and knobs with it, and it rubbed away within a few months. However, I would love to hear other’s experiences with it!
I wanted to get your thoughts on my next project. I have gold trim around my shower that I want to paint an oil rubbed bronze. I have already done my faucets and door knobs and they look great and are holding up well. I used the Rust-oleum spray paint / primer on them but I am a little afraid to spray paint my shower trim. I have nightmares of spray mist going all over my bathroom and onto the stone. Instead, I purchased a can of the Rust-oleum Painters Touch Ultra Cover that you used for your first venture with painting faucets. I wanted to get your thoughts on the pro’s and con’s of spray painting vs regular painting since you have done both. I haven’t found anyone else who has tried regular painting for shower trim so I am a bit nervous about doing it. Do you have any thoughts or suggestions? Thanks!
Hi Linda,
I also have some gold trim that I NEED to paint. It’s a big project, but I believe you’re thinking about it the right way. I once tried spray painting something inside, and I still got overspray on my floor despite covering the area first. The paint in the can is GREAT. Just tape off your areas and go for it. Do several thin coats, and make sure each coat is dry before you paint the next. Since it’s oil-based, it will take a while to dry. You may not be able to use the shower for several days to a week. Let me know how it goes!
Thanks so much for your thoughts – I think I’m going to go for it! And I think doing several thin coats as opposed to a heavy coat is the way to go. I’ll let you know how it turns out – this will be my first project of 2016. No more putting it off! Thanks so much for your advice! 🙂
You painted a faucet!? looks fantastic!!
Would this also work on light fixture?
Hi Sherry! Yes, this paint also works on light fixtures! They have a spray paint version if you’re able to disassemble the light. I’ve actually tried it with great success. Good luck!
It’s been 2 years since your project. I’m curious how long did the paint last for you?
Hi Sindhu! My faucets are still painted! However, I am at the point where I need to do some touch up work. They are still painted but there are some places where the paint has chipped. I am considering new faucets since I feel happy that my painted faucets lasted several years, and it’s probably time to replace them.
I’ve got some horror stories painting my gold shower. First time I tried it I taped off everything, sanded it down, but didn’t use a primer. I painted it with Rust-Oleum oil rubbed bronze spray paint. After about a year it started chipping off and looked horrible. I didn’t remove the silicone so my edges looked messy. About two months ago I decided to disassemble my entire shower (what a nightmare, it’s a huge job). The 2nd time I used the can ned Rust-Oleum oil rubbed bronze paint after I had stripped off all of the old spray paint. I also used Rust-Oleum painters touch clear top coat in the can. Another epic fail!!! All of that literally just peeled off. Round 3….I’ve scraped off all the paint, sanded again and this time I’ve used the Rust-Oleum gray auto primer and the Black Rust-Oleum Paint for Auto trim. It seems to be sticking but there are some areas that don’t seemed smooth. I’ve even looked into powder coating the metal since this painting has become such a pain. I’m at the stage now of putting a clear coat on top to seal but haven’t figured out the best one. If this doesn’t work, I might have to break down and buy a whole new shower, which is very expensive . If your going to tackle this project, I highly recommend disassembling everything the first time and removing all of the silicone. Make sure you get off all of the soap scum and calcium buildup because the paint will not stick. After that I recommend sanding, then sanding some more, then sanding another time just to make absolutely sure there’s nothing left on the surface so the paint will stick. DO NOT paint the shower frame without a primer, you’ll just have more of a mess when it starts to peel off. Hopefully this will help someone and I recommend doing as much research as possible B4 you start this project. It’s a big commitment but worth it if it’s done right.
That is a nightmare, and I appreciate you sharing!
So how did it end up holding up?
Well, the painted faucets are long gone. They were fine temporarily, but I ended up replacing them after I got tired of touch-ups…
What paint brush did you use to paint with?
It’s been so long that I don’t remember! I am SO sorry!! Luckily with oil-based paint like I used, brush strokes are often not visible.
Hi! Love the sink handles and faucet, do you know what brand they are?
Couldn’t you just have tped it off more, then put a plastic bag over it, kitchen gloved up and spray painted it anyway?