Decor

DIY Paneled Walls

DIY Paneled Walls

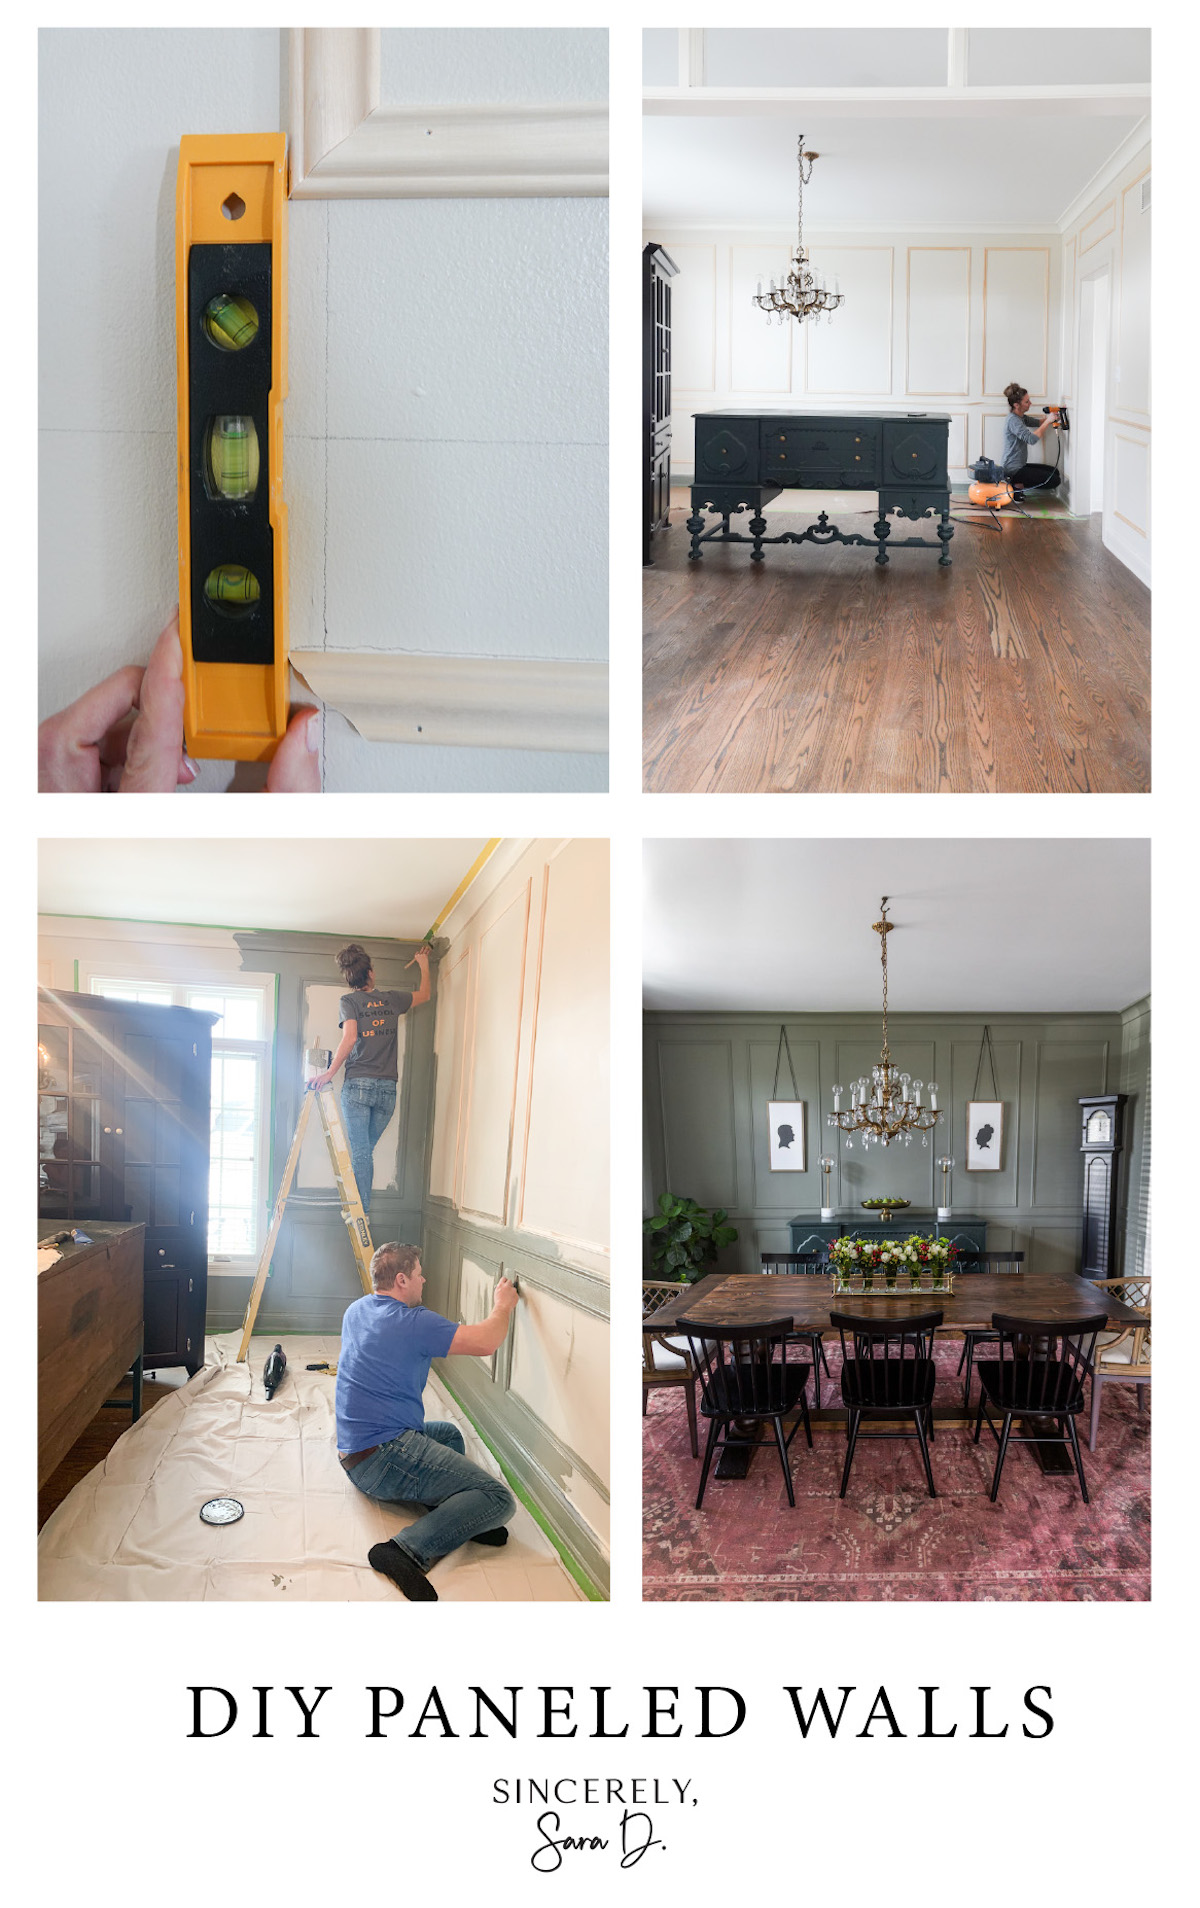
Before I share how to DIY paneled walls, I wanted to show the prep work we had to do first – which is most likely not something you will need to do.

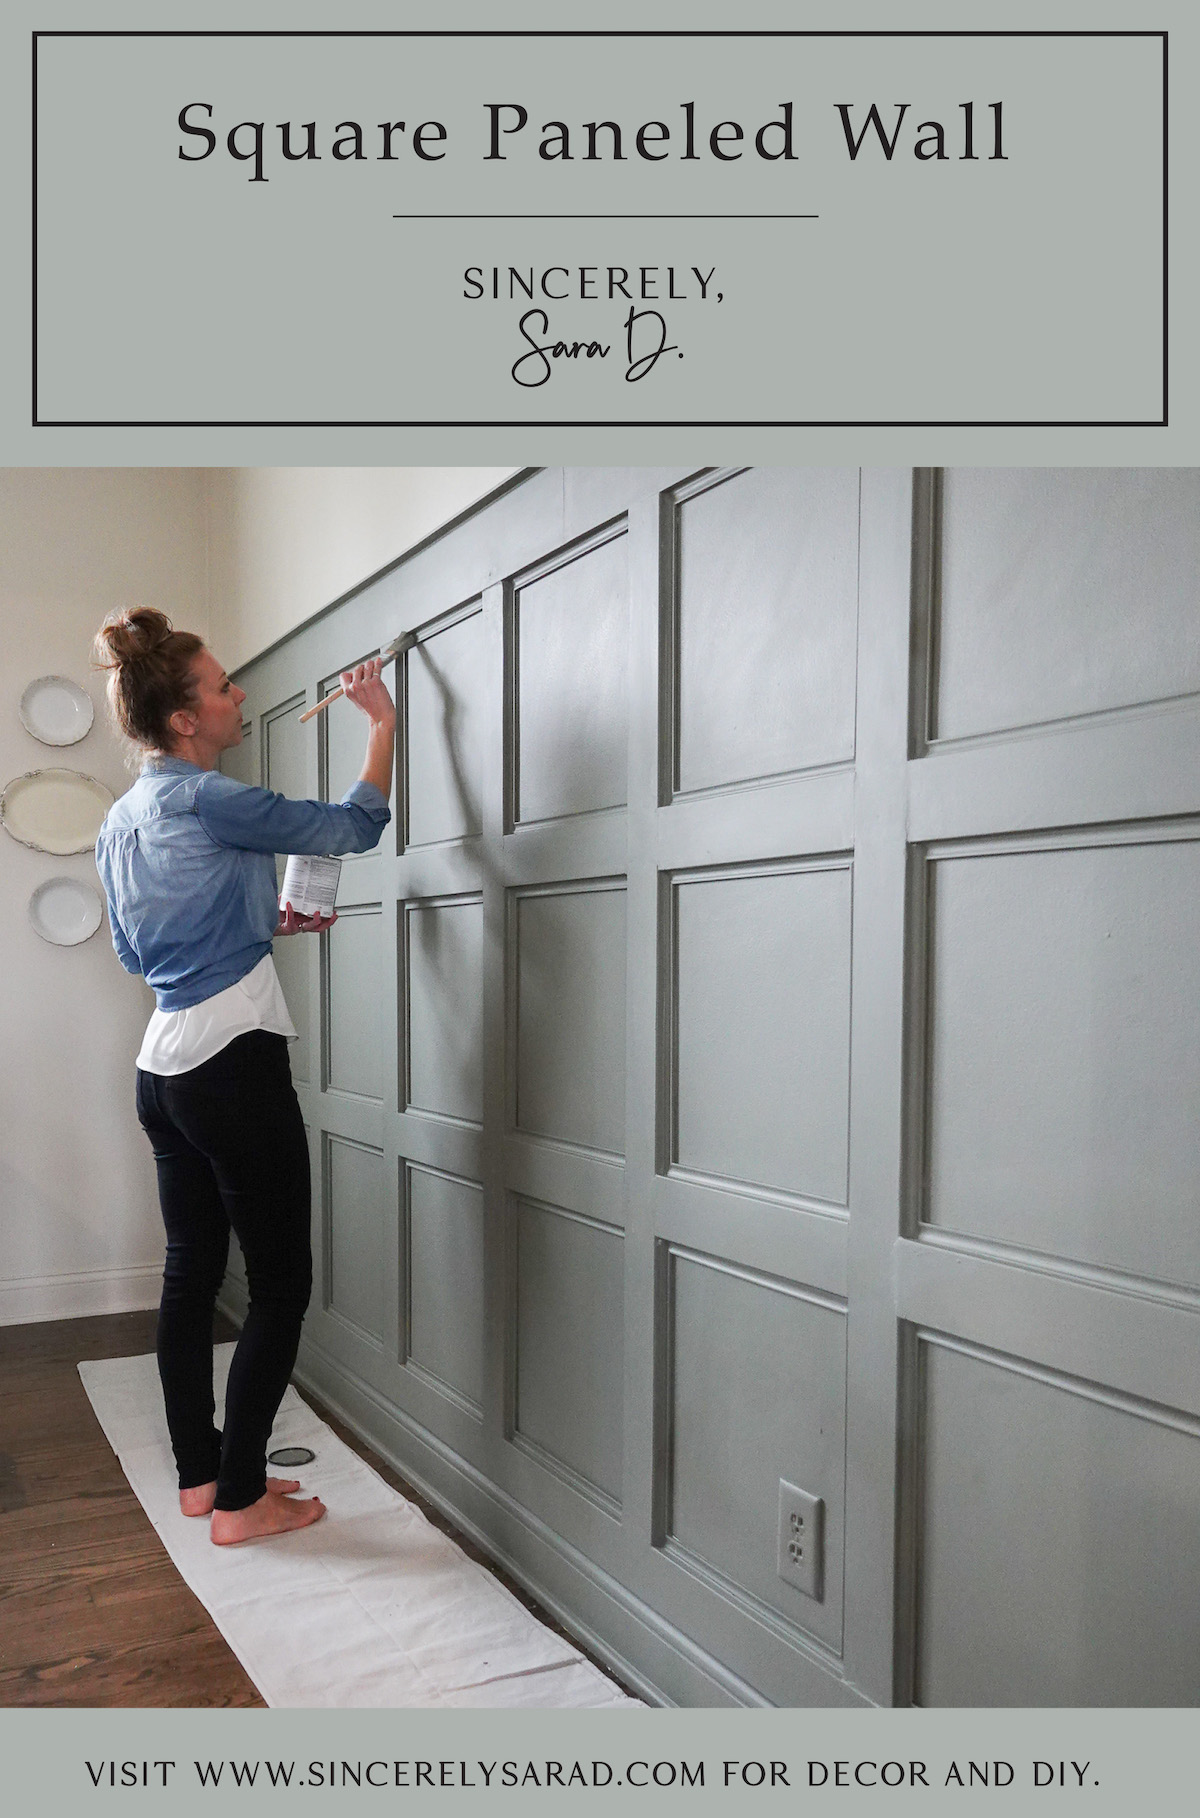
One of our first projects in our home was a square paneled wall. When I designed the wall, I never considered it going beyond the back wall. As time went on, I really wished the wall treatment continued throughout the entire room. There really wasn’t a way to extend it since the square sizes wouldn’t work on the other walls. So, Steve and I decided to start over, and I wanted to create a less heavy paneled wall that was truer to the design aesthetics of our “French Chateau” in central Indiana.

We removed all the old wall treatment and was left with a wall that required quite a bit of repair work. However, once the wall was fixed, it was go time!

DIY Paneled Walls Tutorial

Supplies for Paneled Walls:

  • 1-1/4-in x 8-ft White Hard Unfinished Chair Rail Moulding
  • Compound Miter Saw
  • Finish Nailer and nails
  • Level
  • Pencil
  • Wood Filler
  • Tapping Block

To begin, drawing out a plan is key. I used graph paper, and I found it very helpful. Start with the chair rail between 30-36 inches high (from the floor) and go from there.

I drew the entire plan on my walls which proved to be very helpful. I ended up tweaking the design in that I originally had 6 inches between the panels and sides, but I ended up enlarging the panels and created 5 inch gaps.

I used painters tape (over my pencil lines) so I could better visualize the space.

It may seem like overkill, but I also wrote the dimensions for the panels on the walls. This helped cut down on the time since we were able to cut the panels in batches knowing the sizes of all the panels, but I’ll talk more about that in a minute.

Cutting the Panel Pieces:

To cut these panels, you will be creating picture frames. You will cut each end at a 45 degree angle.

It gets a little confusing – especially if you’re using chair rail molding like mine that isn’t symmetrical on both sides. Make sure you are keeping the same side out when you create the frames.

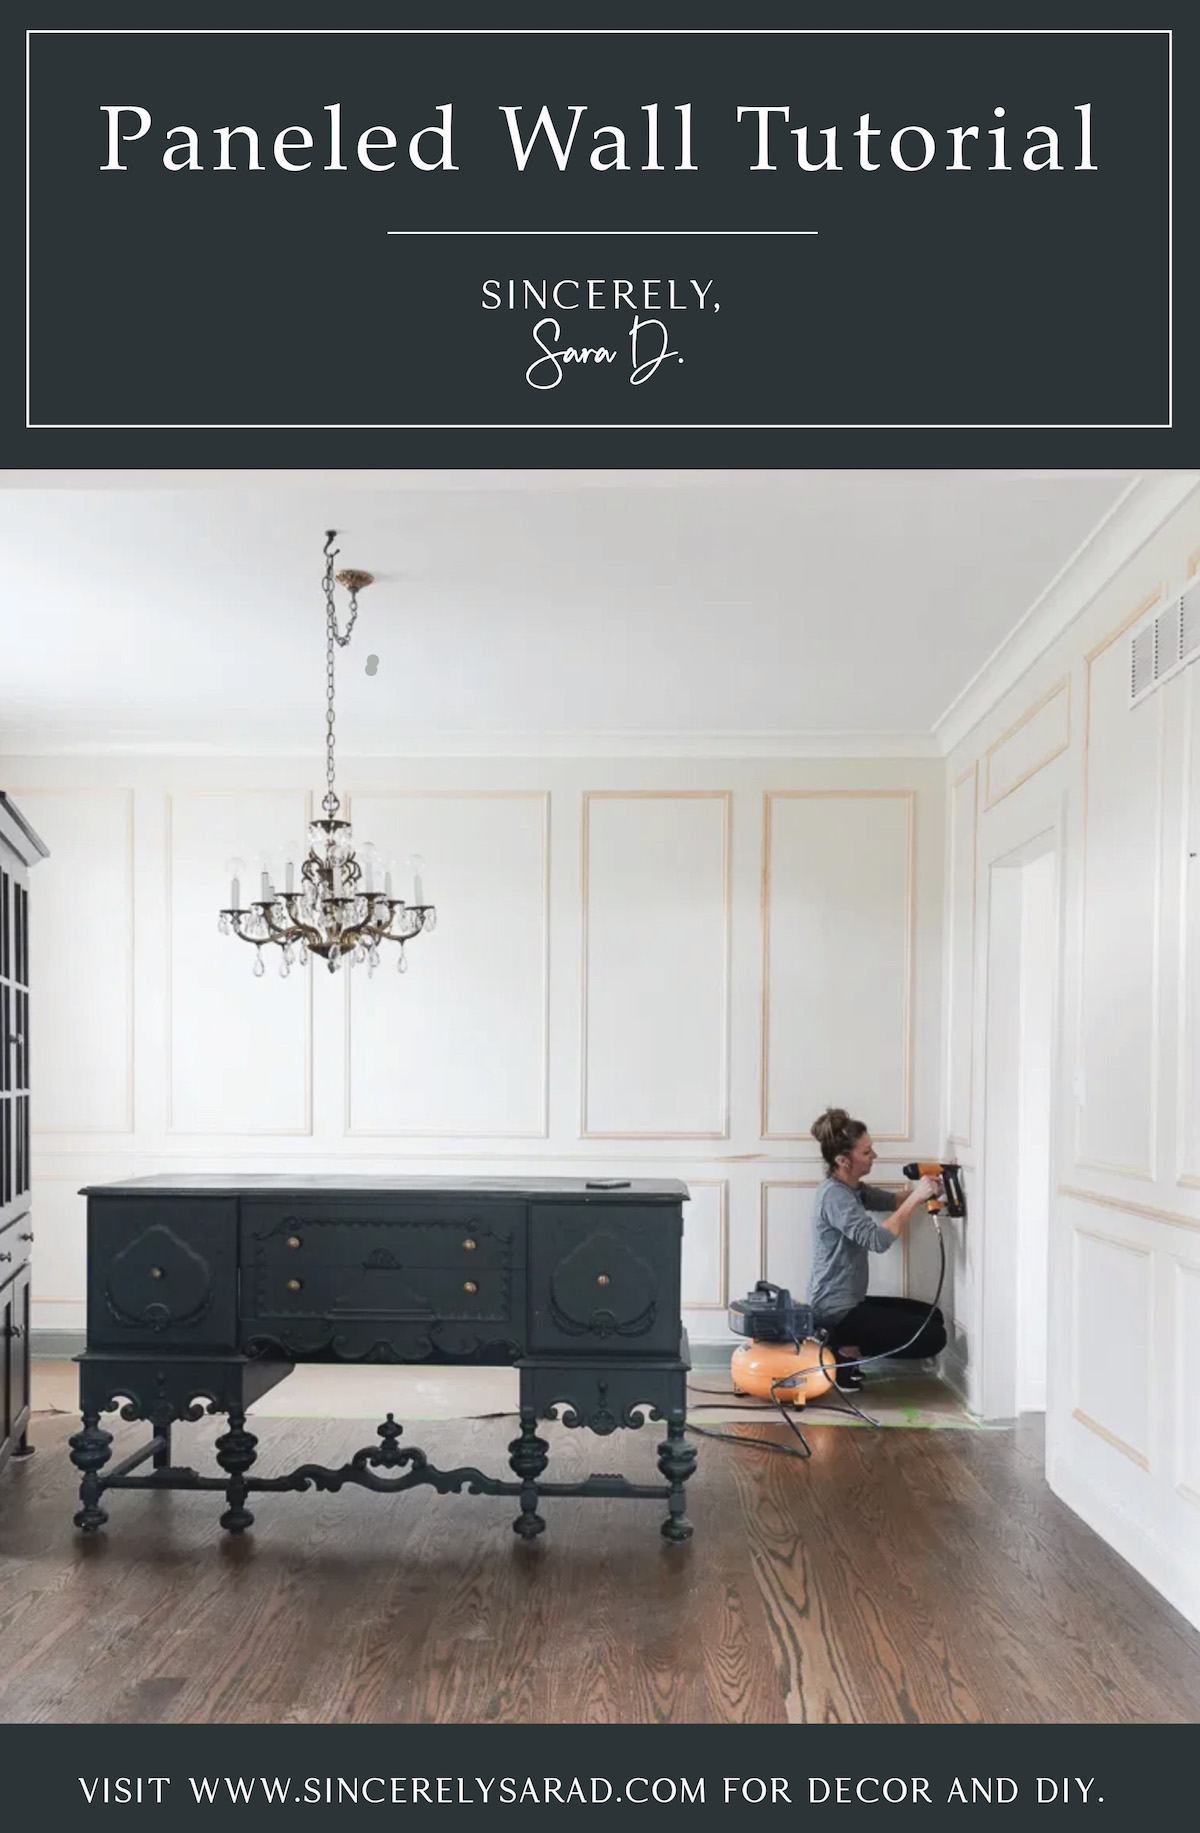
How to Install a Panel:

We began with the top of each panel and made sure it was level before nailing it down.

We used a nail around every 10-12 inches.

Once the top was level and secure, we moved on to the sides. We only added nails to the top of the sides so there was a little wiggle room when adding the bottom piece.

Be sure to use the level when adding every piece.

Once you have the bottom piece level and in place, you can go back through and add the additional nails to the sides.

Once all the panels are installed, you will need to go through and fill the nail holes and evaluate if you need to caulk. Once the wood filler (and caulk – if needed) is dry, it’s time to paint!

Helpful Hints:

Here are several helpful hints to make the installation go smoother and faster:

  • Write down the panel piece dimensions so you can cut them in batches.
  • Use a labeling system to keep all the panel pieces organized.
  • Create a spacer to aid in keeping panels from going wonky.

We created a little spacer (piece labeled “s”) to help the long panels from staying straight. We checked to make sure they weren’t being inverted (or vice versa) before nailing down.

The spacer only works if your panels are all equally distant.

  • When cutting in batches, use the wall to save time on measuring each piece.

We used the wall to help us determine length of the panel pieces. We lined up the saw and then placed the panel pieces against the wall. It proved to be more accurate for us than marking each piece.

  • Level, level, level!

I used the level constantly and found it helpful to match up one panel to another.

  • Work with a partner.

I recruited my dad to help me with this project, and I don’t think I could have done this alone.

He did the majority of the cutting while I worked on the installation.

Buy a Tapping Block

My dad introduced me to the tapping block, and it was SO helpful. There will be times you need to move the piece just a smidge, and this tool will help you do that!

  • When planning the paneling design, consider the height of doorways and windows.

The tops of my panels are flush with the top of my window for a cohesive look.

Installing the Chair Rail

Our Chair rail met in the corners of the room. To have it match up neatly, use a 45 degree angle to miter the piece.

I hope this post was helpful, and I’m going to share a few more photos showing how we dealt with obstacles such as a return vent.

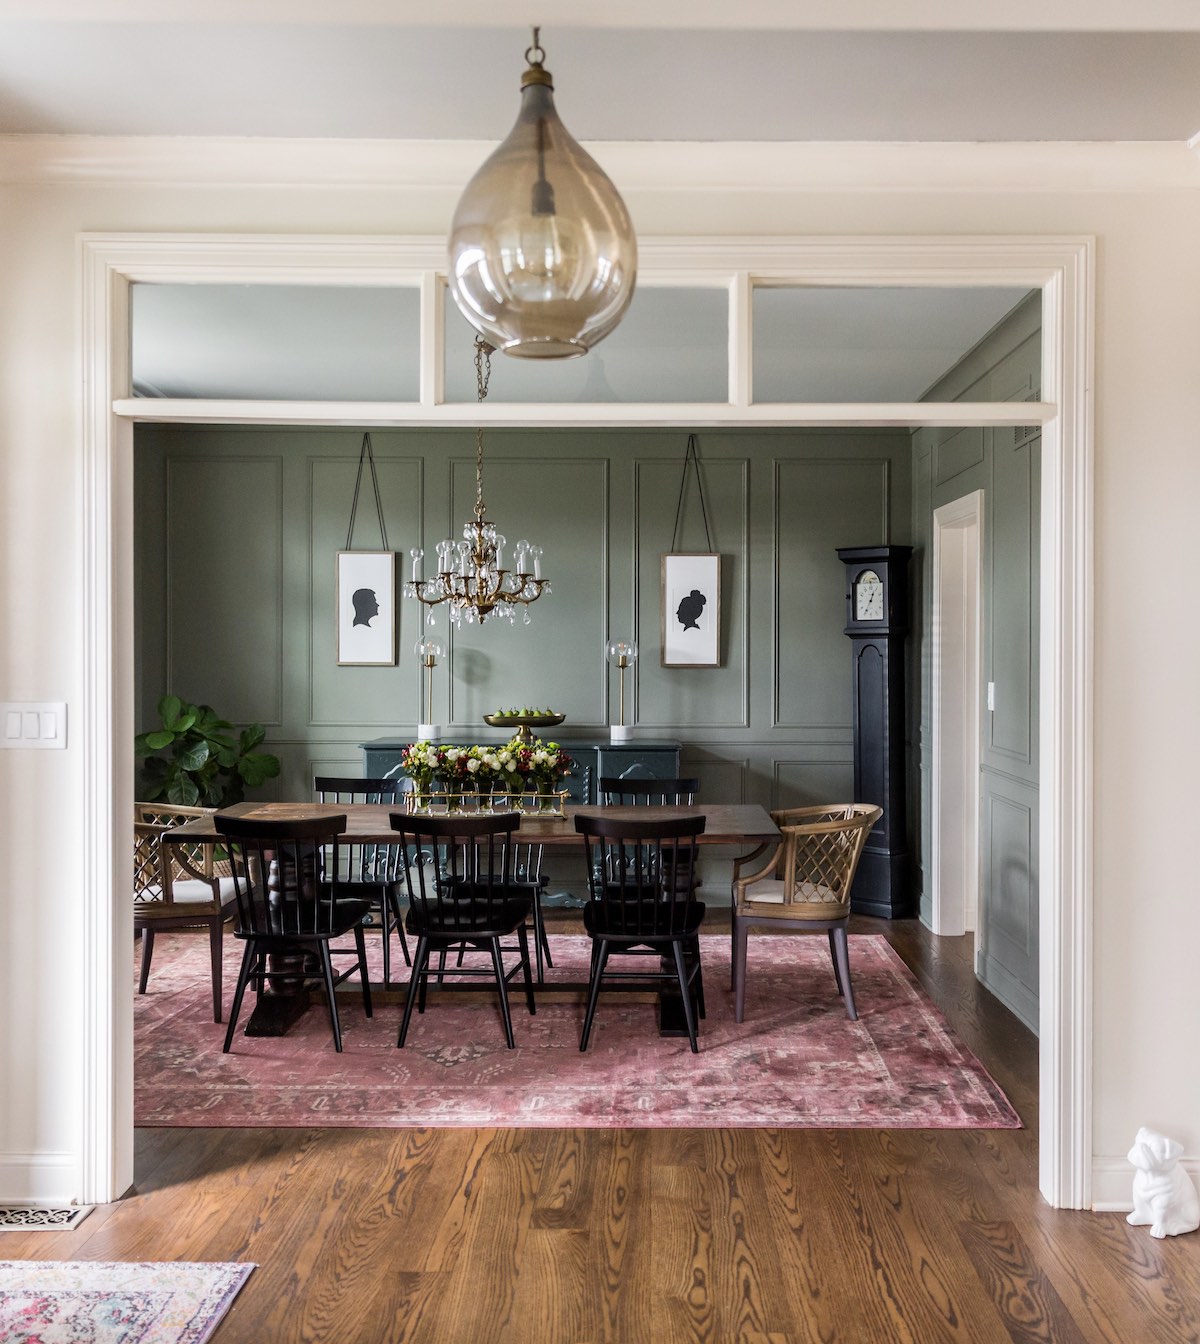
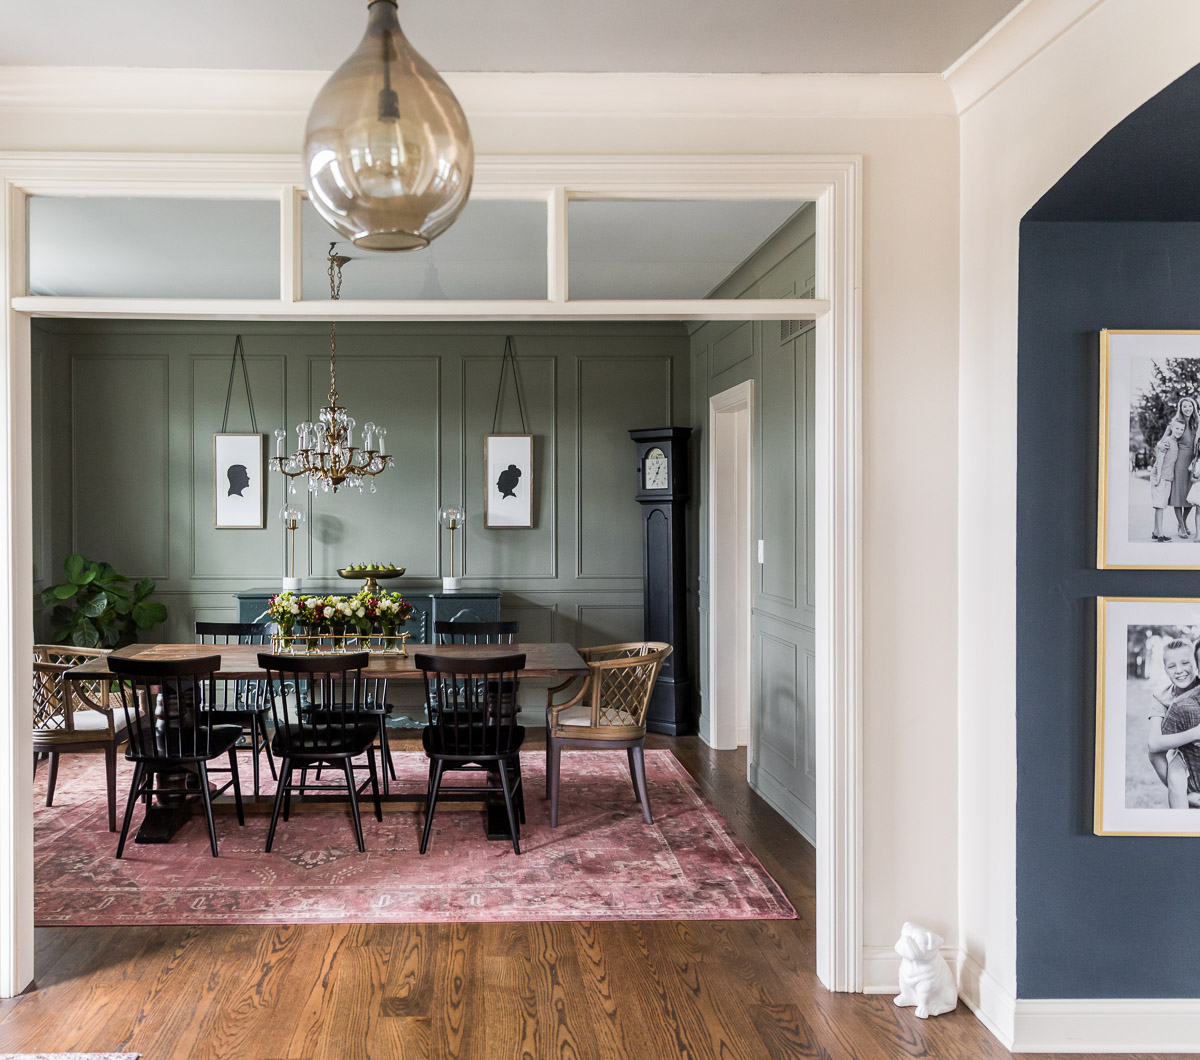
Here’s an overall shot of the space.

And here is how I dealt with the gap on top of the doorframe.

A special shoutout to my dad for all his time and expertise with this project!

And Steve was sweet enough to spend his weekend helping me paint.

We love the final product!

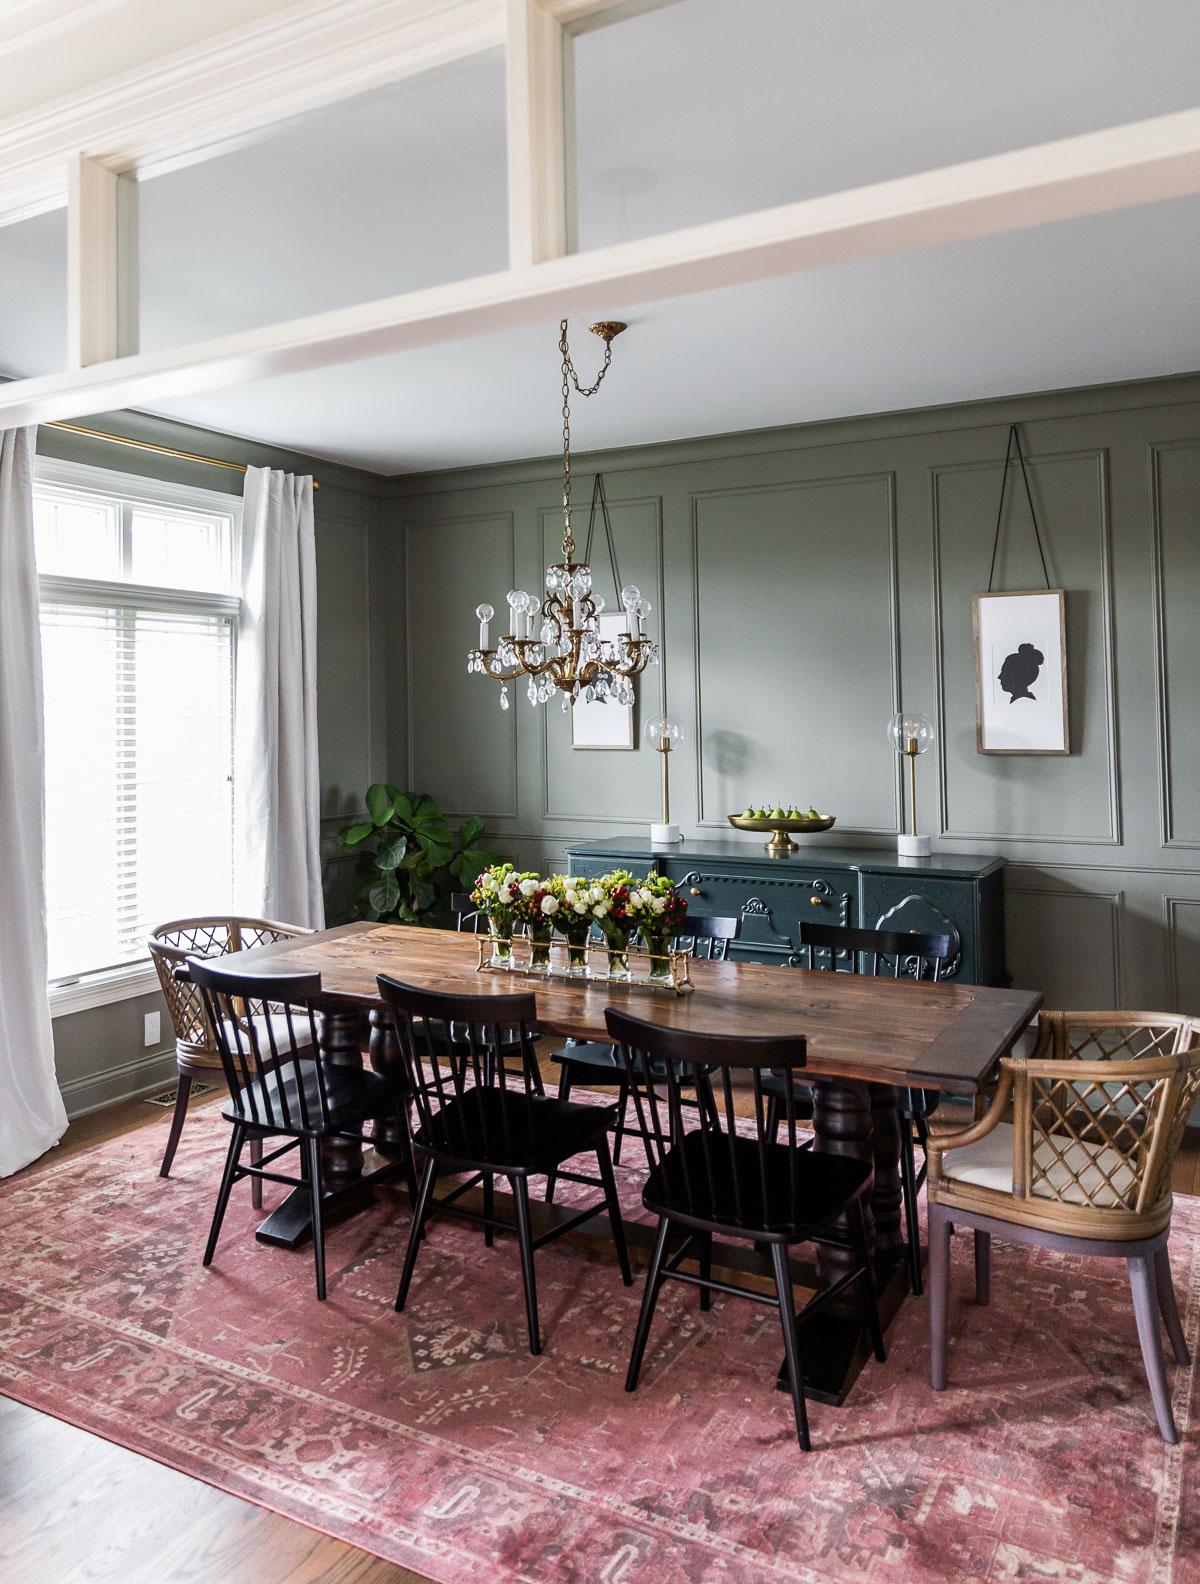
The walls are painted in Benjamin Moore’s Storm Cloud Gray.

Go create something!

Are you new to my blog? Go HERE to see my home tour and HERE to shop for items I use in our home.

Find me on Facebook | Instagram | Twitter Pinterest

Shop the Post
DIY

DIY Wall Treatments

I am obsessed with older homes because they have so much character and charm. Many of these homes have unique wall treatments, and I have tried to replicate those wall treatments in our home. I rounded up all my favorite DIY wall treatments (and tutorials) for you.

Before we move on to the projects, please realize I am not a professional. However, I love the character the wall treatments add to our home’s blank walls, and I enjoy the DIY process – even if they’re not perfect.

Also, when painting these wall art pieces, I would suggest painting the entire wall the same color – include the bottom baseboard. To easily paint baseboards on carpet, see this tutorial.

SQUARE PANELED WALL TREATMENT

DIY Wall Treatments

This square paneled wall was one of the first wall treatments we added to our home, and it’s one of my favorites.

As with any DIY project, it is a good idea to measure the space and sketch out a plan. You can also use painter’s tape to better visualize it on your wall.

I ended up drawing out the plan on the wall too, which was a great idea since I did tweak the sizes of the squares.

SUPPLIES FOR SQUARE PANELED WALL:

This post contains some affiliate links for your convenience. Click here to read my full disclosure policy.

  • Primed MDF board
  • Sandpaper
  • Caulk
  • Wood filler
  • Nail gun (although we did this with a hammer and nails)
  • Chop saw
  • Level
  • Paint
  • Pencil
  • Wood Putty (to hide those nail holes)
  • caulk

We used .688 x 3 in x 8 ft primed MDF molding for most of the wall decor (I added a wider piece to the top and later tweaked that some) and butted the bottom piece right up to the baseboard.

We used a hammer and nails instead of a nail gun. After this project, we bought a nail gun, and it makes the process SO much easier. They are worth the investment.

We caulked and painted the entire wall, and lived with it for several years.

I later added cove molding to the interior of the squares, and it was worth the extra effort.

I also added a thin piece along the top to add a little more dimension and painted the wall in Benjamin Moore’s Storm Cloud Gray.

You can see more on the square wall treatment HERE, and I talk about the updates (inside trim work and green paint color) HERE.

Classic Board and Batten

Classic board and batten is timeless and a fairly easy wall treatment to create. I created this accent wall solo in an afternoon, and is there perfect addition to a kid’s room. If you’re looking for an easy DIY wall decor idea, this is it!

SUPPLIES FOR THIS BOARD AND BATTEN:

  • (9) 5 1/2″ x 8″ primed MDF board
  • (6) 2 1/2″ x 8″ primed MDF board
  • (2) 3 1/2″ x 8″ primed MDF board
  • Sandpaper
  • Caulk
  • Wood filler
  • Nail gun
  • Chop saw
  • Level
  • Paint

For this project, I began and the bottom and moved my way up. I added 3 1/2″ x 8″ primed MDF board to the base (right on top of the baseboard).

Once the bottom piece is up, layout the 5 1/2″ x 8″ boards and figure out how far to space the pieces.

The top piece is a 2 1/2″ x 8″ board.  Once that is in place (use a level to be sure everything is straight), add the larger (5 1/2″ x 8″) boards.  Begin in the center and then center a piece between the center of the wall and the corner on the right side.  Do the same with the left side.

Add another 2 1/2″ piece was added to the top (or you can use a thicker board instead of the two smaller boards – I was working with what I had on hand). To finish off the wall, add a piece of the 2 1/2″ x 8″ board.  I flipped it to create a finished edge (or ledge). 

To see a more detailed board and batten tutorial, you can see the original post HERE.

ELEGANT WALL TREATMENT

This elegant wall treatment is a little more ambitious than the other wall treatments I share, but I was able to create it solo – which means it’s doable!

Supplies for Elegant Wall Treatment

  • (4) 4.5″ corner blocks
  • (20) 1 3/8″ x 8 ft primed base cap molding
  • (15) 4.4″ x 8 ft primed corner-blocked square edge
  • (8) tubes of caulk plus some wood filler
  • (1) gallon of Valspar Reserve Paint in Night View.

You’ll also need a basic miter saw, nail gun, and compressor.

If you want to recreate this look, I would suggest going to my full tutorial HERE. However, here’s a quick rundown:

Begin at the top of the wall and work your way down.  Cut a piece of the corner block square edge to size and make sure the top piece is level while attempting to have it as close to the ceiling as possible.

Cut pieces of the corner caps and create a frame around the corner blocks. Next cut pieces of the corner block square edge to fit around the framed corner blocks.

Add a piece of the corner block square edge to the bottom of the wall above the existing trim and then cut more corner block square edge to frame in the lower portion of the wall.

Finally, frame in the rest of the lower portion with the block square edge and frame the inside that with the trim cap.

DECORATIVE WALL MOLDING

This decorative wall molding is a more delicate wall treatment and added a lot of character to our upstairs landing.

SUPPLIES FOR THIS BOARD AND BATTEN:

To see the full, detailed tutorial and instructions you can go HERE.

To begin, measure the wall and make a plan for the decorative molding.  I used grid paper which was really helpful for measurements. Once I had a plan and measurements, I transferred the plan to the wall and drew out all my frames.

Using 1.25″ trim, I mitered and framed various sized decorative molding.  Use a chop saw to cut the trim (45-degree angle) and a nail gun is very helpful when adhering the frames to the wall (you basically create picture frames). Finish with caulk and paint! It’s amazing how different colors transform these wall panels.

Which is your favorite DIY wall decor idea? Hopefully, you found inspiration here that helps encourage your creativity so you can create a DIY wall art project!

Are you new to my blog? Go HERE to see my home tour and HERE to shop for items I use in our home.

Find me on Facebook | Instagram | Twitter Pinterest

DIY

Square Paneled Wall

Square-Paneled-Wall-Treatment

About five years ago, we added a square paneled wall treatment to our dining room, and you can see that tutorial HERE. It was the first of many wall treatments we have done over the years, and we have really loved it.

It was a medium gray for the first few years of its life.

And then (just like I always do), I decided to switch it up and wanted a change. I painted the square paneled wall treatment off-white (the same color as the trim in the room) to brighten up the dining room.

I have always liked the wall treatment but felt like something was missing – like it wasn’t quite elegant enough for the space. It needed a little more detail, so I decided to fix that and added some additional smaller molding to the inside of each square. It’s all in the details, right?

This wasn’t a hard addition, but it was time-consuming cutting that 45-degree angle on each of those interior pieces of molding. Although we tried, those square are not equal sizes. Even being off an eighth of an inch made a difference on this project and meant I couldn’t cut mitered corners in batches and became a little bit of a jigsaw puzzle.

On a project like this, I prefer brad nails over wood glue and/or construction adhesive, and wood filler and caulk will be your best friends to hide the gaps and nail holes.

Again, if you are looking for the original tutorial for this panel wainscoting, you can go HERE to see how we originally created this accent wall (pre-additional wall molding). We used MDF instead of real wood since we were painting it.

Once I had the small molding installed, I painted the entire wall treatment including the baseboard in a greenish-gray (I know – back to the darker colored wall again). I wanted a different color, and it is Benjamin Moore in Storm Cloud Gray. It is even more beautiful in person.

Want even more feature wall ideas? They add texture and a beautiful focal point to any wall space.

I have created several accent walls in our home (everything from wainscoting to board and batten to shiplap to plank walls), and you can see all the details on those HERE. No contractor is required for these DIY wall treatments which add so much visual interest!

*UPDATE* You guys will think I’m crazy, but we replaced this wall treatment (after almost 6 years) with a thin paneled wall treatment that goes to the ceiling and all around the room. You can see all the details HERE. We tried to figure out a way to keep the square paneled wall, but we couldn’t make it work in the rest of the room since it was solely planned as an accent wall.

Tag me on Instagram or Facebook or email me pictures of your wall treatments! I always love seeing what you’re up to.

Go create something!

Are you new to my blog? Go HERE to see my home tour and HERE to shop for items I use in our home.

Find me on Facebook | Instagram | Twitter Pinterest

Shop the Post
DIY

Board & Batten Tutorial

Want an inexpensive way to add interest to your space?  Try this Board & Batten Tutorial!

Board and Batten Tutorial

My boys’ room recently had a major makeover, and you can see all the furniture details by going here.  I wanted a statement wall in the space, so I created this board and batten wall.  I built it solo one afternoon, and (since I had everything other than the MDF board) this project cost me less than $100!

This post contains some affiliate links for your convenience. Click here to read my full disclosure policy.

Supplies for this project:

  • (9) 5 1/2″ x 8″ primed MDF board
  • (6) 2 1/2″ x 8″ primed MDF board
  • (2) 3 1/2″ x 8″ primed MDF board
  • Sandpaper
  • Caulk
  • Wood filler
  • Nail gun
  • Chop saw

I began by lightly sanding the stripes (most likely you will not have to do this step unless you happen to have stripes on your walls).

Add 3 1/2″ x 8″ primed MDF board to the base.

Once the baseboard is up, lay out the 5 1/2″ x 8″ boards and figure out how far to space the pieces.

The top piece is a 2 1/2″ x 8″ board.  Once that is in place (use a level to be sure everything is straight), add the larger (5 1/2″ x 8″) boards.  Begin in the center and then centered a piece between the center of the wall and the corner on the right side.  Do the same with the left side.

Continue the process until all the vertical boards are up.

Add another 2 1/2″ piece was added to the top (or you can use a thicker board instead of the two smaller boards – I was working with what I had on hand).

To finish off the wall, add a piece of the 2 1/2″ x 8″ board.  I flipped it to create a finished edge (or ledge).  A nail gun was used to adhere the boards to the wall.

Fill the nail holes with wood filler.

Fill the gaps with caulk.

Once everything is dry, sand the wood filler and *paint the board and batten. *I did not prime my boards since they were pre-primed.

After two coats of paint (to see more on this gorgeous paint color, go here), the wall will be complete!

I linked up to many of the decor items used in this space – just click on the image you want to know more about!

The wallpaper from Wallpaper Boulevard, and I used Common Thread from Magnolia Home. It ties in perfectly with the rest of the space and will grow with my boys.

If you noticed, I painted the baseboards the same color as the board and batten.  

Want an easy way to paint baseboards without painting your carpet?  GO HERE to see the easy technique!  It is one of my favorite painting tips.

Go create something!

Are you new to my blog? Go HERE to see my home tour and HERE to shop for items I use in our home.

*This post has been sponsored by Wallpaper Boulevard.  All thoughts and opinions are my own.