I am excited to share our kitchen feature in The Cottage Journal – our DIY kitchen remodel was by far our most ambitious DIY to date.
I am so excited to have our space in this gorgeous publication, and it is one of those moments where I didn’t believe it until I was actually holding the magazine.
For me, I can’t believe our DIY kitchen made the space because I often see everything we did wrong rather than everything we did right. It is also incredibly humbling when I think back to where I was just five years ago.
Five years ago, I was still fairly new to blogging. I was plugging away and mainly posting about paint projects. We had recently moved into our current home where I had decided to get serious about blogging. However, the first year of my blog was done at our previous home, and I shared it with the buyers of our home only to later discover that they had created a blog where they blogged about their home projects.
I realize now that I was too emotionally tied to our first home, but in all my projects and posts, I make an effort to never call out the previous owner in their design decisions. Their little blog bothered me so much that I was ready to quit blogging because I felt like a failure. Luckily my husband is the best cheerleader, and he encouraged me to keep going.
I am glad I didn’t quit because those little beginning projects have slowly transformed into bigger projects. I have slowly gained confidence and knowledge to tackle projects like this kitchen remodel and more recently this DIY bathroom remodel which I did (almost) entirely on my own.
I still have a lot to learn in this crazy blogging journey, but I am thankful for encouragement like my kitchen feature in The Cottage Journal.
Thanks so much to Steve and my family for being my biggest supporters (Steve gets stuck spending nights and weekends on my blog projects) and thanks to my friend Mel of Carpenter Photo for her gorgeous photography (she makes my house look better than it is).
Thanks to all of you for taking time to read and follow along on my blogging journey and remember to keep pursuing what you are passionate about – don’t give up!
Happy Earth Day! I partnered with Greenworks to share some ideas for celebrating earth day.
Ideas for Celebrating Earth Day:
Plant a Tree
A tree is the best gift you can give to both the earth and yourself! Trees have the ability to suck up carbon dioxide (and provide oxygen). If every person on the planet plants one tree, that amounts to nearly 7 billion new carbon sponges!
Plant a Garden
Try growing some vegetables this summer. If you don’t have the space (or time) for a large traditional garden, try a potted garden or a raised garden bed. Watching the plant cycle is fun, educational and rewarding so roll up your sleeves and dig in the dirt!
Experience Nature
What better way to celebrate Earth day than to get out and enjoy all it has to offer? Whether it’s a walk around your neighborhood or a hike in a park, get out and experience nature. It is amazing what a little vitamin d will do for you!
Recycle
If you don’t already recycle, there is no better time to begin than now! Set up a separate trash can in your kitchen to make it as easy as possible.
Throw a Green Party
The party could be anything from an eco-swap (bring a bag or two of stuff and swap it with your friends) to educating kids on ways they can help the environment (turn off lights when leaving a room, take shorter showers and learning what is recyclable).
I have several blogging friends sharing how they are celebrating Earth Day. Go check out what their ideas for celebrating Earth Day:
I am long overdue for sharing a free printable, and I have the PERFECT PRINT for this spring: No Rain, No Flowers.
When you are in the middle of one of life’s downpours, it can be hard to believe something great is right around the corner. However, this little quote is a great reminder that your bad days will pass and you need to be ready for lots of growth. Flowers need rain to grow.
Although it is not fun, having to sit through rain makes those flowers even more special.
This gorgeous artwork was created by my sweet friend Julie of Calligraphy Jewels. We were neighbors for several years before we moved to our current home. Go check her out on Facebook: Calligraphy Jewels. She creates all kinds of beautiful work and specializes in calligraphy. I love seeing everything she creates.
If you want a JPG of the FREE PRINT – NO RAIN, NO FLOWERS, simply click and save the image below. Print one out for yourself and gift another to a friend.
I hope you enjoy this free printables, and I have several other freebies as well. Just go to my blog page and and click on “printables” at the top. You’ll see all kinds of fun printables free for your personal use. I have everything from chore charts to bible verses. I’d love for you to tag me if you use any of these in your home. I always love seeing what you are up to.
And remember, without rain there are no flowers.
Go create something!
Are you new to my blog? Go HERE to see my home tour and HERE to shop for items I use in our home.
We have wanted to add a security camera to our backyard for a while, and we found the perfect solution with Logitech Circle 2 – an easy-to-install security camera.
Thank you Logitech for sponsoring this post. Get whole home security with the Circle 2 security camera!
Having a security camera watching our backyard gives me added peace of mind. It is nice to know I can always see what is happening back there – whether I am home or away.
Circle 2 is the the only indoor and outdoor, weatherproof, Wired or 100% Wire-Free, 1080p HD home security camera with up to 180° field-of-view that records when motion is detected, has night vision, goes just about anywhere, and sets up in minutes.
Circle 2 also has powerful integrations and will work with your smart home. You can tell Alexa to turn on Circle 2 before you leave home, use Apple HomeKit™ to control your place while you’re away, or ask Google Assistant to pull up your camera’s live stream on your phone or Chromecast™ device.
We chose to go Wire-Free, which gave us the freedom to position the Logitech Circle 2 camera wherever we wanted (which happened to be in our backyard).
The Wire-Free camera charges quickly and easily using the included charger. Once the light changes from amber to green, it’s go time!
Set up for the Circle 2 is very simple and once you connect it with the Logi Circle app, you are walked through the entire set up process.
We mounted our Circle 2 under our back porch overhang. We used the provided mount and adjusted the camera to where we wanted it to see. Its view is pretty impressive – both from scope and quality!
There are many mounts available for Circle 2. We used the provided mount, but there are also window mounts, plug mounts, and even magnetic mounts.
Every Circle 2 camera comes with 24-hours of free, secure bank-level encrypted cloud storage; and if you want more storage options, there are two Circle Safe™ plans available.
I love looking through the days activities. It gives you a fast version of everything it saw throughout the day.
If you see something suspicious, you can take action directly from the Circle app – take a snapshot, download footage, or use talk and listen to deter them.
No matter where you place it, Circle 2 provides a crafted home security experience that will continue to evolve with your needs.
One of my favorite features of the camera is the Smart Location feature. It automatically detects when you leave the house or come home, and you can receive alerts when you’re away (and pause alerts when you are back).
I love keeping an eye on our backyard with Logitech Circle 2, an easy to install security camera!
Go create something!
Are you new to my blog? Go HERE to see my home tour and HERE to shop for items I use in our home.
Tiling a floor is not hard – it only requires a little knowledge and confidence going into the project. My first tile project was a kitchen backsplash just a few years ago. With a little practice, I am now tiling full spaces!
Before tiling a space, the old flooring must be removed. Our previous flooring was carpet, so removal was fairly simple.
Once the carpet was removed, we pulled any remaining staples and nails from the subfloor, then it was time to begin laying the cement board ( I share a full tutorial on laying cement board HERE). It is important to stagger them – you don’t want to ever have a place where all four corners meet.
Once the cement board is down and screwed, you will need to tape and mud the seams. The goal is to create a level space for the tile.
I began my tile at the doorway. You need to be strategic about how you lay it, and I want my tile to look perfect at the entryway (I share a tutorial for tiling floors and walls HERE).
From there, I extended out the tile and made sure to use spacers.
It was a long process, but the result is SO beautiful!
It looks like wood but provides the durability of tile.
Our tile flooring will look as good as new for years because spills won’t stain it easily, our kids can play on it without noticeable wear and pets won’t leave it scratched.
Wood-look tile is one of the easiest to maintain, and unlike hardwood, tile can withstand a majority of cleaning materials.
I love the variation and texture this tile brings to the space. Each tile appears unique.
It is amazing how much Jeffrey Court’s tile helped transform the space into one that we love and can enjoy for years to come!
This is a sponsored post written by me on behalf of Jeffrey Court. All opinions are 100% mine.
Go create something!
Are you new to my blog? Go HERE to see my home tour and HERE to shop for items I use in our home.
We moved into our home five years ago, and there were only two smoke alarms in our home – one on the first floor and one on the second (and our home is fairly large). Today I’m sharing How to Install a First Alert Smoke Alarm.
Thank you First Alert for sponsoring this post. First Alert 10-year sealed battery alarms offer hassle-free protection that helps keep your home and family protected for a decade! #LiveWithA10
Our home is an older home, so standards were not what they are today. I have changed the batteries several times in the alarms, but it has taken me until now to add a few more alarms to our home.
My family’s safety is incredibly important to me, so it is crazy I have waited this long to add new alarms. However, I am excited about the new smoke alarms I added – they are the First Alert 10-year Smoke & Carbon Monoxide Alarms.
The 10-year sealed battery alarms offer hassle-free protection to keep my home and family protected for a decade. No more late night low-battery chirps (why does it always happen in the middle of the night?) and no more replacing batteries!
This two-in-one alarm also alerts us if there carbon monoxide presence in our home. I no longer need the plug-in carbon monoxide alarms!
Installing a First Alert Smoke Alarm is really easy, and I am a picture person so I will walk you through the easy steps with photos.
How to Install a First Alert Smoke Alarm:
Hold the mounting bracket again the ceiling or wall so the two clusters of mounting holes are aligned approximately at the 9:00 and 3:00 o’clock positions. Chose one set of the holes and trace around the holes (make sure to trace the mirrored image on the opposite side).
Drill a hole where you just traced and insert the plastic anchors using a hammer. Install the screws but don’t tighten completely.
Attach the mounting bracket by aligning the screw and rotate the bracket into place. Tighten the screws until they are snug but don’t over tighten them.
Write the date of installation, and there is no need to worry about this alarm for another 10 years (we will almost be an empty-nesters by then)!
Mount the alarm to the bracket to activate (you will rotate the alarm to fit). Once unit is activated, it cannot be turned off.
This alarm will have an end-of-life warning letting you know when it is time to replace it.
Installation really is easy, and I also added another alarm to my boys’ room.
My next plan is to add more of these alarms to every bedroom in our home and plan and practice an escape route with my kids – especially because their rooms are on a separate floor than mine.
Protect your family with 10-Year Combination Smoke & Carbon Monoxide Alarms and Live with a 10!
Go create something!
Are you new to my blog? Go HERE to see my home tour and HERE to shop for items I use in our home.
I’m so honored to share today’s Blog Swap with Stacy Risenmay.
Hello! I am so happy to be guest posting over here on Sara’s blog. She has got to be the sweetest, most gentle person I have ever met! She has such a calming presence and her home reflects that. I love her style! I think anyone would feel right at home in her house.
A quick introduction. My name is Stacy Risenmay. I have been married to my college sweetheart for almost 19 years. We have 4 boys and a French bulldog named Kevin. Life is loud, crazy, and stinky. I created my blog about 8 years ago in an attempt to remain sane and to have a place to share my ideas. I blog about everything from home decor and DIY projects to travel, kids activities, and gardening.
I’m going to share some of my favorite spaces with you today (inside and out!).
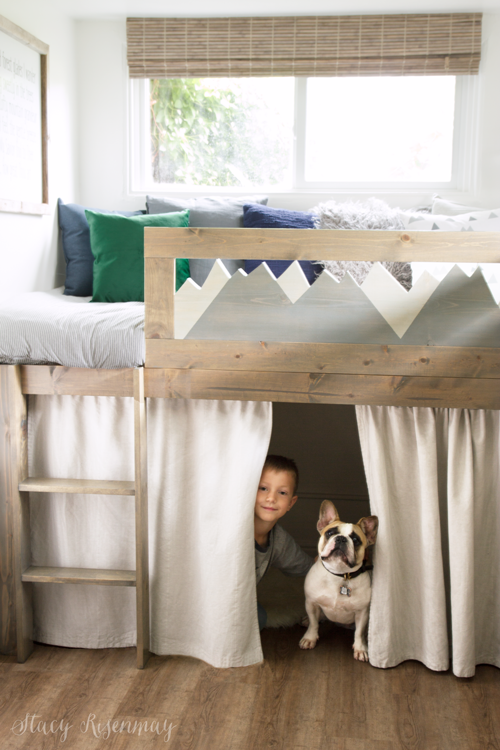
Mountain Themed Boy Room
Two of my boys are crazy for anything to do with nature, survival, and especially the mountains. I wanted to create a shared bedroom that reflected that. I built these L shaped beds that have storage (and a fort!) underneath. There is also a sitting area, a gallery wall, and a navy dresser with some pretty cool drawer pulls! Head over to see the full room and the before!
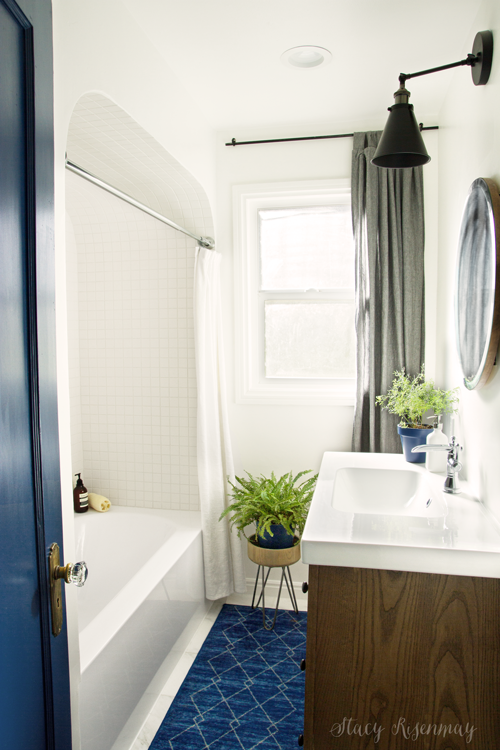
Blue and White Bathroom
I found layers dating back to when the house was built in 1938 when I gutted this bathroom. It was so fun to see the layers of old flooring and wall treatments. While we couldn’t keep the old vanity because of water damage, I was able to keep the arched nook for the shower/tub area. This room is full of DIYs including floating shelves, wallpaper, the vanity, tile, and the sliding mirror. Yep, it slides!!! See all the details for the bathroom on my blog.
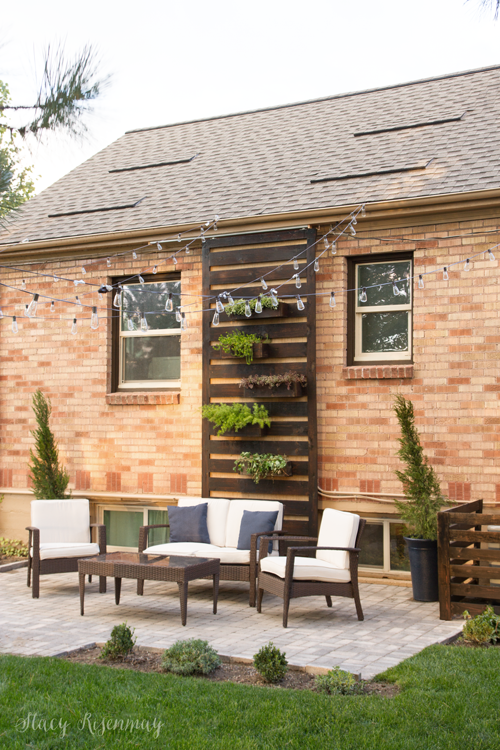
Paver Patio
This past summer and fall we focused on the outside of our house. It all started with a new roof and patio and ended with painted trim, and a whole lots of fixing and refreshing! The patio is one of those things where you ask yourself “Why didn’t we do this sooner?” We love sitting out here when it isn’t covered in snow 🙂 You can read about our curb appeal makeover HERE and see the full patio reveal and process HERE. That vertical planter actually slides and reveal the electrical boxes!
Kitchen
While overall I love our small, cozy house, I do wish our kitchen was a bit bigger. But what it lacks in square feet, it makes up in style. I love the open shelves, fun ceiling, and the perfect gray cabinets. You can see how it started and how it has morphed over the years in this post.
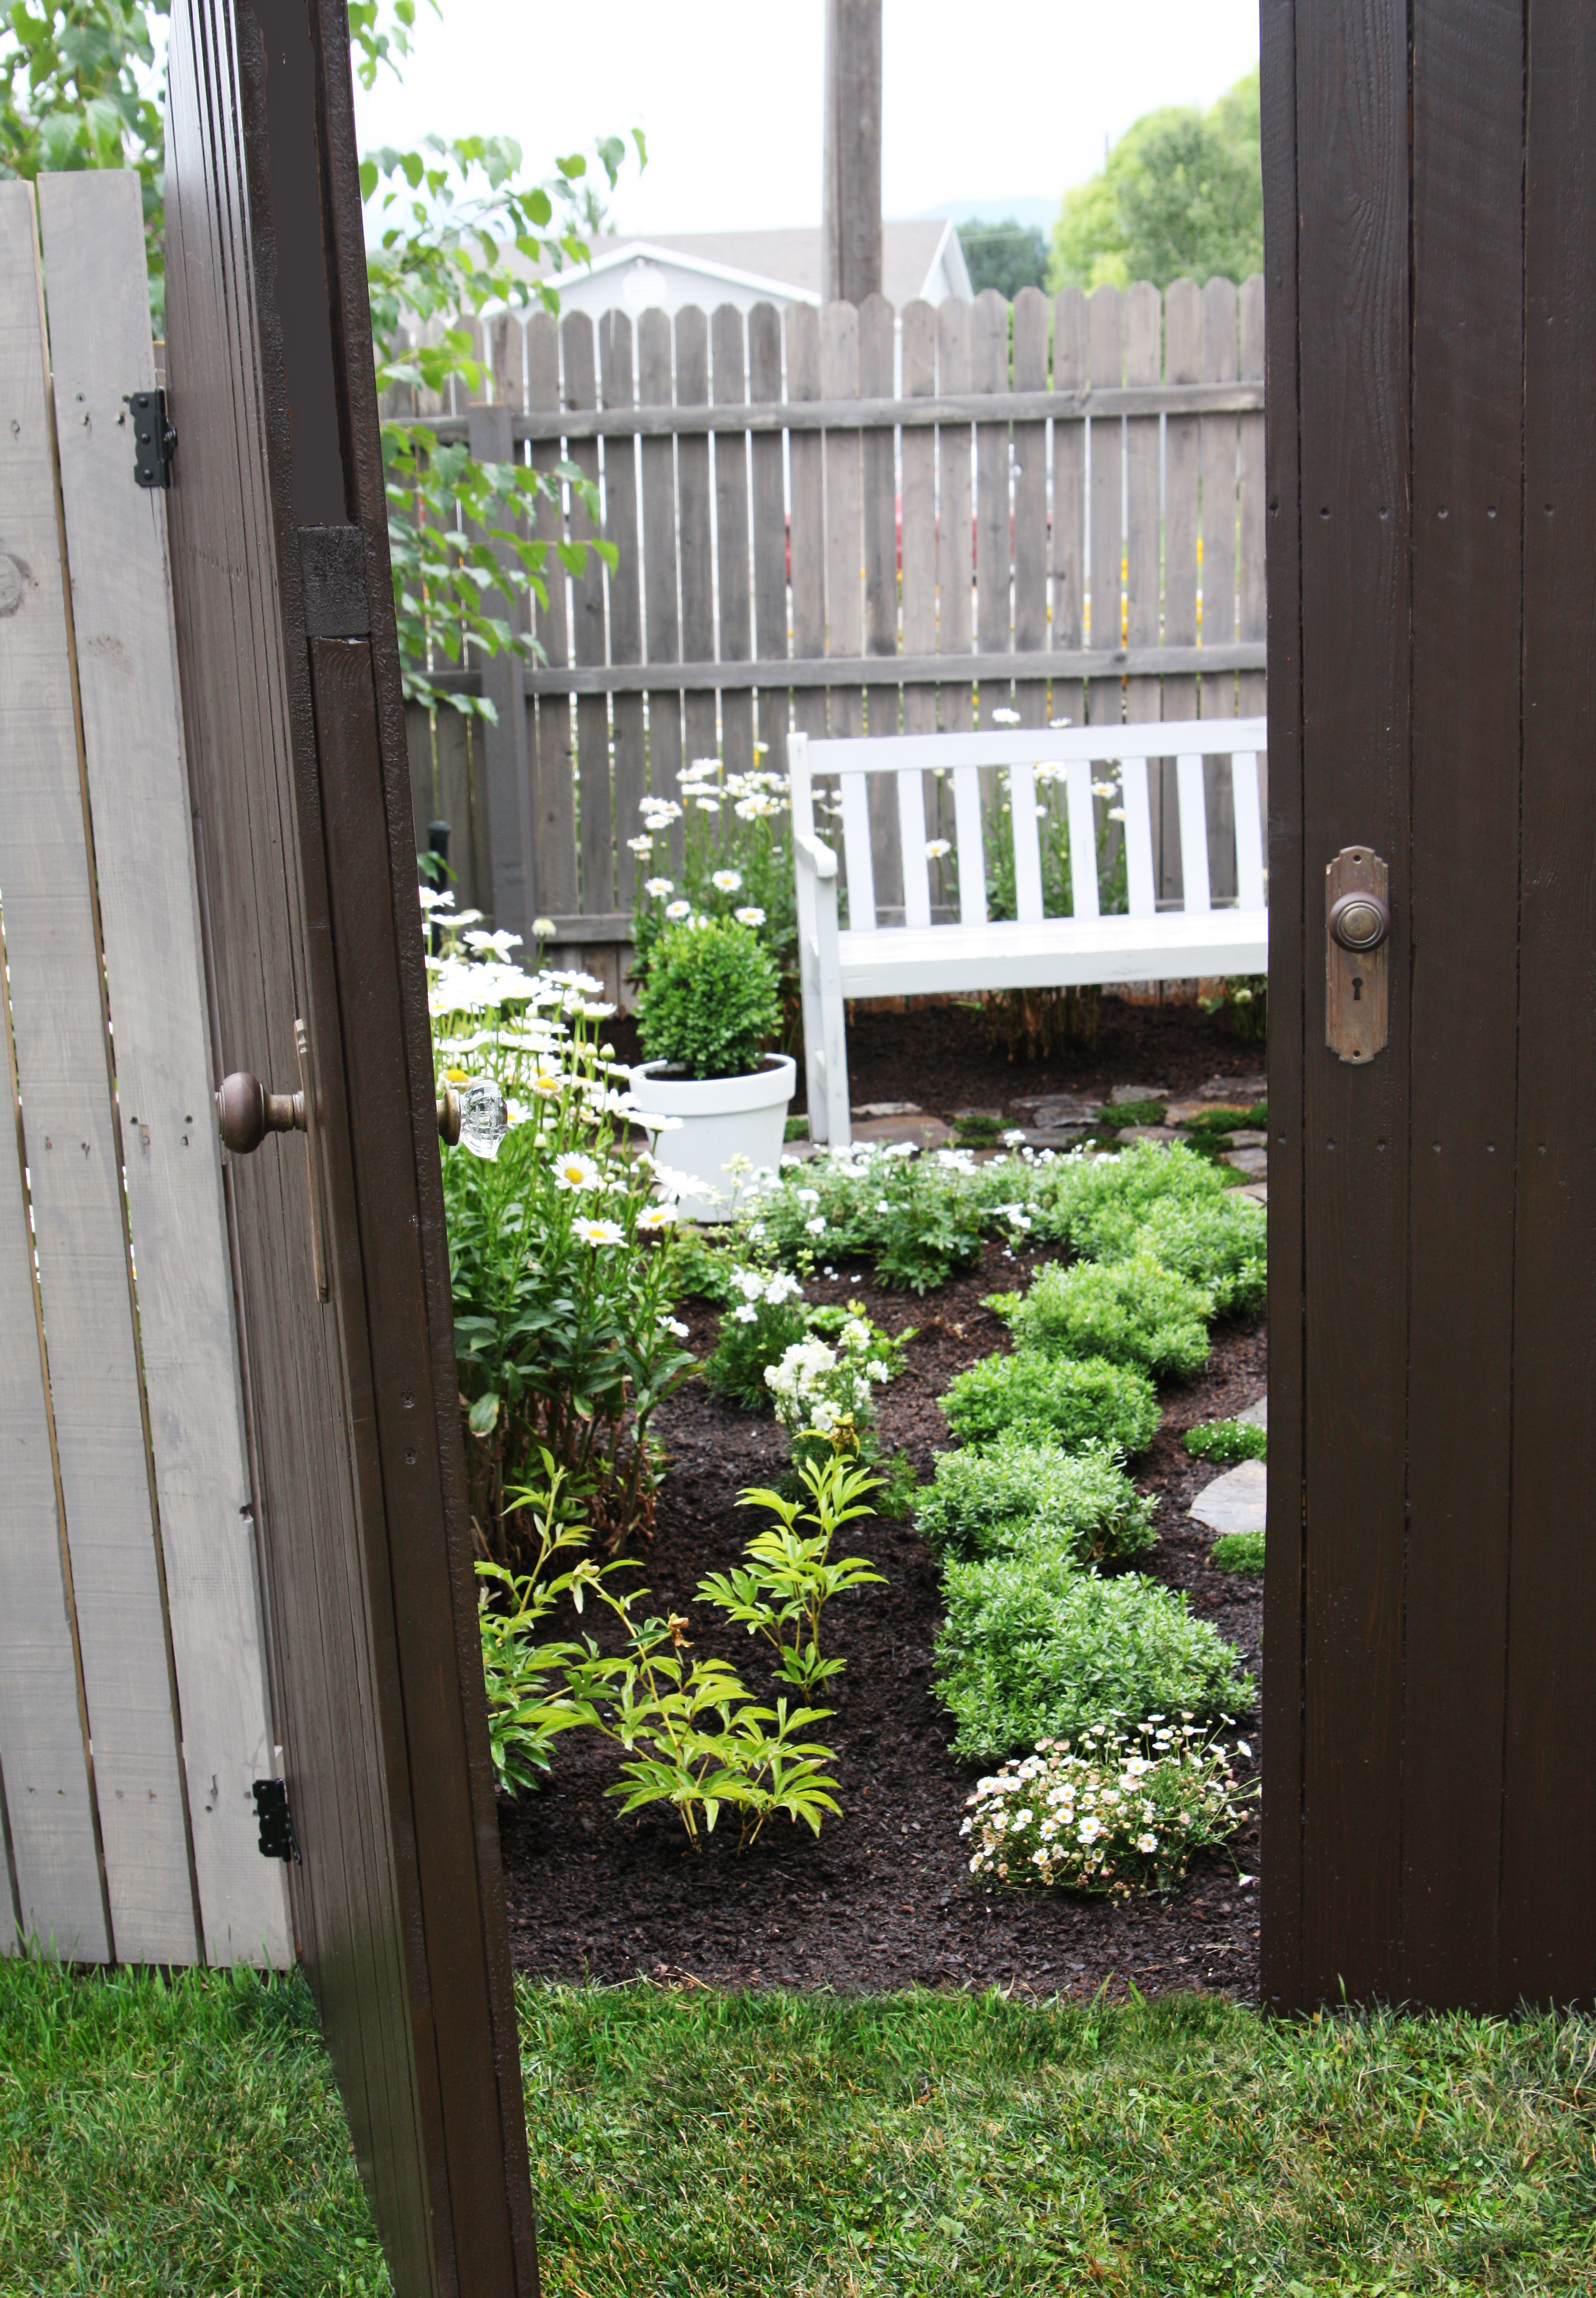
Secret Garden
We had a smallish, awkward side yard that served no purpose and was filled with weeds. One of my favorite books growing up was the Secret Garden. I had the idea to turn it into a little secret garden. You can see the full tour on my blog!
Home Office Space
I love my office. I spend an awful lot of time in there so it should be a space that makes me happy. The before is probably the BEST before picture in the history of ever. Camo sponge painted wall with actual sand added to the paint. SAND. The trim was painted high gloss dark green. The carpet was mint green. And to add in a touch a feminine charm, black lace curtains. Yep. When we moved in, it was the first room we painted 🙂 See the before and the full room over on my blog.
Thanks for letting me share a bit with you today. I hope you will hop over and check out my site for even more home decor and DIY ideas.
What a fun Blog Swap with Stacy Risenmay!
Go create something!
Are you new to my blog? Go HERE to see my home tour and HERE to shop for items I use in our home.
It has been a long winter here in Indiana, but I have begun my outdoor spring cleaning in hopes of encouraging warmer weather!
I partnered with Greenworks, and I am the proud owner of a pressure washer. I have always wanted one, and I can’t believe it has taken me this long to get serious about eliminating dirt and grim outside.
I wanted a pressure washer that was powerful, portable and didn’t take up my entire garage. The Greenworks 2000-PSI 1.2-GPM Cold Water Electric Pressure Washer fits all my requirements, AND it is really pretty. I love equipment that functions well and looks good!
Assembly was fairly simple and using this pressure washer is just as easy.
The Greenworks 2000-PSI 1.2-GPM Cold Water Electric Pressure Washer Details:
14-amp motor generates 1.2 GPM for exceptional cleaning power.
Open-frame design with 10-in wheels.
It includes metal wand, soap and turbo nozzles and multiple quick-connect wand tips for various cleaning applications.
The washer has a soap tank and accessory storage.
The 25-ft hose is kink resistant.
The 35-ft power cord works with all exterior outlets.
The washer has a 3-Year Limited Warranty.
I love how how organized this pressure washer it. Not only is there a place for everything, but everything has a label!
I already have so many plans for my new pressure washer. I’ll be cleaning up entryways, patio furniture, patio, fencing, brickwork, awnings, driveway, our pool area and our cars (well, my boys are going to be washing our cars). The different nozzles are easy to change and allows for different pressure needs.
My absolute Favorite Bedding for Kids is by far Beddy’s. I have been a fan of theirs since I first discovered them when my boys were younger (See more on the boys’ beddy’s HERE).
Beddy’s made my life so much easier for years with my boys. The boys were able to make their beds quickly, and they looked great! My little guys have since grown up (I now have a preteen and a teen), and I updated their bedroom. We went with larger beds and traditional bedding, and unfortunately the beds never look as good as they did with the Beddy’s.
If you are not familiar with Beddy’s, they are an all-in-one bedding system. They have elastic around the entire edge of the bottom edge to keep the bedding secure on the mattress.
There are two easy pull zipper tabs that extend the entire length of the bed. Making the bed is simply zipping it up – it is SO easy. And the result looks amazing!
Most of the bedding has a soft interior minky fabric, but there are 100% cotton options if you decide to forgo the minky interior.
See how easy it is for my daughter to make her bed in this little video:
My daughter has the Vintage Blush II Beddy along with the matching blanket (which she used on colder nights, and it also make the prettiest forts).
I love sharing product that I believe it, and this is a win-win for both mom and kids!
Check out Beddy’s today and save on your entire order with code SARAD!
Go create something!
Are you new to my blog? Go HERE to see my home tour and HERE to shop for items I use in our home.
I have a pretty laundry room remodel to share with you today, and this one is extra special because it is a space I helped my sister-in-law design.
Last year, my friend Angela of Unexpected Elegance and I started a design business called Dwell Well Studio. Our original plan was to do eDesign, but we have found ourselves doing local interior design instead.
It was really hard to get any before shots of my sister-in-law’s space, but this area is their back entry (off the garage). Before, the garage door led into a small, narrow hallway.
Here is a before:
The garage entrance is the the right, a small closet is at the end of the hall, and the laundry room and bath are to the left in separate rooms. On the other side of this doorway is the kitchen.
Here is an after from that same angle:
What a difference, isn’t it?! The hallway closet was moved to the left to allow for an open mudroom area.
The laundry area is no longer closed in, and the space is much more open and inviting!
Here is another before photo:
The laundry room before was closed in with walls and a door and was boring.
After opening up the space, a folding table, new cabinets, wallpaper and a new light fixture were added to create a space that makes doing laundry a little more tolerable!
What was a half bath is now a toilet room. The sink now sits outside in the main space to allow and doubles as a bathroom sink as well as a utility sink.
The space is still missing some decor items, but it such a huge improvement from the previous space.
Would you enjoy doing laundry more in this space? I sure would!
Love laundry room makeovers? I made over my laundry room using mainly paint:
As a designer, I love adding finishing touches to a space.
I recently shared our home office makeover, and I am absolutely thrilled with how it is all coming together. We just completed phase 1 of the remodel, and phase 2 will consist of some built-ins behind the desk (so there will be storage and a place for our desktop computer).
In design, the finishing touches really make the space. Our new door knobs from Nostalgic Warehouse are absolutely the icing on the cake for this room. If you want to see how easy the door knobs are to install, I share a video in an older blog post (and these door knobs can be installed in under five minutes)!
Nostalgic Warehouse allows you to mix and match their plates and knobs. I selected the Studio short plate. The simple, yet elegant design coordinates well with virtually any architectural style and is available in seven exquisite finishes (and a variety of door knob choices to fit your particular look).
Porcelain knobs are rare now, but the beauty and durability of porcelain knobs led to universal popularity in the 1800s and 1900s. The timeless, kiln-fired Black Porcelain Knob creates a sophisticated, yet classic look and is perfect for my home.
The door knobs are the perfect addition to my home as I try to achieve that timeless look I love so much.
I love mixing the old and new, and that is what Nostalgic Warehouse allows me to do in my home.
Their hardware provides me with the beauty and character of antique pieces but allows the luxury of modern functions.
This is a sponsored post written by me on behalf of Nostalgic Warehouse. All opinions are 100% mine.
As a designer, I love adding finishing touches to a space.
I recently shared our home office makeover, and I am absolutely thrilled with how it is all coming together. We just completed phase 1 of the remodel, and phase 2 will consist of some built-ins behind the desk (so there will be storage and a place for our desktop computer).
In design, the finishing touches really make the space. Our new door knobs from Nostalgic Warehouse are absolutely the icing on the cake for this room. If you want to see how easy the door knobs are to install, I share a video in an older blog post (and these door knobs can be installed in under five minutes)!
Nostalgic Warehouse allows you to mix and match their plates and knobs. I selected the Studio short plate. The simple, yet elegant design coordinates well with virtually any architectural style and is available in seven exquisite finishes (and a variety of door knob choices to fit your particular look).
Porcelain knobs are rare now, but the beauty and durability of porcelain knobs led to universal popularity in the 1800s and 1900s. The timeless, kiln-fired Black Porcelain Knob creates a sophisticated, yet classic look and is perfect for my home.
The door knobs are the perfect addition to my home as I try to achieve that timeless look I love so much.
I love mixing the old and new, and that is what Nostalgic Warehouse allows me to do in my home.
Their hardware provides me with the beauty and character of antique pieces but allows the luxury of modern functions.
Go create something!
Are you new to my blog? Go HERE to see my home tour and HERE to shop for items I use in our home.
I recently partnered with Clare, and if you are looking for a way to simplify paint shopping, then I have the easiest solution for selecting paint colors! Clare has created an easier way to paint the space you love with premium Zero VOC paint, designer-curated colors, and the best painting supplies—all delivered right to your front door.
When it comes to color (or anything honestly), too may choices is overwhelming. Clare’s founder is an interior designer who reviewed nearly 600 formulas and cut through the color clutter to create the perfect palette of 55 timeless colors.
Clare has made testing colors a paint-free and easy process – just peel-and-stick! You can get 5 swatches for just $5 and Clare will cover shipping (use code 5FOR5 at checkout).
The paint samples are large, so you can actually see what the color looks like in your space.
Besides beautiful paint colors, Clare also has paint products to help you complete your job.
I ended up selecting Timelessfor both my walls and trim. It is the most gorgeous off-white, and it looks perfect in our new home office.
Since my walls were a deep green, I used Clare’s primer and followed up with two coats of Clare’s eggshell paint.
I used their coordinating trim paint and was incredible happy with both the quality and coverage.
We absolutely love the updated space!
You can see more on this remodel home office HERE! We are in love with the new space.
Go create something!
Are you new to my blog? Go HERE to see my home tour and HERE to shop for items I use in our home.
#DutchBoyPartner This bathroom leaned a little cool, so I warmed it up with Sandstone Tint by @dutchboypaints and it completely changed the look of the space.
No major reno. No new cabinets. Just paint.
Save this if you’ve been wanting to try a DIY project
#DutchBoyPartner This bathroom leaned a little cool, so I warmed it up with Sandstone Tint by @dutchboypaints and it completely changed the look of the space.
No major reno. No new cabinets. Just paint.
Save this if you’ve been wanting to try a DIY project...
56
32
I created this reel two years ago, but since the fields behind our house rotate between corn and beans… it’s a corn summer again. 🌽
The older I get, the more I appreciate these ordinary little rhythms of life. Watching the field change through the seasons has quietly become one of my favorite parts of home.
I created this reel two years ago, but since the fields behind our house rotate between corn and beans… it’s a corn summer again. 🌽
The older I get, the more I appreciate these ordinary little rhythms of life. Watching the field change through the seasons has quietly become one of my favorite parts of home....
52
8
I love this chair and side table from @zgallerie that I decided to try it in my office/library. I’m not sure where I love it more - here or my bedroom! It adds so much elegance and charm to the spaces. Use my code SY5 at checkout for 5% off your entire purchase. Shop My Favorites by commenting LINKS or through the link in my bio #ZGallerie #MyZgallerie #Zgallerie #ModernLuxury #LuxuryInterior
I love this chair and side table from @zgallerie that I decided to try it in my office/library. I’m not sure where I love it more - here or my bedroom! It adds so much elegance and charm to the spaces. Use my code SY5 at checkout for 5% off your entire purchase. Shop My Favorites by commenting LINKS or through the link in my bio #ZGallerie #MyZgallerie #Zgallerie #ModernLuxury #LuxuryInterior...
38
11
We waited 13 years for this - and our house looks happier with her glow-up!
We went from a drafty single door (with a 90s glass inlay I poorly covered up) to double doors that allows in more light and feel right for our home.
My patio is all ready for warmer weather thanks to the new launch with @livabliss + @galeyalix! I’m LOVING the checkerboard outdoor rug. Comment “PATIO” and I’ll send you the links! #Livabliss #LivablissHome #GaleyALixxLivabliss #HomeDecor #Rugs
My patio is all ready for warmer weather thanks to the new launch with @livabliss + @galeyalix! I’m LOVING the checkerboard outdoor rug. Comment “PATIO” and I’ll send you the links! #Livabliss #LivablissHome #GaleyALixxLivabliss #HomeDecor #Rugs...
43
16
I’ve been slowly refreshing our bedroom and recently added this beautiful swivel chair and side table from @zgallerie! They add the perfect elegant modern touch to the space. Use my code SY5 at checkout for 5% off your entire purchase. Shop My Favorites by commenting “LINKS” or through the link in my bio. #gifted #ZGallerie #MyZgallerie #Zgallerie #ModernLuxury
I’ve been slowly refreshing our bedroom and recently added this beautiful swivel chair and side table from @zgallerie! They add the perfect elegant modern touch to the space. Use my code SY5 at checkout for 5% off your entire purchase. Shop My Favorites by commenting “LINKS” or through the link in my bio. #gifted #ZGallerie #MyZgallerie #Zgallerie #ModernLuxury...
23
16
Bathroom Reveal. 💫 Last spring, our upstairs shower leaked into our living room below. We were put on our contractor’s list - and the wait was worth it! We now have a gorgeous bathroom with checkerboard floors - a dream of mine since I first saw my husband’s granny’s farmhouse bathroom with checkerboard floors (years and years ago)! The shower glass is coming soon. Comment LINKS, and I’ll send you the blog post and bathroom product links.
Bathroom Reveal. 💫 Last spring, our upstairs shower leaked into our living room below. We were put on our contractor’s list - and the wait was worth it! We now have a gorgeous bathroom with checkerboard floors - a dream of mine since I first saw my husband’s granny’s farmhouse bathroom with checkerboard floors (years and years ago)! The shower glass is coming soon. Comment LINKS, and I’ll send you the blog post and bathroom product links....
120
26
What started as a leak turned into my dream bathroom ✨ I partnered with @wayfair and found everything - from checkerboard tile to the vanities, mirrors, and faucets. Comment “LINK” and I’ll send you all my favorite finds! *Shower glass coming soon! #ad #wayfaircreator #homereno
What started as a leak turned into my dream bathroom ✨ I partnered with @wayfair and found everything - from checkerboard tile to the vanities, mirrors, and faucets. Comment “LINK” and I’ll send you all my favorite finds! *Shower glass coming soon! #ad #wayfaircreator #homereno...
74
34
@wayfair is helping us turn a disaster into something beautiful ✨A leak from our upstairs shower led to a full remodel, and I can’t wait to show you the AFTER! Bathroom remodel reveal coming soon. Comment “LINKS” and I’ll send all my Wayfair favorites! #ad #wayfaircreator #wayfair #homereno
@wayfair is helping us turn a disaster into something beautiful ✨A leak from our upstairs shower led to a full remodel, and I can’t wait to show you the AFTER! Bathroom remodel reveal coming soon. Comment “LINKS” and I’ll send all my Wayfair favorites! #ad #wayfaircreator #wayfair #homereno...
50
15
I used to paint everything. I literally taught chalk paint classes and wrote an ebook about it.
So I don’t blame whoever painted these, but every room needs a little natural wood.
I used to paint everything. I literally taught chalk paint classes and wrote an ebook about it.
So I don’t blame whoever painted these, but every room needs a little natural wood....
159
26
*TWO THINGS that make wallpaper removal easy* Wallpaper has come a long way and there’s no need to be scared of it anymore! Before I hang wallpaper, I size the walls and often use pre-pasted SureStrip wallpaper that is activated with water! Comment WALLPAPER for easy to remove wallpaper links!
*TWO THINGS that make wallpaper removal easy* Wallpaper has come a long way and there’s no need to be scared of it anymore! Before I hang wallpaper, I size the walls and often use pre-pasted SureStrip wallpaper that is activated with water! Comment WALLPAPER for easy to remove wallpaper links!...
#DutchBoyPartner This bathroom leaned a little cool, so I warmed it up with Sandstone Tint by @dutchboypaints and it completely changed the look of the space.
No major reno. No new cabinets. Just paint.
Save this if you’ve been wanting to try a DIY project
#DutchBoyPartner This bathroom leaned a little cool, so I warmed it up with Sandstone Tint by @dutchboypaints and it completely changed the look of the space.
No major reno. No new cabinets. Just paint.
Save this if you’ve been wanting to try a DIY project...
56
32
I created this reel two years ago, but since the fields behind our house rotate between corn and beans… it’s a corn summer again. 🌽
The older I get, the more I appreciate these ordinary little rhythms of life. Watching the field change through the seasons has quietly become one of my favorite parts of home.
I created this reel two years ago, but since the fields behind our house rotate between corn and beans… it’s a corn summer again. 🌽
The older I get, the more I appreciate these ordinary little rhythms of life. Watching the field change through the seasons has quietly become one of my favorite parts of home....
52
8
I love this chair and side table from @zgallerie that I decided to try it in my office/library. I’m not sure where I love it more - here or my bedroom! It adds so much elegance and charm to the spaces. Use my code SY5 at checkout for 5% off your entire purchase. Shop My Favorites by commenting LINKS or through the link in my bio #ZGallerie #MyZgallerie #Zgallerie #ModernLuxury #LuxuryInterior
I love this chair and side table from @zgallerie that I decided to try it in my office/library. I’m not sure where I love it more - here or my bedroom! It adds so much elegance and charm to the spaces. Use my code SY5 at checkout for 5% off your entire purchase. Shop My Favorites by commenting LINKS or through the link in my bio #ZGallerie #MyZgallerie #Zgallerie #ModernLuxury #LuxuryInterior...
38
11
We waited 13 years for this - and our house looks happier with her glow-up!
We went from a drafty single door (with a 90s glass inlay I poorly covered up) to double doors that allows in more light and feel right for our home.
My patio is all ready for warmer weather thanks to the new launch with @livabliss + @galeyalix! I’m LOVING the checkerboard outdoor rug. Comment “PATIO” and I’ll send you the links! #Livabliss #LivablissHome #GaleyALixxLivabliss #HomeDecor #Rugs
My patio is all ready for warmer weather thanks to the new launch with @livabliss + @galeyalix! I’m LOVING the checkerboard outdoor rug. Comment “PATIO” and I’ll send you the links! #Livabliss #LivablissHome #GaleyALixxLivabliss #HomeDecor #Rugs...
43
16
I’ve been slowly refreshing our bedroom and recently added this beautiful swivel chair and side table from @zgallerie! They add the perfect elegant modern touch to the space. Use my code SY5 at checkout for 5% off your entire purchase. Shop My Favorites by commenting “LINKS” or through the link in my bio. #gifted #ZGallerie #MyZgallerie #Zgallerie #ModernLuxury
I’ve been slowly refreshing our bedroom and recently added this beautiful swivel chair and side table from @zgallerie! They add the perfect elegant modern touch to the space. Use my code SY5 at checkout for 5% off your entire purchase. Shop My Favorites by commenting “LINKS” or through the link in my bio. #gifted #ZGallerie #MyZgallerie #Zgallerie #ModernLuxury...
23
16
Bathroom Reveal. 💫 Last spring, our upstairs shower leaked into our living room below. We were put on our contractor’s list - and the wait was worth it! We now have a gorgeous bathroom with checkerboard floors - a dream of mine since I first saw my husband’s granny’s farmhouse bathroom with checkerboard floors (years and years ago)! The shower glass is coming soon. Comment LINKS, and I’ll send you the blog post and bathroom product links.
Bathroom Reveal. 💫 Last spring, our upstairs shower leaked into our living room below. We were put on our contractor’s list - and the wait was worth it! We now have a gorgeous bathroom with checkerboard floors - a dream of mine since I first saw my husband’s granny’s farmhouse bathroom with checkerboard floors (years and years ago)! The shower glass is coming soon. Comment LINKS, and I’ll send you the blog post and bathroom product links....
120
26
What started as a leak turned into my dream bathroom ✨ I partnered with @wayfair and found everything - from checkerboard tile to the vanities, mirrors, and faucets. Comment “LINK” and I’ll send you all my favorite finds! *Shower glass coming soon! #ad #wayfaircreator #homereno
What started as a leak turned into my dream bathroom ✨ I partnered with @wayfair and found everything - from checkerboard tile to the vanities, mirrors, and faucets. Comment “LINK” and I’ll send you all my favorite finds! *Shower glass coming soon! #ad #wayfaircreator #homereno...
74
34
@wayfair is helping us turn a disaster into something beautiful ✨A leak from our upstairs shower led to a full remodel, and I can’t wait to show you the AFTER! Bathroom remodel reveal coming soon. Comment “LINKS” and I’ll send all my Wayfair favorites! #ad #wayfaircreator #wayfair #homereno
@wayfair is helping us turn a disaster into something beautiful ✨A leak from our upstairs shower led to a full remodel, and I can’t wait to show you the AFTER! Bathroom remodel reveal coming soon. Comment “LINKS” and I’ll send all my Wayfair favorites! #ad #wayfaircreator #wayfair #homereno...
50
15
I used to paint everything. I literally taught chalk paint classes and wrote an ebook about it.
So I don’t blame whoever painted these, but every room needs a little natural wood.
I used to paint everything. I literally taught chalk paint classes and wrote an ebook about it.
So I don’t blame whoever painted these, but every room needs a little natural wood....
159
26
*TWO THINGS that make wallpaper removal easy* Wallpaper has come a long way and there’s no need to be scared of it anymore! Before I hang wallpaper, I size the walls and often use pre-pasted SureStrip wallpaper that is activated with water! Comment WALLPAPER for easy to remove wallpaper links!
*TWO THINGS that make wallpaper removal easy* Wallpaper has come a long way and there’s no need to be scared of it anymore! Before I hang wallpaper, I size the walls and often use pre-pasted SureStrip wallpaper that is activated with water! Comment WALLPAPER for easy to remove wallpaper links!...


 Thanks for letting me share a bit with you today. I hope you will hop over and


 The door knobs are the perfect addition to my home as I try to achieve that timeless look I love so much.


