Home

DIY Open Shelves

I have added these DIY Open Shelves to several rooms in our home.  They’re pretty and function well for additional storage.

I am not sure how many people read magazines these days, but I am thrilled to have a little feature in one!

DIY Open Shelves | Romantic Homes Feature

Romantic Homes magazine featured my DIY open shelves in their September issue.  This really is an easy DIY anyone can do, and it is the perfect solution for that blank wall you keep staring at – wondering what to do with it!

The feature is just one page, but I’m honored to be a part of this gorgeous magazine!


If you want to see the full tutorial for creating these DIY open shelve (I promise you can do it), click HERE to read how!  It is an easy way to make a wall useable (great for storage) AND pretty.

I frame my kids’ Santa photos every year, and I decorate these shelves during the holiday with these adorable and memorable photos.  To see these shelves decked out for the holidays (and the rest of my holiday home tour) click HERE.

I also added DIY open shelves in our recent laundry room makeover.  

To see more on those shelves (which make amazing storage), click HERE.

Go create something!

Are you new to my blog? Go HERE to see my home tour and HERE to shop for items I use in our home.

Find me on Facebook | Instagram | Twitter Pinterest

DIY

Removing Starched Fabric From Walls

I have shared several starched fabric wall tutorials on the blog, and my readers are always concerned about what happens to the wall when the fabric is removed.  Today I am sharing all the details (including a video at the end of this post) and proving how easy removing starched fabric from walls is, and it won’t damage walls or paint!

Removing starched fabric from walls

Starched fabric walls are a great solution for those of us who love the look of wallpaper but have commitment issues.  This treatment is also perfect for renters – starched fabric is a temporary wallpaper.

I am in the middle of remodeling our laundry room, and part of the design includes a tiled wall.  Because of the new design, I am (sadly) removing my fabric wall. To see the full tutorial on how to hang your own starched fabric wall, go HERE.  It is not hard, but it does take a little patience.  I perfected the process after several attempts over the years, and the result is a gorgeous patterned wall that will be easy to remove once you grow tired of it! I had a little difficulty the first time I tried this method in our half bath, and I share all my trials and errors in my original starched fabric tutorial.

I have had readers who have had starched fabric hanging on their walls for years – one woman told me she has had a fabric wall for over 15 years!  I have been told this is an old military housing trick, and it works well on dorm cement blocks.

Want to see me removing the starched fabric from walls? Watch the video here: https://youtu.be/1Vzxi2uSJD0


Have you ever used fabric as wallpaper?  I’d love to hear about your DIY adventures with it – good and bad!

Go create something!

Are you new to my blog? Go HERE to see my home tour and HERE to shop for items I use in our home.

Find me on Facebook | Instagram | Twitter Pinterest See what happens when you remove starched fabric walls...

Decor

Laundry Room Makeover

Laundry room makeover decor ideas

I am in the middle of a month-long laundry room makeover with Blanco.  Blanco makes unique luxury sinks, faucets, and decorative accessories. I was so excited for the opportunity to partner with Blanco on our Laundry Room Makeover because our laundry room sink and faucet are a complete mess.  It’s definitely been well used…

This mess will be replaced by Blanco’s Liven sink in anthracite and Blanco’s Artona Faucet in stainless finish/anthracite.

When we first moved into our home, the cabinets were dark and the laundry room became home for decor items I didn’t know what to do with.  

Then early last year, I updated the space for only around $200.  I painted the cabinets and added fabric to the wall.  

Our space continues to evolve and time goes by.  We are in the middle of preparing for a large kitchen renovation.  Part of the plan is to remove the wall that our piano sits against…  

We will have to move the piano to my office…  

This means my desk will have to go – and I’ve lost my home office. I really don’t spend much time working on my desk or desktop (I mainly use my laptop), but I still wanted a dedicated office space.  So, the laundry room will include my home office. There’s a desk in the space that I’ve never shared because it’s never looked good, but that’s about to change!

On the other side of my laundry room is a built-in desk in 90’s green.  It has a lot of potential, and I’m excited to make the space my new home office. Stay tuned – I’ll be sharing more soon! Go create something!

Are you new to my blog? Go HERE to see my home tour and HERE to shop for items I use in our home.

Find me on Facebook | Instagram | Twitter Pinterest *This post is a sponsored post by Blanco. I take pride in reviewing only products that fit my brand and will be beneficial to my readers. And while this post is sponsored, all the opinions are my own.

Decor

Tuscany Inspired Entertaining Tips

Today I’m sharing some Tuscany Inspired Entertaining Tips.

Dreaming of Tuscany | Easy Entertaining Tips

Although I’ve never been to Tuscany, I dream of its picturesque, rolling landscape and delicious food and wine.  I picture old-world European decor that is dramatic and elegant. I am excited to partner with Balsam Hill on their Around the World campaign, and today we’re going to pretend we’re in Tuscany.  If you’re stopping by from the Parisian Countryside (The Naptime Reviewer), welcome!

I was able to bring a touch of Tuscany’s charm into my home through Balsam Hill’s beautiful decor that adds sophistication to my home.  Besides sharing these gorgeous decor pieces, I’m also going to share a few ways to entertain – without the stress.

When hosting, the easiest place for the food is the kitchen (and if there are kids involved, this is always my default).

I set up a little cheese tray in the kitchen with some fruit-infused water (this is my kid version of entertaining Tuscany-style). I love to add some greenery to all my spaces when I decorate – even when I set up an eating area.

These small Campania Olive Topiaries are perfect for adding warmth to my serving area and require no maintenance since they are faux – so they can live happily in my kitchen. If I was serving a larger crowd and more than just a little cheese tray and drink, I would break the food into various stations:

  • appetizers
  • entrees
  • sides
  • desserts
  • drinks

Let’s go back to dreaming about Tuscany… I imagine music playing in the background.  My piano is the best I can provide for background music here in my home, and I’ve added a little Tuscan charm with  Balsam Hill’s large olive tree.

It’s incredibly realistic looking – right down to the pot.  I love that I don’t have to worry about watering or cleaning up dropped leaves.

However, if my home really were in Tuscany, I think I would invite you into our living room for drinks and appetizers.  My back patio would overlook the gorgeous Tuscan rolling hills, and we would all be laughing, drinking, and nibbling on my cheese tray.

Again, I added some greenery to the serving area with Balsam Hill’s stunning Peach Rose Floral Arrangement.

I considered buying expensive meats and cheeses for my Tuscan-inspired cheese tray.  However, I like to entertain, and the reason I enjoy it is that I make it easy.  Making it easy doesn’t mean it still can’t be gorgeous and special.  Ultimately, I just want to my guests feel comfortable and welcome in my home.

Tips for making an easy but gorgeous cheese tray:

  • Begin with a large platter for arranging the cheese and other edibles (I used Balsam Hill’s Wine Barrel Lazy Susan).
  • Add soft cheese(s).
  • Add a variety of cheese chunks or slices (You can cut your own, buy prepackaged cheese cubes or many grocery stores have a cheese section where they’ve pre-chunked cheese).
  • Add some meat.  You can go as fancy as you prefer, but I just went with salami (mainly because I knew my kids would eat it after this photoshoot).
  • Add some fruit.  Grapes are always a great go-to because they are gorgeous with little work.  I added some peaches because they are in-season and they added gorgeous color to the tray.
  • Add some crackers – look for different shapes and textures.
  • Add some nuts.

Tell me your tips for entertaining easily and beautifully – I’d love to hear them!

Thanks for reading through my Tuscany Inspired Entertaining Tips.

If you want to keep traveling the world, check out these other blogger home stops:

I also created a gorgeous Thanksgiving table with Balsam Hill. Click HERE to see more!

Go create something!

Are you new to my blog? Go HERE to see my home tour and HERE to shop for items I use in our home.

Find me on Facebook | Instagram | Twitter Pinterest

*This post is a sponsored post by Balsam Hill. I take pride in reviewing only products that fit my brand and will be beneficial to my readers. And while this post is sponsored, all the opinions are my own.

Seasonal Decor

DIY Hot Cocoa Bar

 
Easy DIY Hot Cocoa Bar - perfect for entertaining!
Adorable DIY Hot Chocolate Bar
One day (when I grow up), I’ll start drinking coffee. Until then, I’ll keep drinking hot chocolate. In fact, my entire family loves hot chocolate, so I created a little hot cocoa beverage station for us to enjoy! I partnered with Hobby Lobby on this hot cocoa bar and am sharing several easy DIY tutorials for creating your own beverage (coffee, tea, or cocoa) bar. 
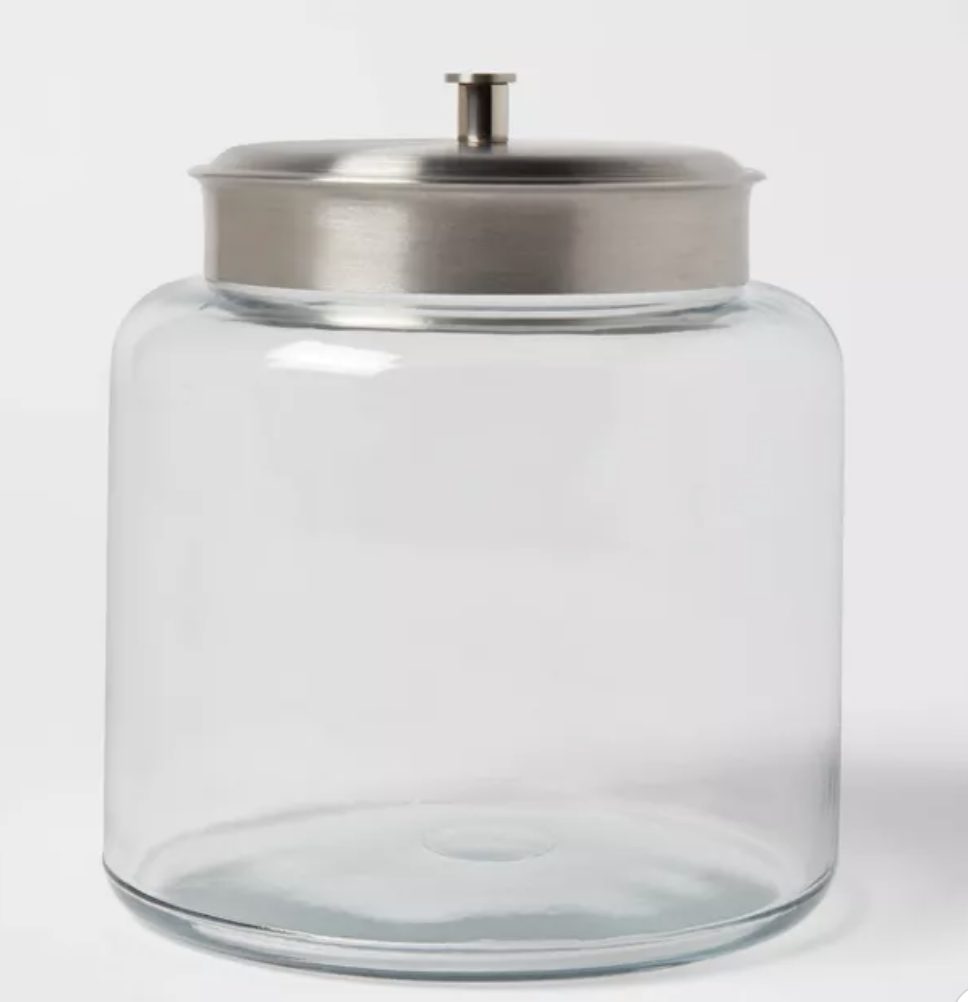
I began with these inexpensive glass jars that come in several sizes. Hobby Lobby currently has several coffee-themed areas set up throughout their stores, and I also found this mug holder that was perfect for my cocoa bar. Because I have a Midas complex and want everything I touch to be gold, I picked up a small bottle of gold spray paint. When spray painting, use a spray primer first (for food products like these glass jars, only paint the outside of the lids). After the primer is dry, paint several thin layers of the color. Since I’m obsessed with the cute little canvas banners I’m seeing everywhere, I decided to create one for my cocoa bar.

Here’s what you’ll need to create your own canvas banner:

  • Canvas (I bought a half yard from Hobby Lobby, and I’ll have enough to make as many canvas banners as my heart desires).
  • Decorative Trim (I bought a half yard of the trim from Hobby Lobby and used most of it).
  • Decorate Rope
  • Paint Marker (I went with black).
  • Perma-Stick Tape
  • Wooden Dowel Rod
  • Carbon Paper
  • Pen
To begin, cut the fabric just a little larger than your printout (mine was 8.5 x 11). Place the carbon paper on top of the cut fabric and the printout on top of the carbon paper. *Download the hot chocolate printable here: Hot-Chocolate-Free-Printable   Using a pen, trace the lettering on the printout. Once the letters are outlined, use a paint marker to fill in the lettering. Using the tape, fold over the edges of the banner. Once the tape is in place, iron to set the tape permanently. Roll the fabric around the wooden dowel rod and secure it with a glue gun. Complete the piece with decorative rope. I added a little fun with the canvas banner to our hot cocoa bar cart. The adorable felt-letter board is also a Hobby Lobby find. A pretty tablespoon allows people to measure their hot chocolate. 
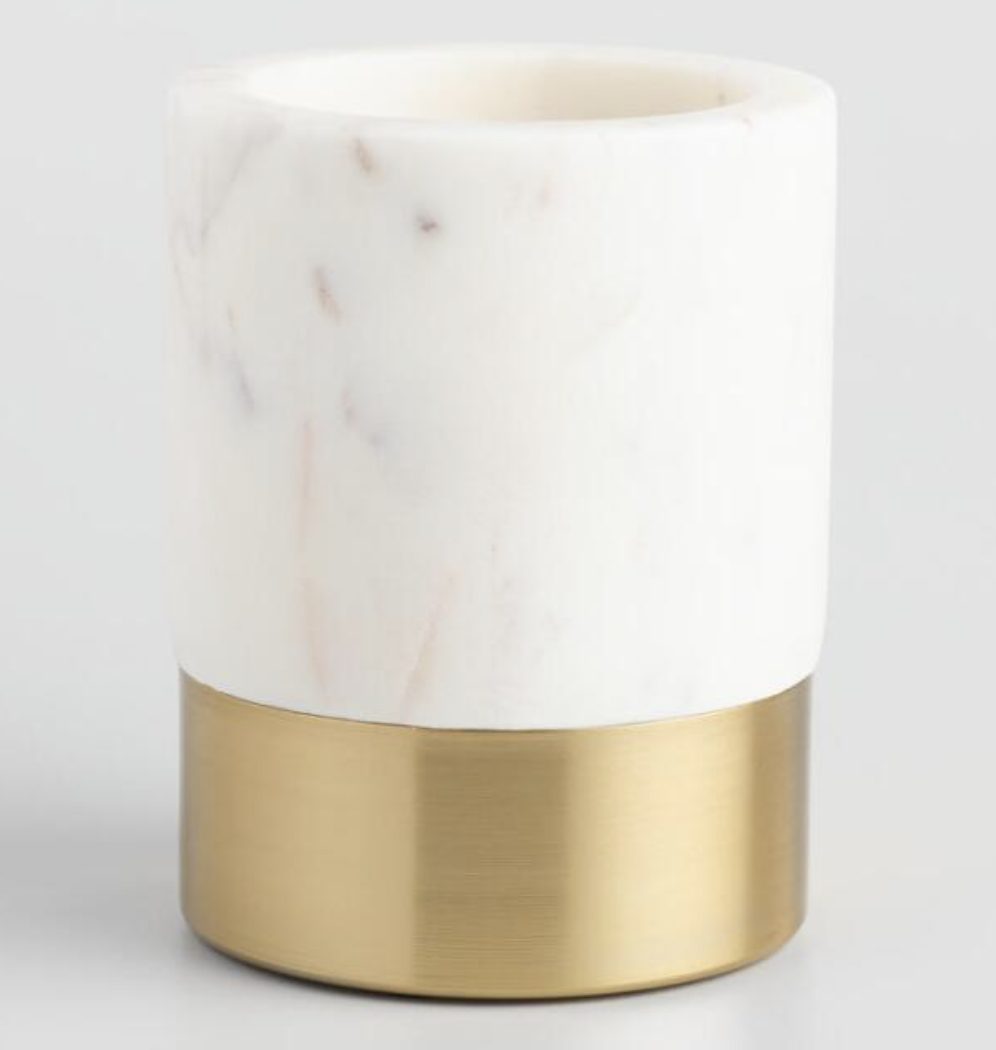
These gorgeous mugs have the gold touches I love along with navy and white. They’re from Hobby Lobby and look gorgeous in my navy family room! Don’t forget to use your 40% off coupon which is good for one item at regular pricing! Go create something!

Are you new to my blog? Go HERE to see my home tour and HERE to shop for items I use in our home.

Find me on Facebook | Instagram | Twitter Pinterest This is a sponsored conversation written by me on behalf of Hobby Lobby. The opinions and text are all mine.
This is such a cute and easy way to create a hot cocoa beverage bar! Includes several easy DIY projects.
DIY Hot Cocoa Bar
Easy tutorial for making a DIY No-Sew Canvas Banner
DIY No-Sew Canvas Banner
DIY

Starched Fabric Wallpaper

I have used Starched Fabric Wallpaper several times throughout our home, and it works great for renters or those of us with commitment issues since it is SO easy to remove.

Temporary Wallpaper: Starched Fabric

I shared this tutorial over a year ago on Remodelaholic, and I decided to share it here as well.  Although great for anyone, this tutorial is perfect for renters (or those of us with decor commitment issues). Starched fabric walls are easily removable and provide the look of wallpaper without the commitment!

This is a photo of my laundry room before its makeover:

With three kids, I spend a lot of time in this laundry room, and unfortunately, there is no natural light in this room.  The dark cabinets and poor light made for a dark and less than exciting space. To brighten the room, I painted the cabinets (click HERE to see more) and added some pretty fabric to the walls.

Starched Fabric Wall Treatment Tutorial

This post contains some affiliate links for your convenience. Click here to read my full disclosure policy.

These are the supplies needed for hanging a fabric wall:

      • Fabric
      • Foam Roller
      • Paint Tray
      • Rag
      • Tape Measure
      • Ruler
      • Liquid Starch
      • Scissors
      • Pen
      • Razor
      • Thumb Tacks

To begin, measure the wall(s) and figure out how much fabric is needed. Pay attention to the width of the fabric.  The width of a bolt can vary and is usually somewhere between 45-60 inches.  I used cotton fabric (and prefer cotton fabric for this project), and bought extra fabric knowing that cotton will shrink. My wall space (including the cabinets)  is 6ft x 8ft.  I knew I would have to match fabric for the walls on top and bottom of the cabinets, so I also bought extra fabric to allow for the correct pattern repeat. I purchased 4.5 yards of pretty blue and cream 45″ cotton fabric I found at Hobby Lobby (I took advantage of their 40% off coupon)!   Home decor fabric can be used, but keep in mind it is typically wider and much harder to handle.  A hanging partner will be needed with the larger fabric width. Measure the length of the wall and lay out the fabric.

Use a tape measure to measure the wall length on the fabric (I added 6 inches to allow for shrinkage and to be safe).

Once the length is marked, use a ruler to draw a straight line for the cut.

Carefully cut along the measured cut line (I used scissors, but you could definitely use a fabric rotary cutter).

Once the first piece is cut, it is time to hang the fabric! I would suggest starting in the middle of the wall, but I started on the side since I had cabinets blocking the rest of my wall and the right side really was my focal point.

Pour the liquid starch into the tray, and cover the roller in starch.

Take the roller and cover the wall where the fabric will be hung.  Cover the wall but not so much that it is dripping. Before adding the liquid starch, shut off any electrical outlets in the room.

Hang your fabric starting at the top.  You can use a level to keep the fabric straight.  Use a thumb tack to hold the fabric in place.

Allow extra fabric at the top because remember there will be some shrinkage. If needed, carefully cut around cabinets and/or other obstacles.

Smooth out the fabric on the wall with hands or a rag.  Then, take the roller and cover the fabric with the liquid starch.

Once the piece is covered in liquid starch, take a rag and smooth out the fabric.

After the first piece is in place, continue with the same steps for the remaining wall.  Make sure to match the fabric repeat (this is where it really starts to get tricky and why you need to buy extra fabric).

Once the wall is done, let the fabric dry before trimming it.  It is good to let it sit overnight.

Take a razor and carefully cut the edges of the dried fabric, and the fabric wall is done!

I did have some areas where the fabric was stretched, but overall, I think the wall looks pretty good.  And for under $50, the fabric wall makes a huge improvement in my room!

Where would you like to add Starched Fabric Wallpaper to your home?

Go create something!

Are you new to my blog? Go HERE to see my home tour and HERE to shop for items I use in our home.

Find me on Facebook | Instagram | Twitter Pinterest


Printables

Psalm 91:4 Print

Psalm 91:4 Print

My kids went back to school today, and I always find myself worrying (and praying) more than normal their first week back, and I wanted to share one of my favorite verses with you.  I created this Psalm 91:4 print and want to share it with you.

Psalm 91:4 | Free Printable

This verse from Psalm 91:4 is one of my absolute favorites, and it always brings me comfort.  This particular Psalm is such a beautiful visual of how much he loves my kids (and me)!  When I can’t protect them, He will.

You can print your own 8×10 JPG by clicking and saving the image below:  

Or, if you prefer an 8.5 x 11 PDF, click on this link:

Psalm – Free – Printable – Sincerely, Sara D

I hope sharing this Psalm 91:4 Print brings you some comfort today! Print out two and give one to a friend. Frame the print for a great (and really inexpensive) gift. It is an easy way to encourage yourself and a friend.

Go create something!

Are you new to my blog? Go HERE to see my home tour and HERE to shop for items I use in our home.

Find me on Facebook | Instagram | Twitter Pinterest *All Sincerely Sara D. printables are for personal, non-commercial use only. Use it, gift it, but don’t alter it, sell it or otherwise distribute the print or the file.  I have several other free printables on the blog:

Home

Haven Conference Recap

This is the third year I’ve gone to Haven Conference, and it is always a fun weekend filled with valuable blogging information! Today I’m sharing my Haven Conference Recap.

When you spent the majority of your time working from home alone, it is so nice to hang out with other people – especially other bloggers!  I spent some time with a few talented Indiana blog friends: Ashley from Simply Designing and Angela from Unexpected Elegance.

Haven Conference Recap

Haven Conference Recap

Angela and I have roomed together for the past three years, and we also only live about 20 minutes apart.

The conference was held at the Grand Hyatt Buckhead (Atlanta) and kicked off with an opening cocktail party on the rooftop.  

That evening, I went with AdThrive (my ad network) to another fun rooftop even at the Gypsy Kitchen.

photo courtesy of AdThrive It was a gorgeous (and really, really hot) evening!

photo courtesy of AdThrive

The next day was packed full of classes, and that evening I went with The Home Depot to a gorgeous dinner they co-sponsored with Kwikset.  We were greeted at the door with adorable little keychains which had our table number on them.

The table setting was absolutely stunning.

I met several sweet bloggers, and just a couple were April from House by Hoff and Chelsea from Making Home Base.

It was a fun evening, and the next day was filled with more classes (I took classes on Lightroom, Facebook, SEO, and podcasts).

I stopped by the Home Depot Booth to see my little DIY Hall of Fame feature for my family room makeover.

Their booth was fantastic and the Home Depot crew is amazing.

The Haven sponsors do so many fun things.  Liberty Hardware gave away adorable tees if you posted a pic with the gold man (you didn’t have to twist my arm – haha)!

The weekend ended with the Home Depot Orange Tank presentations.  Several weeks before Haven, several of us submitted ideas to Home Depot for partnering on projects.  There were 12 finalists that had the honor of presenting ideas, and three winners with a Home Depot partnership and money towards their project.

I was THRILLED to be one of the 3 winners, and Home Depot is partnering with me on my kitchen renovation!

If you have any interest in reading, my presentation is below.  I hope it may be helpful to future Orange Tank presenters because I had no idea what to expect!

Hi! I’m Sara Davis, and I blog at Sincerely, Sara D. I would be incredibly honored to partner with Home Depot on my kitchen renovation. We moved into our home three and a half years ago and made the space feel more like us with some inexpensive cosmetic changes. Here is the before and after of our kitchen. The power of paint is amazing, but it can only go so far. Our kitchen layout isn’t working for us.  It was not well designed, and someone is always banging into something. The dishwasher opens too closely to the sink and the fridge is tiny and crammed in the corner. Our oven is a wreck and burns everything (we haven’t had a good cookie in over three years). We need a better layout and new appliances for the space. A new layout also means removing cabinets and suddenly the kitchen is a huge renovation (which is why it hasn’t happened yet). While we’re knocking out cabinets, we want to remove the wall that is between our kitchen and family room. We love to host family, friends, and our small group, and opening up the kitchen would make entertaining so much better. I’ve introduced my readers to projects similar in scale to this kitchen remodel. We had a leak in our master bath (so significant the shower was not usable). One thing led to another and suddenly we were in the middle of an entire bathroom renovation. Here is the before and after of our master bath. My readers LOVED this renovation, and they will go CRAZY over a kitchen remodel – especially one that involves even more DIY like this project. I can only imagine their excitement with a full kitchen renovation. I promise they will be cheering from behind their screens as they get inspiration for their own homes and spaces. You are just down the road from me so Let’s Do This Home Depot! The kitchen is the heart of the home, and mine isn’t functioning well. Let’s revive the heart of my home together!

I was incredibly thankful and overjoyed to win, and I can’t wait to start working on the project together! Before I left that evening to catch a flight home (and then on to celebrate my parents’ 45th wedding anniversary), I caught up with my friend Amy from One Artsy Mama.  She recently published a book on hand lettering.

It was a fun-filled weekend, and I’m looking forward to next year’s Haven!  

For those who’ve never been, I hope this Have Conference Recap encourages you to buy a ticket this year!

Go create something!

Are you new to my blog? Go HERE to see my home tour and HERE to shop for items I use in our home.

Find me on Facebook | Instagram | Twitter Pinterest

Shop the Post
Home

This Old House Feature

I am excited for a recent This Old House Feature which included my DIY laundry room makeover.

Inexpensive Laundry Room Makeover | This Old House Feature

The article shares how I transformed our laundry room for a little over $200 with several (easy) DIY projects.

Although (unfortunately) it doesn’t bring a rush of traffic to my blog, it is always so fun to see projects in print!


When we first moved into the house, this is how our laundry room looked:

Laundry-Room-Makeover

And here is how it looked after my inexpensive DIY makeover:

Using Peg Board in the Home

We are lucky to have such a large laundry room (although it does end up being a junk/catch-all room).  A few inexpensive DIY projects have made the space a little more useable and homey:

  • PAINTED THE CABINETS AND REMOVED SOME DOORS.  The windowless laundry room was brightened by painting the cabinets a cream color, and I have the full tutorial HERE.  I also updated the hardware.
  • ADDED FABRIC TO THE WALL.  Adding fabric to the wall is great for those of us who aren’t ready to commit to wallpaper because it is so easy to remove.  You can see more HERE.
  • ADDED PEGBOARD STORAGE.  You can go HERE to see all the details of this pegboard wall.
  •  

Laundry Room DIY Makeover.

Laundry Room Budget Makeover

DIY Peg Board in Laundry Room

Peg Board DIY Tutorial

As fun as it is to share pretty photos of my home on the blog (and occasionally in print), my home never looks that perfect.  I had to share this photo of what the room looked like this morning – a real-life photo of my laundry room (and this is on a good day):

And you should see my laundry room now after being away for over a week.  I may never catch up on all the laundry…

Go create something!

Are you new to my blog? Go HERE to see my home tour and HERE to shop for items I use in our home.

Find me on Facebook | Instagram | Twitter Pinterest

Seasonal Decor

Giving Back with Balsam Hill

I am excited about Giving Back with Balsam Hill.  It’s a unique opportunity to help raise money for our local food bank.

Giving Back with Balsam Hill

During the school year, 22 million children receive free or reduced-priced meals through the National School Lunch Program. However, when school is out, only 3.9 million receive free or reduced-price meals throughout the USDA Summer Food Service program. Second Harvest Food Bank of Central Indiana and Feeding America are trying to close the summertime gap so kids don’t go hungry.

Giving Back with Balsam Hill

I am partnering with Balsam Hill for their 4th annual Christmas in July celebration.  During this celebration, Balsam Hill is generously donating money to Second Harvest Food Bank.  However, to raise money for the food bank I need your help (and it’s so easy)!  All you need to do is like, comment, and share Facebook posts from Balsam Hill.  

A like is worth $0.50, while a comment or a share is worth $1.

A little over a year ago, I traveled to The Dominican Republic with my extended family and built a house for a family in need. It was a life-changing experience, and by FAR my favorite DIY project (see more about that experience HERE).

Once home, I wanted to do more and realized there are needs right here in the United States. People are going hungry and that’s just not okay. My husband joined the board of Second Harvest Food Bank, and we are both so impressed with the organization and its passion to stop hunger. We believe in what Second Harvest does and want to help them serve others!

The hardworking staff at Second Harvest Food Bank is amazing. Everyone we have come in contact with – from those in the front office to those in the warehouse – is wonderful. They’re kind, patient (the staff took the time to explain to my kids how the food bank helped people), and passionate about their cause – stopping hunger.

As much as I LOVE sharing DIY home decor ideas, there is more to life than pretty things. We were put on this earth to serve others, and Second Harvest Food Bank does just that. I want to use my blog as a platform to serve and love others (and thanks to Balsam Hill, I’m to do this by raising awareness for Second Harvest Food Bank and Feeding America). My husband and I will continue to donate our time and resources to Second Harvest Food Bank and want to involve our kids in the charity. It will be a family thing!

I will be the first to admit that is easy to get caught up in our own lives and forget there’s a (needy) world beyond mine! We all want to make the world a better place, so let’s do that! You can make a difference and giving back is good for everyone – both the recipients and givers!

Second Harvest Food Bank of Central Indiana is part of Feeding America – a US Hunger Relief Organization. By going to their website, you can search for a food bank near you to donate your time and/or money!

Thanks for joining me on this Giving Back with Balsom Hill.

Go create something!

Are you new to my blog? Go HERE to see my home tour and HERE to shop for items I use in our home.

Find me on Facebook | Instagram | Twitter Pinterest  

Seasonal Decor

Landscaping Tips

Today I’m sharing some Landscaping Tips.

We have been busy prepping our home and landscaping for the holiday weekend. Toro’s all new PowerPlex™ 40V Max* Lithium Ion Products made the project a little easier.

Landscaping Tips for the 4th

Our home is twenty years old, and our landscaping is starting to show its age.  Although we will eventually need to replace much of it, we are trying to work with what we have for now which involves lots of trimming. I began by trimming the hedges and bushes with Toro’s Power Plex hedge trimmer.  I have always used an electric trimmer and dealt with a cord that was always too short and would miss spots.  However, Toro’s Power Plex Hedge Trimmer is battery-powered, and it reached wherever I needed to go!

The 24-inch trimmer is sturdy and has a 90° rotating handle.  It also has reduced vibrations because of a dual-action cutting system, and the battery allows up to 60 minutes of run time.  I was able to trim all of the bushes and hedges in my front yard using one battery!

We mulched this past spring, and the last thing I wanted was a bunch of clippings messing up our pretty mulch.  My husband suggested I lay down some old sheets to catch the trimmings, and it worked amazingly well.

There was no raking (and loss of mulch).  I just rolled up the sheets with the clippings and dumped them.  It was so easy!

After I had all the bushes and hedges trimmed, we began working on our overgrown trees.

We have several smaller ornamental trees around the house that needed trimming as well as a larger cluster of trees off the side of our home that had fairly low hanging limbs.

I put my husband to work with the Toro Power Plex Chainsaw, and I think he had a little too much fun cutting down branches.

The chainsaw (like the hedge trimmer) is battery-powered, and it is amazingly powerful!

The Toro chainsaw has a no-pull easy start – it runs on just the push of a button.  It ran only using one battery the entire time my husband was trimming trees, and it has tool-free chain tensioning (adjust by turning knobs with fingers).  It also has reduced kickback – chain, bar tip indicator, chain brake, and metal bucking teeth.

We had a pretty massive pile of limbs and branches by the time our tree trimming was complete.

Our town picks up landscaping clippings for free – we just have to set them out on the road.

Besides having well-groomed landscaping, we also ended up with a nice little pile of logs for our firepit.

The next evening we had the most gorgeous rainbow appear over our newly manicured landscaping:

We are ready for the holiday weekend thanks to Toro!

What are your favorite Landscaping Tips?

Go create something!

Are you new to my blog? Go HERE to see my home tour and HERE to shop for items I use in our home.

Find me on Facebook | Instagram | Twitter Pinterest

*This post is a sponsored post by Toro. I take pride in reviewing only products that fit my brand and will be beneficial to my readers. And while this post is sponsored, all the opinions are my own.

Home

LEVITON Smart Lighting

There is a fun new way to wake up your kids in the morning, and it involves just the touch of a button thanks to LEVITON Smart Lighting.

A few years ago, I participated in Leviton’s Renu Challenge – a competition between several bloggers.  We were asked to design a space using Leviton’s colorful light switches and outlets. After using their switches and outlets in the boys’ bathroom makeover (see all the details HERE), I ordered more for our master bathroom remodel. When Leviton recently reached out to see if I was interested in partnering and testing out their new Decora Smart line with wi-fi technology, I was excited since I was already a fan of their products.

The Decora Smart light switches are simple and classy and come in either white or light almond.  You can turn on the lights using the switch or by using the “My Leviton” app.

I have the app on my phone (it is right above my mail app in the photo above), and it works so well!

I replaced all our bedroom light switches with the Decora Smart switches.  Our man cave (which is actually our family hang-out space) is also a smart light switch.

Everyone in our family sleeps with fans, and all of our fans are now hooked up to the plug-in outlets which also have the wi-fi technology the switches have.

Leviton’s plug-in outlets are amazing.  They are easy to install (just plug them in), and almost anything can be turned on or off with just the touch of a button on the app.  If we drank coffee, I would have my coffee maker plugged into the smart outlet.  The plug-in outlets can be programmed to turn on (or off) at the same time every day!

This is where my life just got a little easier.  Although we are on our summer schedule right now (which means the kids can sleep in longer), I will be ready for the early school mornings thanks to Leviton.  I will have a school schedule on my app which will turn off their fans and turn on their lights at the same time every morning!

My dad replaced all my old switches with the new Leviton switches.

Once the switches (and plug-ins) are installed, go to the app.

The app walks you through programming, and it is really easy!

Now I can wake up my kids without even running upstairs.  I set the schedule on the app to turn on their lights (and turn off their fans) every morning.

The lights can be turned off with a touch of a button for family movie night. I made a little video to show just how easy the My Leviton app is to turn on and off the lights.  

Watch it here: 


There are so many options for the Decora Smart wi-fi light switches and plug-ins.  How would you use them in your home?

Go create something!

Are you new to my blog?

Go HERE to see my home tour and HERE to shop for items I use in our home.

Find me on Facebook | Instagram | Twitter Pinterest *This post is a sponsored post by LEVITON. I take pride in reviewing only products that fit my brand and will be beneficial to my readers. And while this post is sponsored, all the opinions are my own.  

We're On Instagram
I love this chair and side table from @zgallerie that I decided to try it in my office/library. I’m not sure where I love it more - here or my bedroom! It adds so much elegance and charm to the spaces. Use my code SY5 at checkout for 5% off your entire purchase.
Shop My Favorites by commenting LINKS or through the link in my bio #ZGallerie #MyZgallerie #Zgallerie #ModernLuxury #LuxuryInterior

...

32 11
We waited 13 years for this - and our house looks happier with her glow-up!

We went from a drafty single door (with a 90s glass inlay I poorly covered up) to double doors that allows in more light and feel right for our home.

What do you think?

...

90 38
My patio is all ready for warmer weather thanks to the new launch with @livabliss + @galeyalix! I’m LOVING the checkerboard outdoor rug. Comment “PATIO” and I’ll send you the links! #Livabliss #LivablissHome #GaleyALixxLivabliss #HomeDecor #Rugs

...

41 16
I’ve been slowly refreshing our bedroom and recently added this beautiful swivel chair and side table from @zgallerie! They add the perfect elegant modern touch to the space. Use my code SY5 at checkout for 5% off your entire purchase. Shop My Favorites by commenting “LINKS” or through the link in my bio. 
#gifted #ZGallerie #MyZgallerie #Zgallerie #ModernLuxury

...

21 16
What started as a leak turned into my dream bathroom ✨ I partnered with @wayfair and found everything - from checkerboard tile to the vanities, mirrors, and faucets. Comment “LINK” and I’ll send you all my favorite finds! *Shower glass coming soon! #ad #wayfaircreator #homereno

...

70 34
@wayfair is helping us turn a disaster into something beautiful ✨A leak from our upstairs shower led to a full remodel, and I can’t wait to show you the AFTER! Bathroom remodel reveal coming soon. Comment “LINKS” and I’ll send all my Wayfair favorites! #ad #wayfaircreator #wayfair #homereno

...

48 15
*TWO THINGS that make wallpaper removal easy* Wallpaper has come a long way and there’s no need to be scared of it anymore! Before I hang wallpaper, I size the walls and often use pre-pasted SureStrip wallpaper that is activated with water! Comment WALLPAPER for easy to remove wallpaper links!

...

41 29
What a difference pattern can make in a space! 

Are you ready to try wallpaper in your home?

...

131 46
2016 didn’t seem that long ago until I dug through my blog for old home photos. 😳

...

112 13
Dreaming of spring days while winter does its thing.

...

63 14