I recently discovered the most fun Colorful Fairy Tale Art by Hal the Gal (Hallie M. Bertling). Hallie loves bringing favorite classic stories to life through in-depth research, bright colors, and a great pair of shoes – allowing readers to step into the adventures for themselves!
There are definite perks to having everyone at home right now – I’ve had my kids pose for photoshoots several times this week!
Hallie gifted me with two limited edition reproductions of “Wendy loves Peter Pan” and “Off to Neverland.” I was asked to share the prints on Instagram, but I love them so much I wanted to share here on the blog as well!
Hallie shares the gouache painting process on her website, and it is AMAZING how much thought, research, and time is put into each painting. You can see more on that process HERE.
Here’s a close-up of “Wendy loves Peter Pan.”
And a close-up of “Off to Neverland.” Both can be purchased framed or unframed HERE.
Hallie has an entire faerie tale feet series that you can find HERE which includes everything from The Wizard of Oz to The Secret Garden to Anne of Green Gables.
She also has has prints, stickers, journals and pins of her artwork which also includes a Harry Potter series.
Hallie has created something for everyone, and her art is timeless and will be loved by all – young AND old!
I’ve teamed up with Hallie on Instagram for a giveaway. You can enter here on Instagram beginning March 19th.
Hallie has created artwork that is unique and fun. You can’t help but look at one of her pieces and instantly be transformed into the story. Take a look at all she has in her shop HERE.
Go create something!
Are you new to my blog? Go HERE to see my home tour and HERE to shop for items I use in our home.
Yesterday I pulled out our Easter decor to brighten our home while we are all stuck at home, and I rounded up some Amazon Easter Decor so you can add fun to your space – without leaving the house!
We all need a reason to smile right now, and this Easter decor roundup will do just that. It is cheery and whimsical.
I love hand-painted eggs, and Amazon has SO many options (perfect for any decor style). However, they are so pretty that you may just want to leave them out year-round.
An easy and inexpensive way to add some holiday touches to your home is through seasonal dish towels like this bunny dish towel (and it comes in a 2-pack).
This glass cake stand is a beautiful way to add some spring touches to your kitchen, but it’s also a piece that you can use year-round! It is perfect for special events, and I have one I use for everything from appetizers to cookies.
This cute throw pillow will make you smile with its fuzzy little chicks. It would be perfect all year long in a kid’s room or playroom.
I love using photo galleries in our home, and I’m sharing several photo wall ideas for your home. Most of the ideas are fairly inexpensive and easy to create!
Old Photo Wall
I recently added a photo wall gallery to our upstairs hallway, and you can see more on that makeoverHERE. This gallery is inexpensive and fairly easy to recreate. Here’s what you’ll need:
IKEA Frames – These frames are only $12.99, and hold photos that are 16×20. They also come pre-matted!
Photos – I scanned some old family photos and sent them to our local office supply store to be printed. They printed on normal paper, so the quality isn’t great (but the old photos aren’t great quality to begin with).
And that is it! This is by far one of my less expensive gallery walls, and I love the nod to our heritage.
Framed Silhouettes
I know technically this isn’t a photo wall, but it is made from photographs so that counts, right? Silhouettes are such a fun way to decorate the walls, and these silhouettes are SO easy to create (they’re also very inexpensive).
Here’s what you’ll need:
Oval frame – I found mine at Walmart for around $6, but they were black and I painted them gold. If you prefer not to paint your own, here are some gold oval frames.
Digital profile photo – I used my phone to take the photos and emailed them to myself.
This photo wall near our kitchen is the my most asked about photo gallery. This one was SO easy, but it is much more expensive. BUT, the photos came frames AND matted and I just had to hang them. You can see more details HERE.
Is the above option out of your prices range? Check out this other options that is very similar in look!
For this wall, I inexpensive frames and had my photos printed online. The reason I ended up replacing was because the frames are inexpensive and did eventually warp AND I love gold!
Here’s what you’ll need:
IKEA frames – These fit 16×20 images but do warp easily. Try hanging by two nails on the far ends to help avoid this.
Photos – I used an online photo printer for mine.
I created a post about this wall several years ago, and you can read all the details HERE.
Go create something!
Are you new to my blog? Go HERE to see my home tour and HERE to shop for items I use in our home.
Get the Look: Dining Room Decor is the third in the Get the Look series. You can also get the sources for our kitchen and living room. I try to share affordable pieces because I love to have a high-end look without spending too much.
Our table was custom made by a friend, but you can find a similar dining room table HERE. It is simple, elegant, and should stand the test of time.
Our chandelier was my grandparents’ (my grandpa gifted my grandma it on an anniversary, and you can read more about it HERE). Unfortunately I couldn’t find one exactly like it (I’m sure there are some sitting in antique shots). However, I love this modern brass chandelier.
I found these brass table lamps, and it was love at first site. They are traditional with a modern edge and the perfect height for a buffet.
This brass footed bowl adds elegance to any space and the price is perfect. I filled mine with faux limes.
The portrait artwork is a digital download, and it is a great piece. It completely made my space. You can have it printed as photo or canvas.
These windsor dining chairs come in a variety of colors and work with all design styles. They come in pairs and are affordable.
A little over two years ago, Steve and I remodeled our kitchen. I am often asked to share our DIY kitchen remodel cost, so today I’m breaking it all down.
We hated the kitchen layout from the day we moved in. The space was closed in, you couldn’t see the living room from the kitchen, and the appliances were outdated and poorly placed.
Knowing how expensive and time consuming a kitchen remodel would be, I painted the cabinets and changed out the hardware which bought us several years of being okay with the space. You can see why I painted the cabinets TWICE here.
I have attended Haven Conference for several years, and in 2017 I won a competition with The Home Depot. I had the amazing opportunity to partner with them on the remodel. Although I priced them out for you, we did not have to pay for the appliances or the countertops thanks to The Home Depot.
In complete transparency, I also partnered with Custom Service Hardware on the Cabinets, Hickory Hardware on the hardware, Delta Faucet on the faucet and pot filler, and Blanco on the sink. Keep in mind this blog is my full time job which is why I am able to partner with companies. So for us, the cost of the kitchen included all the things that snowball after a remodel – we had to hire a drywaller for our shortened wall and to patch the ceilings where the wall once extended. We also had to paint the ceilings throughout the entire first floor. Because we changed the layout of the kitchen, we had to patch the floors and ended up refinishing/staining the entire first floor as well.
DIY Kitchen Remodel Cost
Cost of Labor: $0
Cost of Supplies: $11,465
Quartz Countertops: $4685
RTA Cabinets: $4560
Farmhouse Sink: $720
Kitchen Faucet: $375
Pot Filler: $450
Cabinet Hardware: $425
Miscellaneous Plumbing and Electric Supplies: $250
TOTAL: $11,215
Cost of Appliances: $5,200
Oven: $2200
Refrigerator: $2000
Dishwasher: $800
Microwave: $200
TOTAL: $5,200
Total Cost of Kitchen Remodel: $16,465
Now, as I mentioned before, we had a snowball effect. Because of our remodel we had to patch and paint the ceilings throughout the entire first floor. We also had to patch parts of the kitchen flooring and as a result refinish all the wood floors on the first floor. Keep in mind that with any remodel, additional costs like these will come up.
Cost of Flooring: $4,200
Since we changed the layout of the kitchen, we had some areas that needed patched, and while we were at it wanted to refinish the floors and have them stained a different color. This cost actually included our kitchen, kitchen nook, family room and dining room.
Drywall and ceilings: $3,900
We opened up a wall in our kitchen and took out a little coat closet. As a result, we needed some drywall work and the ceilings needed patched as well. We ended up repainting the ceilings in the kitchen, kitchen nook, living room, library and dining room.
Total Cost of Kitchen Remodel (including our unique additional costs): $24,515
I was curious what the average kitchen remodel costs, and I obviously found there is a huge range of costs. However, I feel pretty good about our kitchen knowing that the average upscale kitchen remodel (although I would consider ours in the mid-level range) is over $80,000!
Obviously the fact that we did most of the work ourselves helped save a lot of money. We recruited friends for the demo and throughout the kitchen remodel.
As I mentioned earlier, we brought in professionals for the projects that were beyond our expertise.
For nine weeks, we spent every spare moment and lost lots of sleep working on the kitchen. However, two years later, we still love our kitchen and feel and extra since of pride knowing we created so much of it!
I started this “get the look” series earlier this year, and this week is Get the Look: Living Room Decor. It is a fun, moody, elegant look, and I am sharing how to get the same look in your home.
The paint color I used in the family room is Valspar’s Night View. It is my favorite deep navy paint color. It is absolutely gorgeous and makes for the most perfect sophisticated moody space.
I love using navy in our home (although green is quickly rising to the top as I used it on my DIY paneled wall and dining room buffet). I have tested out a lot of navy colors over the years and wanted to share what I feel are The Best Navy Paint Colors.
THE BEST NAVY PAINT COLORS:
Night View by Valspar
Night View is my favorite navy paint color. It is sophisticated, not too blue, and adds the perfect moodiness to any space. I used it in our living room, and it completely transformed the space.
If you want to see the tutorial for my DIY elegant wall paneling, GO HERE!
Dark Denim by Behr
Dark Denim by Behr is a beautiful true, rich navy. I used it in our half bath but only on half the wall since there is no natural lighting in the space.
Midnight Show by Behr
If you are looking for a more blue, playful navy, then Midnight Show is your color. It is brighter than the others, and I used it in my boys’ room on their accent wall.
I share the full (easy) tutorial for the board and batten treatment in there room, and you can GO HERE to read all about it!
Hale Navy by Benjamin Moore
Hale Navy by Benjamin Moore is a fan favorite. It is a beautiful rich navy. I used it several years ago when I decorated a space for the Indianapolis Home Show (see more on that HERE).
This photo doesn’t do the color justice thanks to fluorescent lighting.
I would highly recommend these four navy paint colors. They are all gorgeous. Anyone have any other favorite navy paint colors? Please share in the comments!
Go create something!
Are you new to my blog? Go HERE to see my home tour and HERE to shop for items I use in our home.
This striped wallpaper would be beautiful in any home. Although it is subtle it would add some pattern (and a little color) to the space.
This micro botanical wallpaper is so pretty, and how can you not love the navy? It would look amazing in a half bath.
PILLOW
Navy and white are perfect for coastal decor, and this navy and white sham has a whimsical feel to it. Liven up your white bedding with this pillow (or two).
BISTRO CHAIR
I have bistro chairs in our kitchen nook, and I LOVE them. They are easy to care for, and this bistro stool is gorgeous.
POUCHES
Pouches are a great way to stay organized, and these pretty striped pouches will help you do just that.
PENDANT
This woven pendant is a single light, so it won’t add a lot of lighting to a space. However, it will add a statement, so if that is what you’re looking for, this is the perfect lighting piece.
MIRROR
It was love at first sight for me with this gold mirror. I don’t own it but would LOVE to. It’s a gorgeous, timeless piece.
Umbrella
This beach umbrella is just fun. I don’t have any reason to own a beach umbrella, but I think it would spice up any patio area – even here in the midwest!
What is your favorite item from today’s roundup – leave a comment and let me know!
Are you new to my blog? Go HERE to see my home tour and HERE to shop for items I use in our home.
We have used RTA (ready-to-assemble) cabinets in our kitchen, and our home office. There are definite RTA Cabinet Pros and Cons, and I wanted to share a full review so you can help decide if this is the route you want to take for your next remodel.
RTA Cabinet Pros and Cons
PROS
Cost-Efficient: RTA cabinets come in a variety of options, but since you do the assembly, the cost is lower than traditional cabinets.
Quality Construction: Most RTA cabinets are solid wood with dovetail drawers. Mine are also soft-close, and the construction is very solid.
Customer Service: I have had two very separate experience with this. My first experience (with our kitchen cabinets) was very good – great customer service, video tutorials, and printed instructions.
Customization: Although they’re not 100% custom, RTA cabinets provide several options – color, cabinet style, and trim.
Easier/Quicker to Ship: RTA cabinets take up much less space than pre-assembled cabinets and can ship as soon as the order is taken.
CONS
Customer Service: Although we had a fantastic experience with this on our kitchen remodel, we have a very different experience with our office cabinets. There were no instructions and no video tutorials to be found. Thank goodness this wasn’t our first time with RTA cabinets.
Time: Building RTA cabinets takes time. We averaged around 1 hour for each cabinets and our kitchen has 20 cabinet units (although many RTA sources will claim 30 minute assembly).
No Guarantees: Most RTA cabinets do not come with guarantees since you do the assembly.
Added Expense: In the rare case that assembly is to difficult, you may need to hire a professional which adds to the cost.
It is overwhelming at first when you see your entire kitchen in a group of small, flat boxes. Steve and I spent all our nights and weekends assembling cabinets in the garage (notice the tv we brought out to help make the process a little less tedious).
For us, the assembly time was worth the savings, and we actually enjoy taking on projects.
Our kitchen cabinet turned our gorgeous, and we are so pleased – two years later. Our only frustration is some of the drawers don’t close all the way, and some of our drawer fronts are just a little off (due to our assembly). You can see more on our RTA kitchen cabinets HERE.
TIPS
Order sample doors. It is very helpful.
Wait for a sale (and if you find a great sale, you can buy your cabinets ahead of time and store them easily since they don’t take up much room).
It may be worth to pay a little more for cabinets from a reputable company. Customer service will be better and as a result, the building process will be much smoother for you.
Use wood glue for added reinforcement.
Use brackets for additional support. Some cabinets came with the L brackets and some didn’t, but we bought some and added them to all.
Use a cordless screwdriver. You don’t want to risk stripping the screws, so opt for a cordless screwdriver over an electric drill.
Watch cabinet assembly videos. Although some RTA cabinets come with detailed instructions, not all do. Search for cabinet assembly videos for additional help.
Assemble on a flat surface. Don’t try to assemble cabinets on carpet – it is important that the cabinets are square.
Assemble similar cabinets at once. Save time by assembling similar cabinets together. Assemble all the top cabinets and then the base cabinets. Save the harder cabinets (like drawer and lazy Susans) for last as you build up your expertise and confidence.
The first order contained the wrong cabinets, and we had to ship them back. When we received our cabinets, there were no instructions to be found. It was a frustrating assembly process. However, once assembled, the quality was great.
Watch this video for a little more info on RTA cabinets:
Hopefully, this post helps you decided whether RTA cabinets are right for you. Overall, we’re pleased with the quality and would recommend RTA cabinets but encourage buying them from a reputable, helpful company.
Are you new to my blog? Go HERE to see my home tour and HERE to shop for items I use in our home.
I love velvet furniture (it adds sophistication and texture to any space), and I rounded up several pieces of Affordable Velvet Furniture. Many of these pieces come in a variety of colors.
Want to add velvet to your space but can’t splurge on furniture? Try these inexpensive velvet pillow covers that come in a variety of colors!
I added a green velvet accent chair to our library, and besides being incredibly comfortable, it is a gorgeous addition to the space.
I also added some velvet to our home office.
This little tufted velvet loveseat is my favorite. It adds so much fun to the space, and everyone (aka: my kids) want to hang out in our office because of it.
If you haven’t added velvet to your home yet, where would you love to see some?
Are you new to my blog? Go HERE to see my home tour and HERE to shop for items I use in our home.
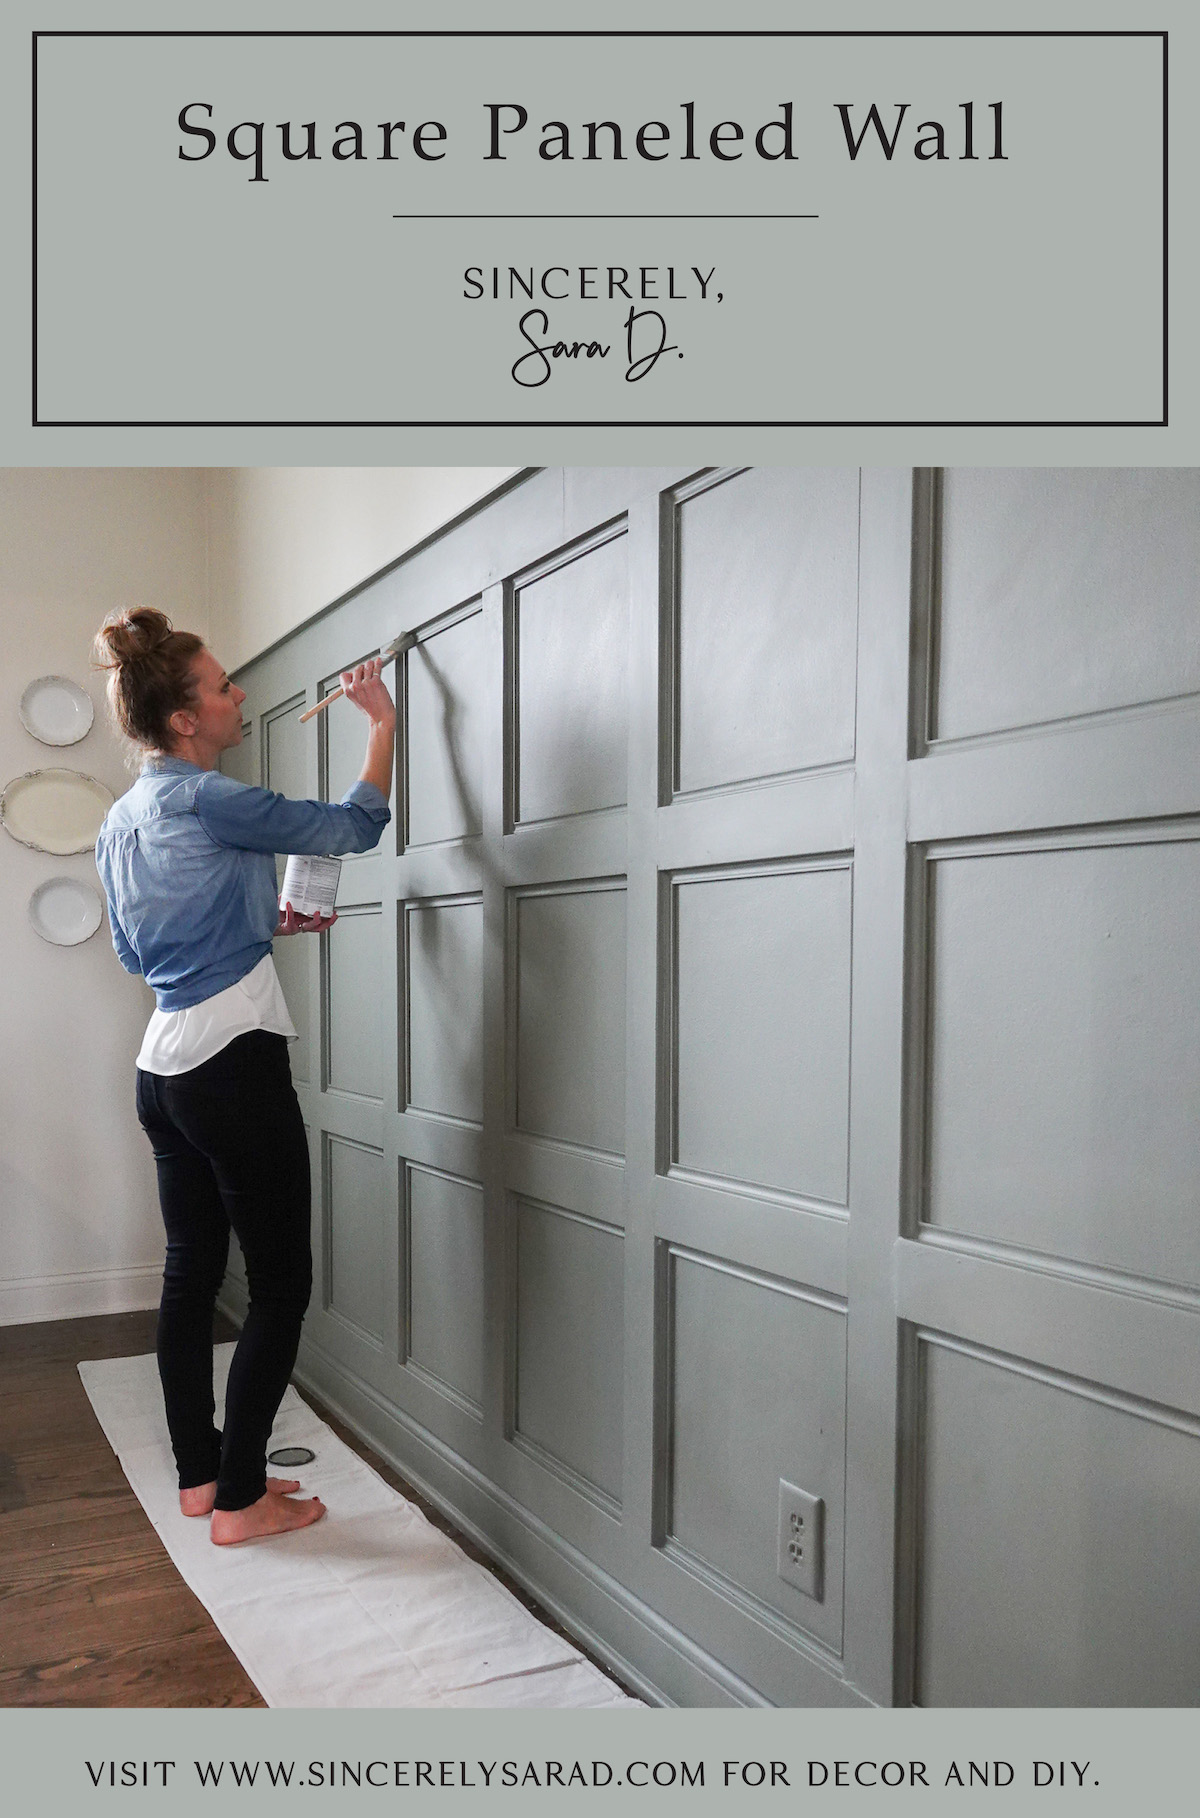
About five years ago, we added a square paneled wall treatment to our dining room, and you can see that tutorial HERE. It was the first of many wall treatments we have done over the years, and we have really loved it.
It was a medium gray for the first few years of its life.
And then (just like I always do), I decided to switch it up and wanted a change. I painted the square paneled wall treatment off-white (the same color as the trim in the room) to brighten up the dining room.
I have always liked the wall treatment but felt like something was missing – like it wasn’t quite elegant enough for the space. It needed a little more detail, so I decided to fix that and added some additional smaller molding to the inside of each square. It’s all in the details, right?
This wasn’t a hard addition, but it was time-consuming cutting that 45-degree angle on each of those interior pieces of molding. Although we tried, those square are not equal sizes. Even being off an eighth of an inch made a difference on this project and meant I couldn’t cut mitered corners in batches and became a little bit of a jigsaw puzzle.
On a project like this, I prefer brad nails over wood glue and/or construction adhesive, and wood filler and caulk will be your best friends to hide the gaps and nail holes.
Again, if you are looking for the original tutorial for this panel wainscoting, you can go HERE to see how we originally created this accent wall (pre-additional wall molding). We used MDF instead of real wood since we were painting it.
Once I had the small molding installed, I painted the entire wall treatment including the baseboard in a greenish-gray (I know – back to the darker colored wall again). I wanted a different color, and it is Benjamin Moore in Storm Cloud Gray. It is even more beautiful in person.
Want even more feature wall ideas? They add texture and a beautiful focal point to any wall space.
I have created several accent walls in our home (everything from wainscoting to board and batten to shiplap to plank walls), and you can see all the details on those HERE. No contractor is required for these DIY wall treatments which add so much visual interest!
*UPDATE* You guys will think I’m crazy, but we replaced this wall treatment (after almost 6 years) with a thin paneled wall treatment that goes to the ceiling and all around the room. You can see all the details HERE. We tried to figure out a way to keep the square paneled wall, but we couldn’t make it work in the rest of the room since it was solely planned as an accent wall.
Tag me on Instagram or Facebook or email me pictures of your wall treatments! I always love seeing what you’re up to.
Go create something!
Are you new to my blog? Go HERE to see my home tour and HERE to shop for items I use in our home.
I love visiting and touring other people’s homes, so I thought it would be fun to do various city home tours. Today’s home tours are local here in Indianapolis, and it is two mini home tours with some local DIY bloggers.
You may already know them, but if you don’t, let me introduce so you can be inspired by their decor and DIY skills!
Angela is a dear friend of mine, and we’ve collaborated on several projects together and even owned a business together (for a short while). When I first became interested in blogging, I reached out to Angela and she graciously met me and gave me some great advice.
Angela’s style is comfortable, charming, and elegant.
Here is an image of her living room.
Angela knows how to use power tools, and she created this dutch door! You can see the DIY dutch door tutorial HERE.
Angela also recently remodeled her kitchen, and she did it SOLO! You can see more on that DIY kitchen remodel HERE.
Sarah has been blogging a long time, so she has a stockpile of amazing DIY projects. She’s not afraid of powertools and shows simple ways to add value to your home.
Sarah’s style is inviting and traditional with modern touches.
I am in love with the pendants in her kitchen. Go HERE to see how Sarah added character to her kitchen.
Sarah decorates with a lot of navy, and her family room is so inviting. I love her pillow pattern play, and you can see a little friend hanging out in the space.
Sarah pulls that same color palette into her dining room, and it works just as well in that space.
#DutchBoyPartner This bathroom leaned a little cool, so I warmed it up with Sandstone Tint by @dutchboypaints and it completely changed the look of the space.
No major reno. No new cabinets. Just paint.
Save this if you’ve been wanting to try a DIY project
#DutchBoyPartner This bathroom leaned a little cool, so I warmed it up with Sandstone Tint by @dutchboypaints and it completely changed the look of the space.
No major reno. No new cabinets. Just paint.
Save this if you’ve been wanting to try a DIY project...
56
32
I created this reel two years ago, but since the fields behind our house rotate between corn and beans… it’s a corn summer again. 🌽
The older I get, the more I appreciate these ordinary little rhythms of life. Watching the field change through the seasons has quietly become one of my favorite parts of home.
I created this reel two years ago, but since the fields behind our house rotate between corn and beans… it’s a corn summer again. 🌽
The older I get, the more I appreciate these ordinary little rhythms of life. Watching the field change through the seasons has quietly become one of my favorite parts of home....
52
8
I love this chair and side table from @zgallerie that I decided to try it in my office/library. I’m not sure where I love it more - here or my bedroom! It adds so much elegance and charm to the spaces. Use my code SY5 at checkout for 5% off your entire purchase. Shop My Favorites by commenting LINKS or through the link in my bio #ZGallerie #MyZgallerie #Zgallerie #ModernLuxury #LuxuryInterior
I love this chair and side table from @zgallerie that I decided to try it in my office/library. I’m not sure where I love it more - here or my bedroom! It adds so much elegance and charm to the spaces. Use my code SY5 at checkout for 5% off your entire purchase. Shop My Favorites by commenting LINKS or through the link in my bio #ZGallerie #MyZgallerie #Zgallerie #ModernLuxury #LuxuryInterior...
38
11
We waited 13 years for this - and our house looks happier with her glow-up!
We went from a drafty single door (with a 90s glass inlay I poorly covered up) to double doors that allows in more light and feel right for our home.
My patio is all ready for warmer weather thanks to the new launch with @livabliss + @galeyalix! I’m LOVING the checkerboard outdoor rug. Comment “PATIO” and I’ll send you the links! #Livabliss #LivablissHome #GaleyALixxLivabliss #HomeDecor #Rugs
My patio is all ready for warmer weather thanks to the new launch with @livabliss + @galeyalix! I’m LOVING the checkerboard outdoor rug. Comment “PATIO” and I’ll send you the links! #Livabliss #LivablissHome #GaleyALixxLivabliss #HomeDecor #Rugs...
43
16
I’ve been slowly refreshing our bedroom and recently added this beautiful swivel chair and side table from @zgallerie! They add the perfect elegant modern touch to the space. Use my code SY5 at checkout for 5% off your entire purchase. Shop My Favorites by commenting “LINKS” or through the link in my bio. #gifted #ZGallerie #MyZgallerie #Zgallerie #ModernLuxury
I’ve been slowly refreshing our bedroom and recently added this beautiful swivel chair and side table from @zgallerie! They add the perfect elegant modern touch to the space. Use my code SY5 at checkout for 5% off your entire purchase. Shop My Favorites by commenting “LINKS” or through the link in my bio. #gifted #ZGallerie #MyZgallerie #Zgallerie #ModernLuxury...
23
16
Bathroom Reveal. 💫 Last spring, our upstairs shower leaked into our living room below. We were put on our contractor’s list - and the wait was worth it! We now have a gorgeous bathroom with checkerboard floors - a dream of mine since I first saw my husband’s granny’s farmhouse bathroom with checkerboard floors (years and years ago)! The shower glass is coming soon. Comment LINKS, and I’ll send you the blog post and bathroom product links.
Bathroom Reveal. 💫 Last spring, our upstairs shower leaked into our living room below. We were put on our contractor’s list - and the wait was worth it! We now have a gorgeous bathroom with checkerboard floors - a dream of mine since I first saw my husband’s granny’s farmhouse bathroom with checkerboard floors (years and years ago)! The shower glass is coming soon. Comment LINKS, and I’ll send you the blog post and bathroom product links....
120
26
What started as a leak turned into my dream bathroom ✨ I partnered with @wayfair and found everything - from checkerboard tile to the vanities, mirrors, and faucets. Comment “LINK” and I’ll send you all my favorite finds! *Shower glass coming soon! #ad #wayfaircreator #homereno
What started as a leak turned into my dream bathroom ✨ I partnered with @wayfair and found everything - from checkerboard tile to the vanities, mirrors, and faucets. Comment “LINK” and I’ll send you all my favorite finds! *Shower glass coming soon! #ad #wayfaircreator #homereno...
74
34
@wayfair is helping us turn a disaster into something beautiful ✨A leak from our upstairs shower led to a full remodel, and I can’t wait to show you the AFTER! Bathroom remodel reveal coming soon. Comment “LINKS” and I’ll send all my Wayfair favorites! #ad #wayfaircreator #wayfair #homereno
@wayfair is helping us turn a disaster into something beautiful ✨A leak from our upstairs shower led to a full remodel, and I can’t wait to show you the AFTER! Bathroom remodel reveal coming soon. Comment “LINKS” and I’ll send all my Wayfair favorites! #ad #wayfaircreator #wayfair #homereno...
50
15
I used to paint everything. I literally taught chalk paint classes and wrote an ebook about it.
So I don’t blame whoever painted these, but every room needs a little natural wood.
I used to paint everything. I literally taught chalk paint classes and wrote an ebook about it.
So I don’t blame whoever painted these, but every room needs a little natural wood....
159
26
*TWO THINGS that make wallpaper removal easy* Wallpaper has come a long way and there’s no need to be scared of it anymore! Before I hang wallpaper, I size the walls and often use pre-pasted SureStrip wallpaper that is activated with water! Comment WALLPAPER for easy to remove wallpaper links!
*TWO THINGS that make wallpaper removal easy* Wallpaper has come a long way and there’s no need to be scared of it anymore! Before I hang wallpaper, I size the walls and often use pre-pasted SureStrip wallpaper that is activated with water! Comment WALLPAPER for easy to remove wallpaper links!...
#DutchBoyPartner This bathroom leaned a little cool, so I warmed it up with Sandstone Tint by @dutchboypaints and it completely changed the look of the space.
No major reno. No new cabinets. Just paint.
Save this if you’ve been wanting to try a DIY project
#DutchBoyPartner This bathroom leaned a little cool, so I warmed it up with Sandstone Tint by @dutchboypaints and it completely changed the look of the space.
No major reno. No new cabinets. Just paint.
Save this if you’ve been wanting to try a DIY project...
56
32
I created this reel two years ago, but since the fields behind our house rotate between corn and beans… it’s a corn summer again. 🌽
The older I get, the more I appreciate these ordinary little rhythms of life. Watching the field change through the seasons has quietly become one of my favorite parts of home.
I created this reel two years ago, but since the fields behind our house rotate between corn and beans… it’s a corn summer again. 🌽
The older I get, the more I appreciate these ordinary little rhythms of life. Watching the field change through the seasons has quietly become one of my favorite parts of home....
52
8
I love this chair and side table from @zgallerie that I decided to try it in my office/library. I’m not sure where I love it more - here or my bedroom! It adds so much elegance and charm to the spaces. Use my code SY5 at checkout for 5% off your entire purchase. Shop My Favorites by commenting LINKS or through the link in my bio #ZGallerie #MyZgallerie #Zgallerie #ModernLuxury #LuxuryInterior
I love this chair and side table from @zgallerie that I decided to try it in my office/library. I’m not sure where I love it more - here or my bedroom! It adds so much elegance and charm to the spaces. Use my code SY5 at checkout for 5% off your entire purchase. Shop My Favorites by commenting LINKS or through the link in my bio #ZGallerie #MyZgallerie #Zgallerie #ModernLuxury #LuxuryInterior...
38
11
We waited 13 years for this - and our house looks happier with her glow-up!
We went from a drafty single door (with a 90s glass inlay I poorly covered up) to double doors that allows in more light and feel right for our home.
My patio is all ready for warmer weather thanks to the new launch with @livabliss + @galeyalix! I’m LOVING the checkerboard outdoor rug. Comment “PATIO” and I’ll send you the links! #Livabliss #LivablissHome #GaleyALixxLivabliss #HomeDecor #Rugs
My patio is all ready for warmer weather thanks to the new launch with @livabliss + @galeyalix! I’m LOVING the checkerboard outdoor rug. Comment “PATIO” and I’ll send you the links! #Livabliss #LivablissHome #GaleyALixxLivabliss #HomeDecor #Rugs...
43
16
I’ve been slowly refreshing our bedroom and recently added this beautiful swivel chair and side table from @zgallerie! They add the perfect elegant modern touch to the space. Use my code SY5 at checkout for 5% off your entire purchase. Shop My Favorites by commenting “LINKS” or through the link in my bio. #gifted #ZGallerie #MyZgallerie #Zgallerie #ModernLuxury
I’ve been slowly refreshing our bedroom and recently added this beautiful swivel chair and side table from @zgallerie! They add the perfect elegant modern touch to the space. Use my code SY5 at checkout for 5% off your entire purchase. Shop My Favorites by commenting “LINKS” or through the link in my bio. #gifted #ZGallerie #MyZgallerie #Zgallerie #ModernLuxury...
23
16
Bathroom Reveal. 💫 Last spring, our upstairs shower leaked into our living room below. We were put on our contractor’s list - and the wait was worth it! We now have a gorgeous bathroom with checkerboard floors - a dream of mine since I first saw my husband’s granny’s farmhouse bathroom with checkerboard floors (years and years ago)! The shower glass is coming soon. Comment LINKS, and I’ll send you the blog post and bathroom product links.
Bathroom Reveal. 💫 Last spring, our upstairs shower leaked into our living room below. We were put on our contractor’s list - and the wait was worth it! We now have a gorgeous bathroom with checkerboard floors - a dream of mine since I first saw my husband’s granny’s farmhouse bathroom with checkerboard floors (years and years ago)! The shower glass is coming soon. Comment LINKS, and I’ll send you the blog post and bathroom product links....
120
26
What started as a leak turned into my dream bathroom ✨ I partnered with @wayfair and found everything - from checkerboard tile to the vanities, mirrors, and faucets. Comment “LINK” and I’ll send you all my favorite finds! *Shower glass coming soon! #ad #wayfaircreator #homereno
What started as a leak turned into my dream bathroom ✨ I partnered with @wayfair and found everything - from checkerboard tile to the vanities, mirrors, and faucets. Comment “LINK” and I’ll send you all my favorite finds! *Shower glass coming soon! #ad #wayfaircreator #homereno...
74
34
@wayfair is helping us turn a disaster into something beautiful ✨A leak from our upstairs shower led to a full remodel, and I can’t wait to show you the AFTER! Bathroom remodel reveal coming soon. Comment “LINKS” and I’ll send all my Wayfair favorites! #ad #wayfaircreator #wayfair #homereno
@wayfair is helping us turn a disaster into something beautiful ✨A leak from our upstairs shower led to a full remodel, and I can’t wait to show you the AFTER! Bathroom remodel reveal coming soon. Comment “LINKS” and I’ll send all my Wayfair favorites! #ad #wayfaircreator #wayfair #homereno...
50
15
I used to paint everything. I literally taught chalk paint classes and wrote an ebook about it.
So I don’t blame whoever painted these, but every room needs a little natural wood.
I used to paint everything. I literally taught chalk paint classes and wrote an ebook about it.
So I don’t blame whoever painted these, but every room needs a little natural wood....
159
26
*TWO THINGS that make wallpaper removal easy* Wallpaper has come a long way and there’s no need to be scared of it anymore! Before I hang wallpaper, I size the walls and often use pre-pasted SureStrip wallpaper that is activated with water! Comment WALLPAPER for easy to remove wallpaper links!
*TWO THINGS that make wallpaper removal easy* Wallpaper has come a long way and there’s no need to be scared of it anymore! Before I hang wallpaper, I size the walls and often use pre-pasted SureStrip wallpaper that is activated with water! Comment WALLPAPER for easy to remove wallpaper links!...


