Paint

Best Paint Colors

Best Paint Colors 

The Best Paint Colors for Your Home

Our interior paint colors have changed over the years, but today I am sharing my current favorites for the best paint colors.  I am really into creams, grays and anything navy right now, and I add pops of color with accent pieces. I am asked all the time about the navy in our family room, and it is a gorgeous color.  It is Night View by Valspar, and I absolutely love the deep navy color.

I also painted the wall separating the family room and kitchen this gorgeous shade of blue, and you can see the gallery wall HERE. Although it is not complete, I am slowly repainting all our interior doors in Orion Gray by BEHR.

Be careful when painting interior doors because it is impossible to stop at just one!  You can see more details on the DIY laundry room remodel that began my door painting craziness. If you want a brighter navy, try Midnight Show by Navy.  It creates the perfect accent wall in my boys’ room.

You can see more pictures of my boys’ room as well as the tutorial for the board and batten wall by going here. If you are on the search for a pretty gray, try Repose Gray by Sherwin Williams.  I often recommend it to clients who want a neutral, and it works in any space and/or lighting.    

This bathroom was a recent remodel, and you can see all the before and after photos by going here. I prefer a cream over a white in our home because it feels warmer to me (and we have off-white trim).  I have used Coconut Milk by Valspar often in our home – including our master bedroom.  You can see more on our master remodel by going here.

I recently discovered Swiss Coffee by BEHR paint, and it is less creamy than the coconut milk.  

It is gorgeous – especially if you are looking for an off-white color.

Go create something!

Are you new to my blog? Go HERE to see my home tour and HERE to shop for items I use in our home.

Decor

Best Rugs for Decorating

If you are like me, it takes you forever to find the perfect rug.  Today I am sharing what I have found to be the best rugs for decorating.

In a perfect world, price would not matter, and I would have vintage rugs scattered throughout my home.  However, I am on a budget (like I assume most of us are), so I have rounded up some of my favorite rugs that look good AND don’t break the bank! This post contains some affiliate links for your convenience. Click here to read my full disclosure policy. I am a huge fan of this elegant neutral rug.

It is both our dining room and master bedroom.

Another favorite is the colorful rug in our family room.

It adds fun to the space and looks amazing with the navy walls.

I also love simple navy flat woven rugs for our home.

This rug is in our back entry mudroom area.

There is a similar navy rug in my boys room.

It is great at hiding dirt and adds to the space.

I have included links to the rugs in the post above, or you can click on the image below to be taken to the rug source:

Want to see more on the spaces I shared in this post?  

Click on the links below:

Go create something!

Are you new to my blog? Go HERE to see my home tour and HERE to shop for items I use in our home.

DIY

How to Make Framed Silhouette Art

My most popular question lately from readers has been the source for the silhouettes hanging in our kitchen.  Since they are a DIY, I thought it was time I shared how to make framed silhouette art.  These portraits are not only easy to make, but they are really inexpensive too!  It’s a win-win!

To make your own silhouette, you will need:

This post contains some affiliate links for your convenience. Click here to read my full disclosure policy.

  • Phone (or camera)
  • White paper
  • Black paper
  • Tape
  • Scissors
  • Frame (I found my frames at Walmart and spray painted them gold, BUT HERE are the same frames already gold).

The first step is to take a profile photo. These work best against a plain wall.

If you are using your phone camera, you can easily email the photo to yourself.

Save the photo from your email to your desktop.

Next, open Word. My frames were only 5×7, so I put my silhouette on one side of a (landscape) 8.5 x 11 sheet.

Now you will need to print out the photo.  It does not require a fancy printer – I just used a black and white printer.

Make sure your silhouette will fit your frame correctly.

Cut around the silhouette photo and a black sheet of paper.  Tape the corners.

Carefully cut around the portrait using a smaller and sharp set of scissors.

Make any adjustments needed.  I often round the bottom of the portrait (you can see this in the video below).

Add tape (double stick is best) to the back of the silhouette.

Tape it on to your white piece of paper and place in frame.  You now have your own silhouette portrait art! In this tutorial, I used black construction paper because it was all I had on hand.  However, I would recommend using a higher quality black paper because construction paper does fade over time.

Watch this video to see How to Make Framed Silhouette Art:

Easy Silhouette Portrait Art

Tag me on social media if you make your own silhouette art.  I want to see your creations!

Go create something!

Are you new to my blog? Go HERE to see my home tour and HERE to shop for items I use in our home.

Love making silhouettes?  Check out this large silhouette tutorial and make your own for around $3!  

Go here to see how!

Decor

Favorite Wall Lamps

I receive so many questions from readers regarding the sources of the many wall lamps we have in our home that I decided to share a post dedicated to some of my favorite wall lamps.

Favorite Wall Lamps | Wall lamps are great for decorating and require NO electrical work! These are some of the best wall lamps via Sincerely, Sara D.

On my list of things I want to learn, I would love how to wire so I can install hardwired wall sconces.  However, until then, I am going to continue to use plug-in wall lamps.  They look amazing and are crazy easy to install. There is also an easy trick for hiding the electrical cords, and you can see how to do that here. In our master bedroom, we use wall lamps instead of night stand lamps. I love the elegance they bring to the space (and you can read more on our master bedroom makeover here). Wall lamps add charm to any space This post contains some affiliate links for your convenience. Click here to read my full disclosure policy.

This brass wall lamp comes as a set for under $100, and you can order it here.

If you are not a brass fan, this wall lamp also come in silver. Due to space, we also added wall lamps above the boys beds, and I love how the black and gold works in their masculine space (see more on the boys bedroom makeover here).

Sources for wall lamps

This brass and black wall lamp is less than $50! Click here for the link. Now I also found some absolute dream brass plug-in wall lamps (and another source for the black and gold wall lamp).  

Unfortunately the price tag on the brass lamps keep them a dream for me, but if you want to dream with me (or splurge on some gorgeousness), take a look at these:

Click on the wall lamps to be taken to the product site.

Do you use wall lamps in your home?  It is hard to stop once you start!

Go create something!

Are you new to my blog? Go HERE to see my home tour and HERE to shop for items I use in our home.  

Home

Charleston in 3 Days

My family recently took a trip to Charleston, and I wanted to share our experience so you know what to do in Charleston (in 3 days). This was my fourth year attending Haven Conference, and the first time it was being held in Charleston.  I was immediately excited because I knew I would love Charleston (because I believe I am a southern girl trapped in the midwest).

I shared my experience with Haven last year (you can read about that Haven conference experience here). Since I won the Home Depot’s Orange Tank last year (which allowed me to DIY my dream kitchen), I had the honor of being the guest judge for this year’s Orange Tank completion.  It was so fun to be on the other side of the table!

Haven Conference

Since Haven was being held in Charleston, my family decided to make it a family adventure.  Steve flew in with the kids after the conference ended, and we spent three days exploring what should be my home. Since their flight was late (and to save a little money), we stayed at a Fairfield Inn near the airport the first night.  However, the next three nights we splurged and stayed at the Renaissance Charleston Historic District Hotel. It had some unique and quirky decor – which we all loved.

It was right in the middle of downtown Charleston and self parking was only $20 in a nearby garage (we rented a car). The room was small, but the hotel provided a cot so all five of us had a bed.

Day One: Middleton Place & Sullivan’s Island

The first day we got up and went to Middleton Place (plantation).  It was hot, so we were armed with water, fans and frog togs. We purchased the tickets when we arrived, and I was surprised how expensive the plantation was.  We decided to do the entire experience which included a home tour and a carriage ride. Middleton Plantation We learned a lot and the kids enjoyed it, so I felt like it was overall a good experience.

I could have stayed longer just walking around the grounds, but the rest of my family doesn’t tolerate heat well.

Middleton Plantation We headed towards Charleston and stopped at Hominy Grill for a late lunch.

We avoided the line this way, and we all loved our meals. We went back to the hotel and ventured over to Sullivan’s Island. The kids had fun playing in the ocean for a few hours and then we headed back to the hotel.  We ended up ordering pizza that evening and eating it in the room.  The heat took a toll on everyone, and we headed to bed.

Day Two: Downtown Charleston & Fort Sumter

We managed to experience most of downtown Charleston in one day.  We began by walking to Palmetto Carriage Works where we had booked a residential district tour.

What to do in Charleston (in 3 Days)

We arrived for our time slot and didn’t have to wait long before our carriage arrived. We learned so much from our tour guide, and I would highly recommend taking a carriage ride tour of the city.

Next we headed to the City Market which was really close to our carriage tour.  The kids found some fun souvenirs and then we headed on to the Old Slave Mart Museum. It was definitely hard for all of us to walk through that museum.

From there we went to the Old Exchange and Provost Dungeon which was so interesting.  We had a really interesting tour guide who walked us through the dungeon.

From there we had lunch at a really good barbecue restaurant (I’ll try to find the name to share).

We then headed down Rainbow Row and walked back up to Waterfront Park.

We then headed out to Fort Sumter which requires a ferry ride.  The boys were definitely more interested in the fort (Lena and I weren’t so much).

We were completely exhausted after a full day and ordered Chinese in that evening.

Day Three: Kiawah Island

We crammed so much into day two because we really wanted a full beach day. After asking around, the general consensus for the best beach was Kiawah Island.

It was supposed to rain, but we ended up having a gorgeous day and spent over five hours at the beach.  We went to the public beach, and I was so impressed with how nice it was.  We were able to rent chairs and an umbrella and there were bathrooms and showers. We went back that evening and cleaned up before dinner and enjoyed our last evening strolling the gorgeous streets of Charleston.

Overall, it was a fantastic trip. We hope to come back again someday Charleston!

Go create something!

Are you new to my blog? Go HERE to see my home tour and HERE to shop for items I use in our home.


Paint

How to Paint Baseboards on Carpet

I have created several different wall paneling treatments for our home, and I usually end up painting the baseboards to match the wall.  Unfortunately, many of the baseboards are on carpet (which can be tricky to paint), but I have figured out how to paint baseboards on the carpet.

Supplies needed to paint baseboard trim without painting the carpet:

  • Packing Tape OR Painter’s Tape
  • Putty Knife

To begin, run the packing (or painter’s) tape next to the baseboard – overlapping it so that there is some tape to stuff under the baseboard (make sure the tape is sticky side down).

I used the packing tape for convenience (I was out of painter’s tape at the time.). However, I have found that I prefer the painter’s tape since the paint dries faster on the painter’s tape than it does on packing tape. I prefer FrogTape, but the blue painter’s tape works as well.

how to paint baseboards and not carpet

The putty knife makes it easy to line the underside of the baseboard with tape.  There’s typically a decent gap between the bottom of the baseboard and the carpet that you will see once you are able to push down the carpet (and push back the tape). To better protect the carpet, run another strip of tape next to the first and add a drop cloth to avoid the hassle of paint splatters (which will happen no matter how careful you are).

Allow the paint to dry completely before attempting to remove the tape. I suggest two coats of paint (allowing the first coat of paint to dry completely before adding the second). This allows for good coverage and a nice paint job. 

Don’t overload your paintbrush (always use bristle brushes over foam brushes) and use quick horizontal strokes to avoid excess paint and paint drips. I also always suggest keeping a damp rag handy for quick clean-up if needed.

Painting baseboards on the edge of the carpet is so easy with this painting technique!

Want the full tutorial for this wall treatment I did in my boys’ room?  This board and batten cost me less than $100, and it makes such a nice statement in the space!  Go here for the full tutorial!

What other painting tricks do you have? Share in the comments!

Check out this other DIY wall treatment in our home. 

Go create something!

Are you new to my blog? Go HERE to see my home tour and HERE to shop for items I use in our home.

Shop the Post
Home

Home Filter Club

This post is sponsored by FiltersFast.com.  All thoughts and opinions are my own. With three kids and a busy schedule, the last thing my mom brain needs is another thing to remember.

FiltersFast.com Home Filter Club

I shared earlier this year about how I love finding easy ways to keep my home and family clean and healthy.  I am a member of FiltersFast.com Home Filter Club (see more on that here) so I don’t have to spend any time worrying about when I need to change our air filters.  When it is time to change them, they show up on my doorstep!

Did you know you can do the same thing with your refrigerator filter?  When it is time to change the water filter, the filter shows up on your doorstep! If you are curious how to find which filter your fridge uses, check out the Fridge Finder Tool on their website.  Here’s a short video you can watch to help get you started: https://www.youtube.com/watch?v=8trob6GZcwQ   We go through a lot of water as a family of five – especially during summer with sports and the warmer temperatures.  Thanks to the Home Filter Club, I don’t have to stare at that red “change filter light” and add the water filter to my never-ending to-do list.

Beyond loving FiltersFast.com Home Filter Club as a busy mom, there are also several other reasons to join:

  • Save 5% on your order (and all future orders)
  • Enjoy the convenience of not having to reorder
  • Cancel or modify your orders anytime
  • Select a delivery schedule that works for you
  • Pay as you go

Go create something!

Are you new to my blog? Go HERE to see my home tour and HERE to shop for items I use in our home. Want more details on my DIY kitchen remodel?  Go here for all the details!  

Home

Find Your Purpose

Do What You Love and Find Your Purpose.

Do What You Love - Find Your Purpose

Steve and I recently took a trip to Chicago to see Hamilton (which was AMAZING), and while we were there we came across this window. It reminded me of a post I shared several years ago about using your gifts and finding your passion.  I thought it was time to revisit the subject and encourage you to find the way to Do What You Love. One of my favorite quotes is from Erma Bombeck (download the free printable here):

It’s a pretty powerful quote, isn’t it?! Is there some talent you are hiding away and not using? Before kids, I worked at a greeting card company doing what I loved – creating. Once we had our oldest, we realized that I needed to stay home due to my crazy long commute and a husband who was working way too many hours. Although I am thankful I was able to stay at home, I really didn’t love it.  I had trouble finding purpose in sleepless nights, feedings and endless diaper changes. I had no time for myself, and I was depressed and lacked passion for anything at that point in my life.

Luckily, I found a Bible study full of the most encouraging women who were both in my stage and out of it. I realized that I was going through was a phase. I’m sure you’ve heard the quote, “The days are long but the years are short.” And boy the days really can feel like the clock is just ticking by – especially during the witching hours between naps and dinner. My job and purpose at that point in my life was to care for my young kids. Although it felt minor, it was a huge responsibility. My little ones would be adults someday, and I was given the responsibility by God to raise them. There really are moms who from day one love being a mom and want nothing more. I wanted to be that mom…desperately! But I wasn’t.

As my kids got older, they required a little less of me which meant I slowly found a little more of me. I began creating again – invitations, decorating, painting walls…slowly I was uncovering my passion. I prayed that God would show me what He wanted to do with my creativity. When Steve would be gone on work trips, he always came back to a project. In the evenings after the kids were in bed, I would get restless and creative. Most of the time the projects involved painting walls – and boy did I do some crazy things! Luckily those walls could be repainted, and I’m sure they have been with the home’s new owners (and Steve never discouraged my creative outlets).  Once Steve was gone a little longer than normal since he was on a mission trip with our church. When he came back, I had created my business. Sincerely, Sara D. was born.

The need to dream never should disappear.

For some reason, we stop dreaming after having kids. You know that when you were a kid, you dreamed about finding prince charming, marrying that prince charming and living happily ever after with your babies. However, that’s not the end. There are still dreams to be dreamed.

Joyce Maynard

They are learning from us! If we don’t go after our dreams, how will they ever learn to chase after theirs? For over five years now, I’ve been working on growing my business and praying that God uses it and my gifts to glorify Him. I love my job, and it brings me so much joy. For now, I feel that I have found my passion and purpose.

Finding our purpose in life is probably our greatest quest as humans.

It is a theme in any stage of life, largely because our specific purposes may change – or at least be carried out differently – in different seasons of life. Thankfully, we as believers can rest in the fact that our lives do have purpose. God created us with intent, He knows His plans for us, and He is eager to reveal Himself to us. He desires that we know Him, we enjoy Him, we witness about Him, and we live out our unique role in His Body.

Jeremiah

A purpose that applies to all humans is that of knowing and enjoying God. As believers, our purpose here on earth is to share the gospel. We as his disciples are to go and make fishers of men by sharing the message of salvation. However, each one of us was formed with a unique purpose and passion.

God didn’t make all of us the same – we’re each his unique handiwork.

The Bible is full of examples of God’s personal touch on people’s lives. The prophets were individually called by God for a specific time and purpose. Abraham, Noah, Joseph, Ruth, Esther, Mary, and multiple others gifts were used by God for His purposes. First Corinthians 12:12-31 talks about the Church in terms of a body. Each member of the Church has a different purpose, just as each portion of the body is used for different things. Romans 12:6-8 and 1 Corinthians 12:4-11 list several spiritual gifts a person might have. We know from science and psychology that people are unique. No one in the world is exactly like you. God made that design. Psalm 139 is a beautiful depiction of the care with which God created us. He “knitted us together in our mother’s womb”. There is a unique purpose that God has just for you.  God has a plan for one each of us. My friend Amy Howard said:

AMY HOWARD

I want us all to dream big and think about what you are passionate about. I personally feel I was created to create. I want to share my love of creating with others – especially women. I love the relationships I’m forming with women through my blog and readers and classes.What is your gift? A gift is something that you’re not only good at, but it’s something that you have a desire to do. When you’re using that gift you’re filled with joy and power and you often find that you’ve found your passion. Embrace your gift and find your passion. This will take courage, but the most unnatural path to take is to not do what you were made to do. Singers want to sing. Painters want to paint. Teachers want to teach.

Be Brave

Embrace your gifts and find your purpose!

This will require courage, so let’s be brave and dream big together. Go create something!

Are you new to my blog? Go HERE to see my home tour and HERE to shop for items I use in our home.

Paint

Faux Wood Paint Tutorial

I recently discovered a Faux Wood Paint Tutorial that looks good AND is easy!

faux wood paint technique

If you followed along during our DIY kitchen remodel, you saw me use this same technique on our plaster stove hood (see that tutorial here).

I loved the result so much, that I decided to use the same technique on my 15 year old dresser.  It was dinged up and not real wood, but I really wanted a wood dresser in our recent master bedroom makeover.  So, I pulled out the paint!

The dresser is so heavy that I decided to paint it in the bedroom.  I added a drop cloth underneath and removed the hardware.

This post contains some affiliate links for your convenience. Click here to read my full disclosure policy.

I used Simple Green to clean off any grime and dirt before I painted. 

I used chalk paint to achieve this look, and I began by painting the entire piece with white paint.

Once the white paint was dry, I used a dry brush method  and added a dark gray.  This gives the appearance of wood grain and dimension. *If you are unfamiliar with the dry brush technique, click here to see the full tutorial!

I added one more layer of paint – a light gray.  This helped tone down some of the areas I added too much dark gray to and added more dimension to my piece.

Once the paint was dry, I when over the entire dresser with a dark wax.  I buffed with a lint-free cloth.

I share a more detailed tutorial on this painting technique here.

What do you think?  I love the richer color for my new space!

Go paint something! 

Are you new to my blog? Go HERE to see my home tour and HERE to shop for items I use in our home.

Decor

Blog Swap with Kierste of Simply Kierste Design Co

Today I’m sharing another in my series of monthly blog swaps.  I’ve met so many amazing bloggers over the years, and I wanted to share some of these talented designers.  Today’s blog swap is with Kierste of Simply Kierste Design Co.  You will absolutely love Kierste and her gorgeous farmhouse..

Hello! My name is Kierste, the girl behind Simply Kierste Design Co, where I share farmhouse style, DIY, organization ideas, holiday inspiration, and simple recipes. I live with my husband and six darlings on nine wooded acres in our upstate New York farmhouse, Old Salt Farm.

Blog Swap with Kierste of Simply Kierste Design Co

I’m delighted to be here! Sara’s home is stunning, and I got lost looking through all of her ideas and tutorials.

We built our farmhouse eighteen months ago, and it’s been so fun working on our very long to-do list, both inside and outside. We did a lot of the work during the building process as well–all of the barn doors, lockers in the mudroom, shiplap, and kitchen island. I love to scout furniture to refinish, and have been building and making DIY home decor to adorn our walls and fill our home.

We built our kitchen island out of reclaimed barn wood from an old, local barn that was being torn down, and every member of our family had a hand in making it, even the littlest. Hands down, it’s my favorite thing in our home. I tell my husband that if we ever have to move, I’m taking it with us!

I love an organized home, and with six kids, it makes such a difference in my daily life. A couple of my most utilized projects are simple but so effective–numbered crates in the lockers for shoes, and an organized pantry. DIY farmhouse shelves in the laundry room add storage and aesthetics.

DIY Numbered Crates

A Laundry Routine That Works For Any Size Family!

Kitchen Pantry Organization | simplykierste.com

I’ve been decorating slowly, room by room, and it’s been such a fun process. My boys’ buffalo check room and my four year old’s shabby chic vintage style room are two that are finished, and I’m working on my twin girls’ room now…just some bookshelves and few decor pieces to go!

Black Buffalo Check Boys' Bedroom Makeover | Boys' Room on a Budget | simplykierste.com #buffalocheck #boysbedroom #bedroommakeover #industrialbedroom

Vintage Style Shabby Chic Girl's Bedroom

Since we built our home, we had a lot of work to do outside…and still do. We worked hard last summer on the landscaping–growing grass, planting flowers, and adding a DIY stone patio. We built DIY posts to hang string lights, put in a 200 foot zipline, and built a huge fire pit area with adirondack chairs and a tiki torch lined path. This summer we are putting in a large platform connecting our two trampolines, installing a drinking fountain on the back patio, and finishing up a playset/tree swing area. Can’t wait!

Outdoor String Lights on DIY Posts | simplykierste.com

Our First Summer at Old Salt Farm | simplykierste.com

Celebrating holidays and seasons is much loved in our home, and creating ideas, recipes, and decor for my family are my most treasured.

Christmas at Old Salt Farm

It’s fresh peach crisp in the summer, apple picking and caramel apples in the fall, handmade cinnamon ornaments and Christmas book advent at Christmas, and so much more.

How to Make the Perfect Caramel Apples | Tips & Tricks | simplykierste.com

Through winter, summer, fall, and spring–there’s always a project going on around here!

Christmas Home Tour Old Salt Farm | simplykierste.com #hometour #christmashometour #christmasdecor #farmhousechristmas

Thank you so much for having me, Sara, and letting me share my love of farmhouse style! Come on over and say hi…I’d love to have you!

Old Salt Farm Instagram | Simply Kierste Instagram | Pinterest | Facebook | Twitter

DIY

Elegant Wall Paneling

I wanted to give my family room an entirely new look, and this Elegant Wall Paneling updated the space.


I do not claim to be a woodworker, but I am pleased with the result and spent around $300.

How to Install Elegant Wall Paneling:

Materials

Here’s what I used:

  • (4) 4.5″ corner blocks
  • (20) 1 3/8″ x 8 ft primed base cap molding
  • (15) 4.4″ x 8 ft primed corner blocked square edge
  • (8) tubes of caulk plus some wood filler
  • (1) gallon of Valspar Reserve Paint in Night View.

You’ll also need a basic miter saw, nail gun and compressor. This is what the primed base cap looks like.

DIY Elegant Paneled Wall

And this is the primed corner block square edge.

DIY Elegant Paneled Wall 2

Step-by-Step Installation Instructions

Elegant DIY Paneled Wall

I began on the top of the wall and worked my wall down.  I cut a piece of the corner block square edge to size and made sure the top piece was level while attempting to have it as close to the ceiling as possible. Elegant DIY Paneled Wall 2

This is where things get tricky pretty fast.  I cut pieces of the corner caps and created a frame around the corner blocks.  I then cut pieces of the corner block square edge to fit around the framed corner blocks.  I had bigger gaps than I would have liked, but I used caulk to fill those in (again, I am new to solo woodworking)!

Elegant DIY Paneled Wall 3

Once that top part is done, the rest is easy!  I added a piece of the corner block square edge to the bottom of the wall above the existing trim. I then cut more corner block square edge to frame in the lower portion of the wall.

Elegant DIY Paneled Wall 5

And then framed in the rest of the lower portion with the block square edge.  Then I framed inside that with the trim cap.

DIY Paneled Wall With Remodelaholic

After all the trim was hung, I went through and caulked everything.  This took forever, and I would suggest using a caulk gun over the individual tubes like I did. Once the caulk dried, I painted the entire paneled wall with two coats of paint.

DIY Elegant Wall Treatment 2 1

I added a couple hanging lamps to both paneled walls, and I was done!

DIY Elegant Wall Treatment 1

Wall treatments can make a high impact in a space for low cost.

Want to know how I hid the lamp cords?  Go here to see the easy tutorial!

Go create something!

Are you new to my blog? Go HERE to see my home tour and HERE to shop for items I use in our home.  


Shop the Post
Decor

Blog Swap with Cami of Tidbits

Today I’m sharing the first of what will become monthly blog swaps.  I’ve met so many amazing bloggers over the years, and I wanted to share some of these talented designers.  Today’s blog swap is with Cami of Tidbits.  You will absolutely love Cami and her gorgeous home…

Hello Sincerely, Sara D. readers! Isn’t Sara a breath of fresh air on this world wide web??!! I’m so honored to be here today to introduce myself to you.

Blog Swap with Cami of Tidbits

Since I come to Sara’s place to be inspired by drop-my-jaw room transformations (I’m sure that’s one of the reasons you follow her too), I thought I’d share a few of my own room makeovers with you that I have done and shared on my blog TIDBITS.

But first, I want to share one of my first interactions with Sara, which happened to be in real life at Haven Conference. We were both nervously awaiting our turn to pitch in person to Home Depot for a project or room makeover. I wish you all could have seen Sara. She had beautiful huge prints showcasing her kitchen and family struggling to all work in the poorly planned space at the same time. Then she had a perfectly laid out plan to transform the space into the dream kitchen we all now know and love. Needless to say, Sara crushed it that day, got the sponsorship, and we all benefited from seeing her create our dream kitchen in all it’s lovely glory. Also needless to say . . . I didn’t get the job . . . but have never forgotten this sweet gal and came out with a new friendship that I just treasure! That’s a win for me!

Now let me take you through some of my favorite before and afters from the TIDBITS home. Our home is an outdated 1990’s rambler style home, and we’ve slowly been making our way through every room giving it new life. In case you haven’t visited before, I like to define my style as a mix between a Farmhouse in France and a Cottage on the Coast, with lots and lots of white 😉

Most recently, I shared some basement bedroom makeovers for my 3 girls. A basement can be a scary place, but making it beautiful takes care of that! Trust me!

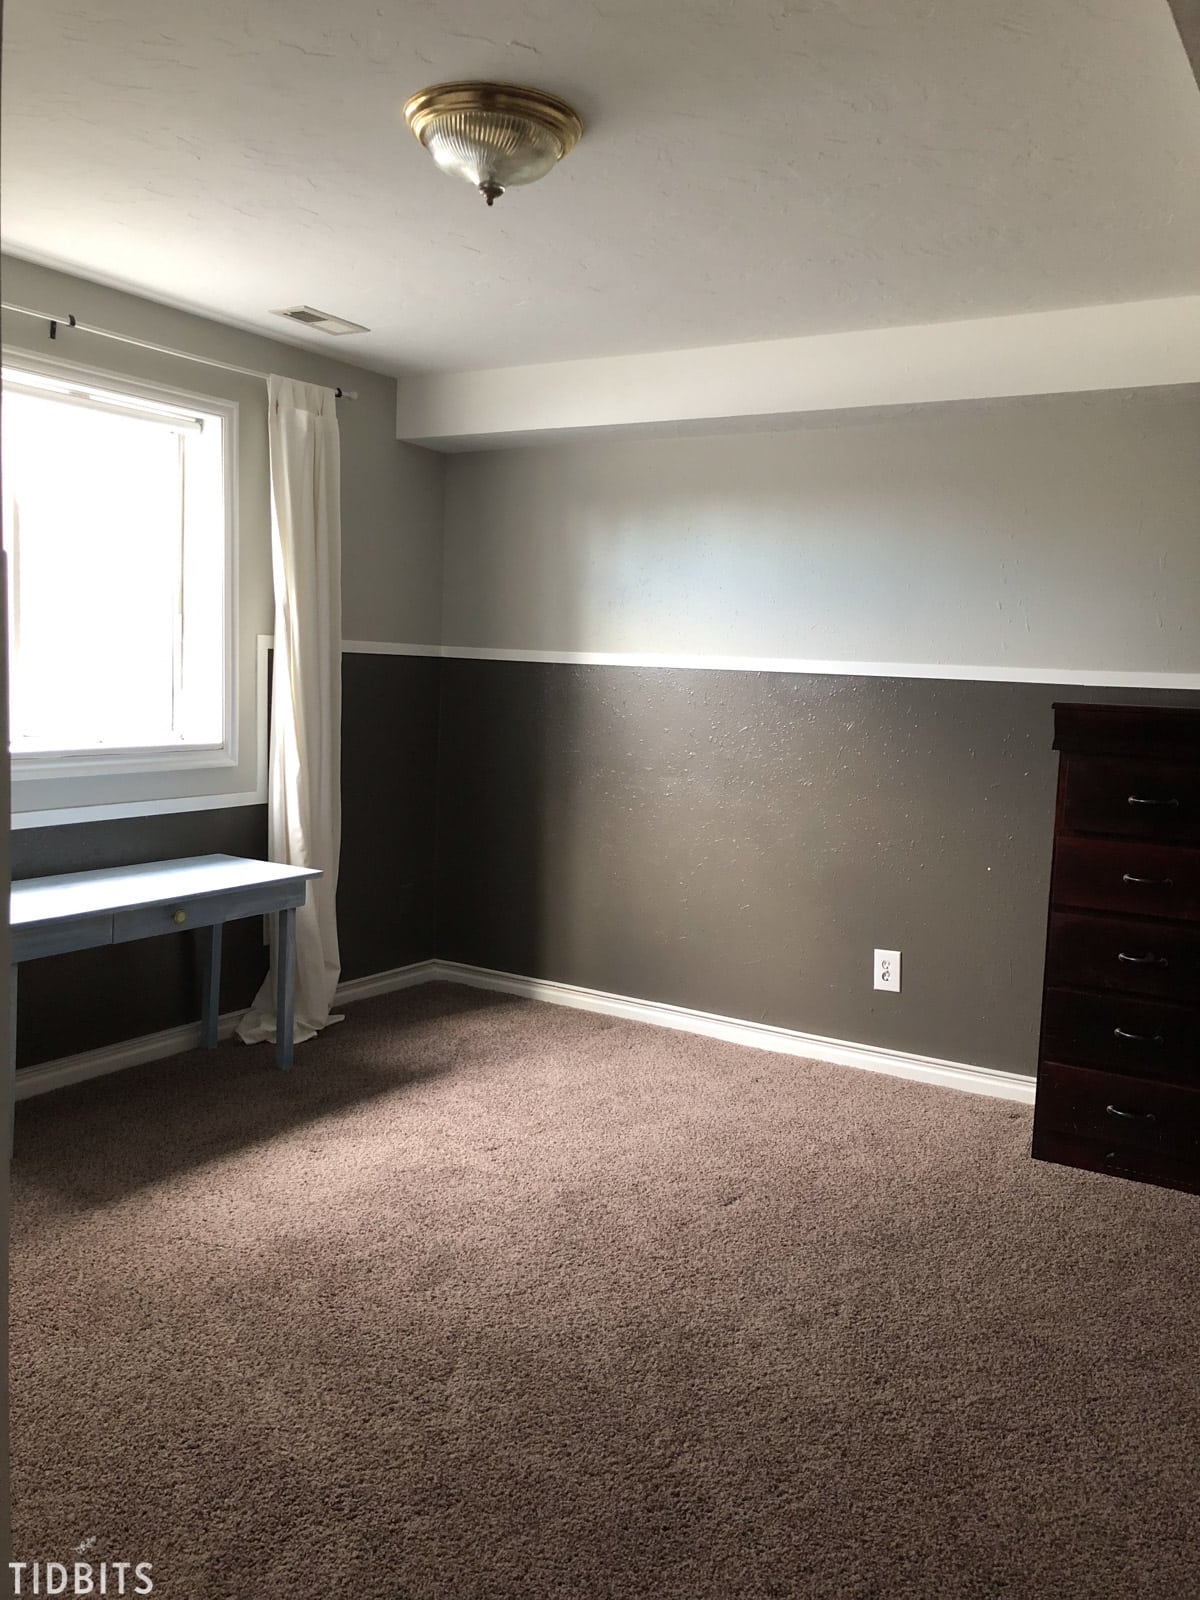
Here is one bedroom before:

Bedroom Before

Then the “after” where we turned it into a Blue and White Cottage haven, with lots of DIY’s and tutorials like

Now, here is a little peek at the AFTER!

Blue and white girls bedroom makeover

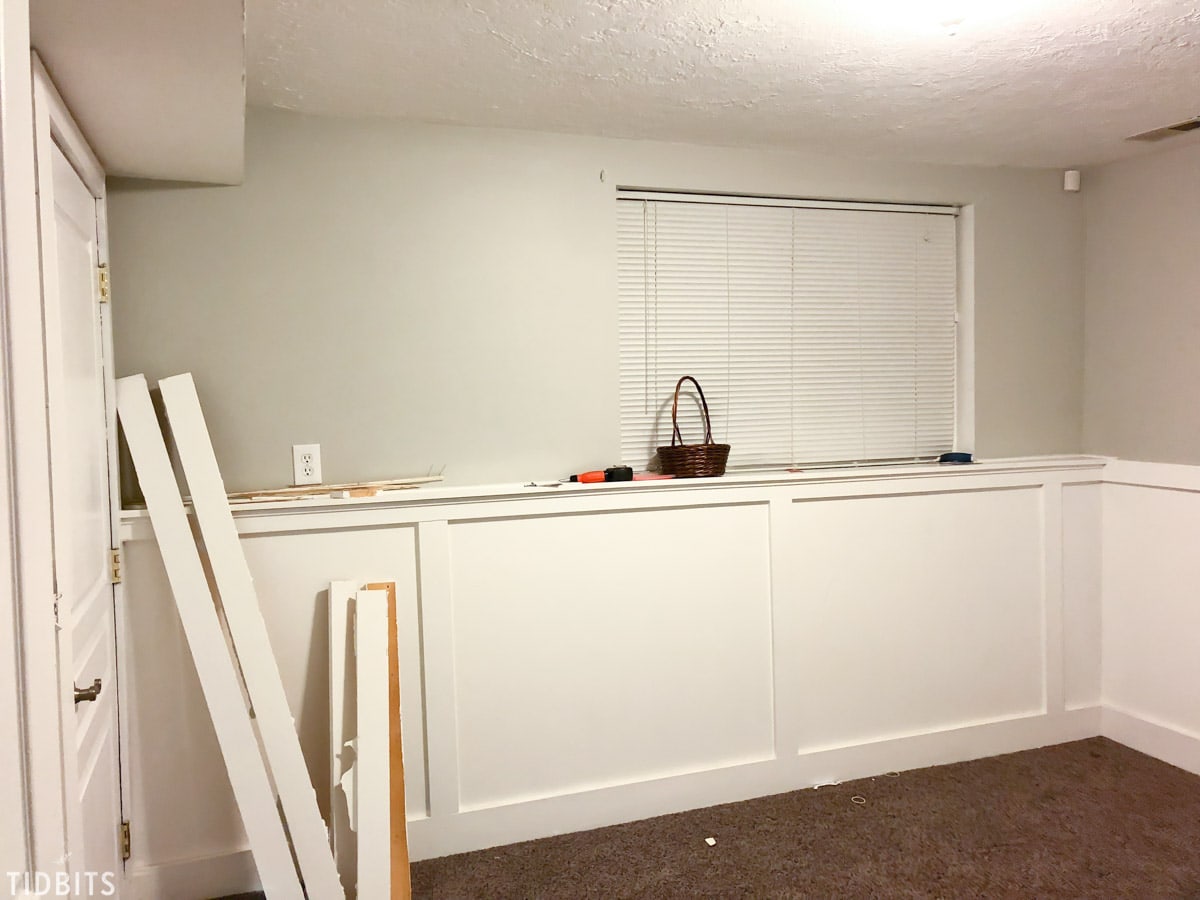
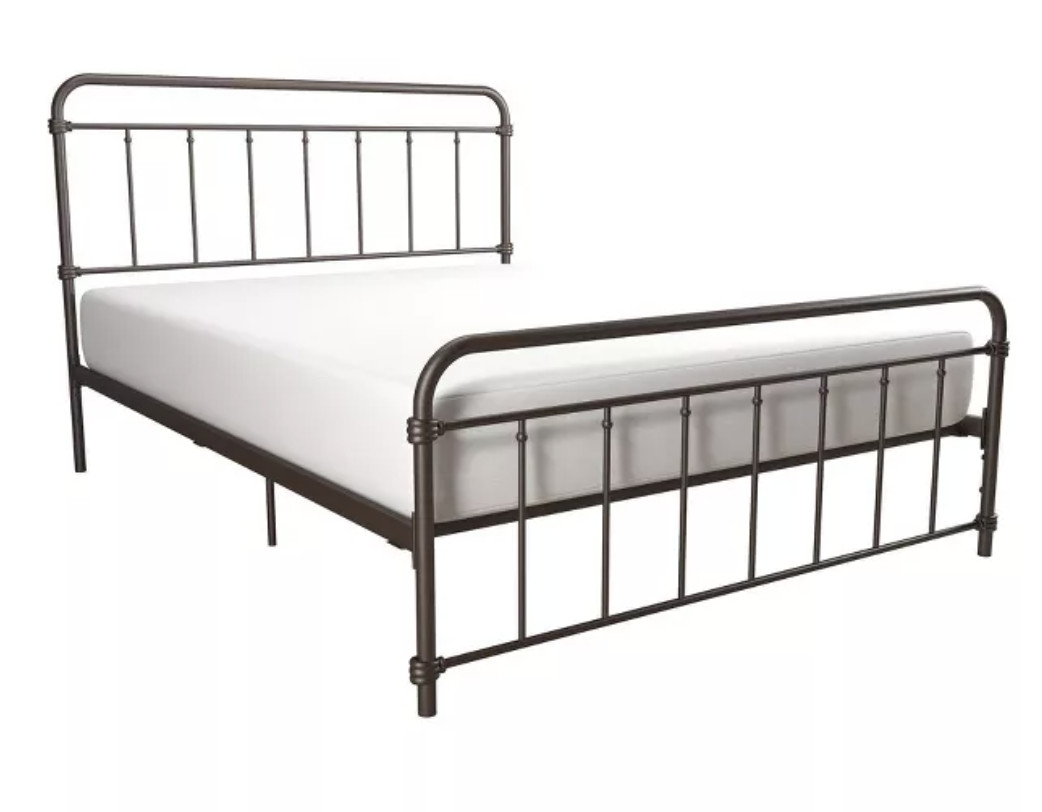
The other dark and dreary downstairs bedroom started like this:

Girls French Cottage Bedroom before

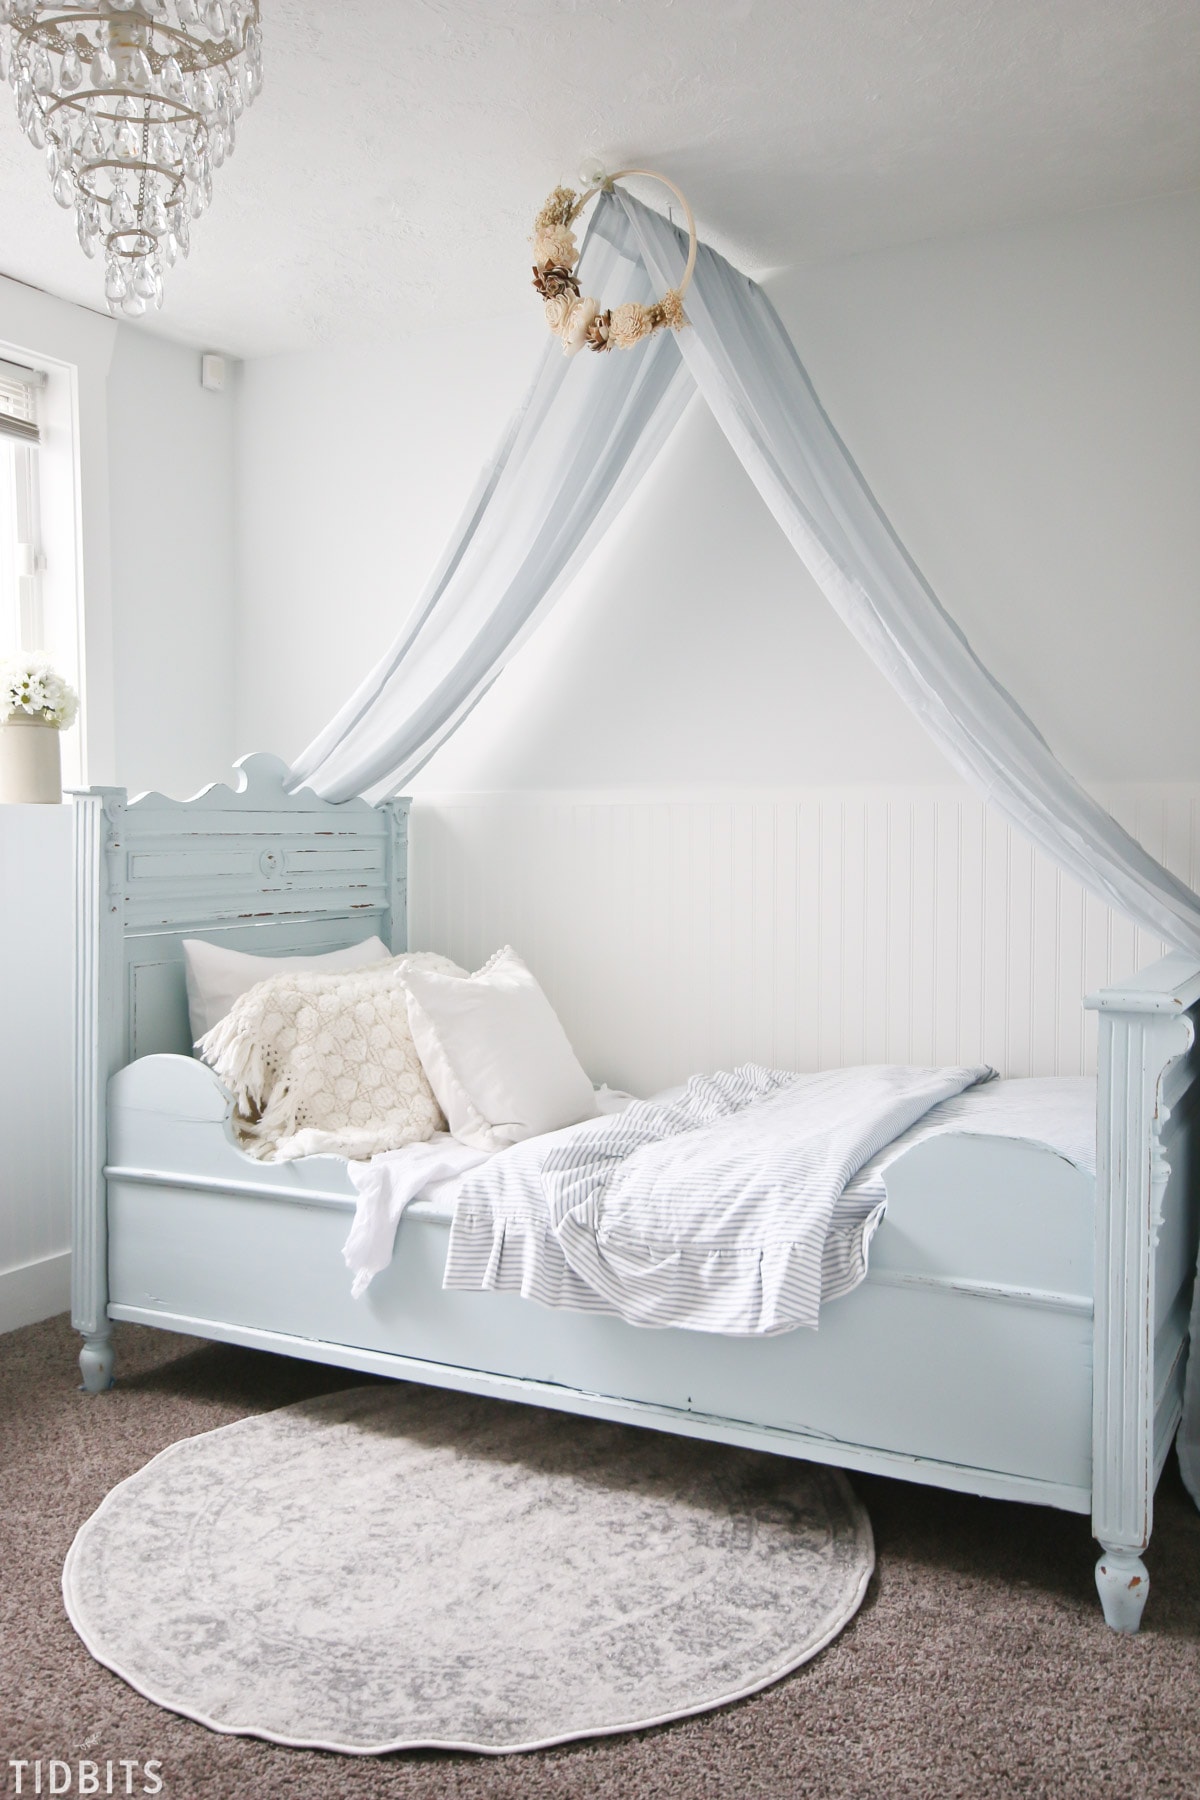
And ended up being the cutest French Cottage Girls Bedroom. To think I found those beds on Facebook Marketplace!!

French Cottage Girls Bedroom makeover by TIDBITS

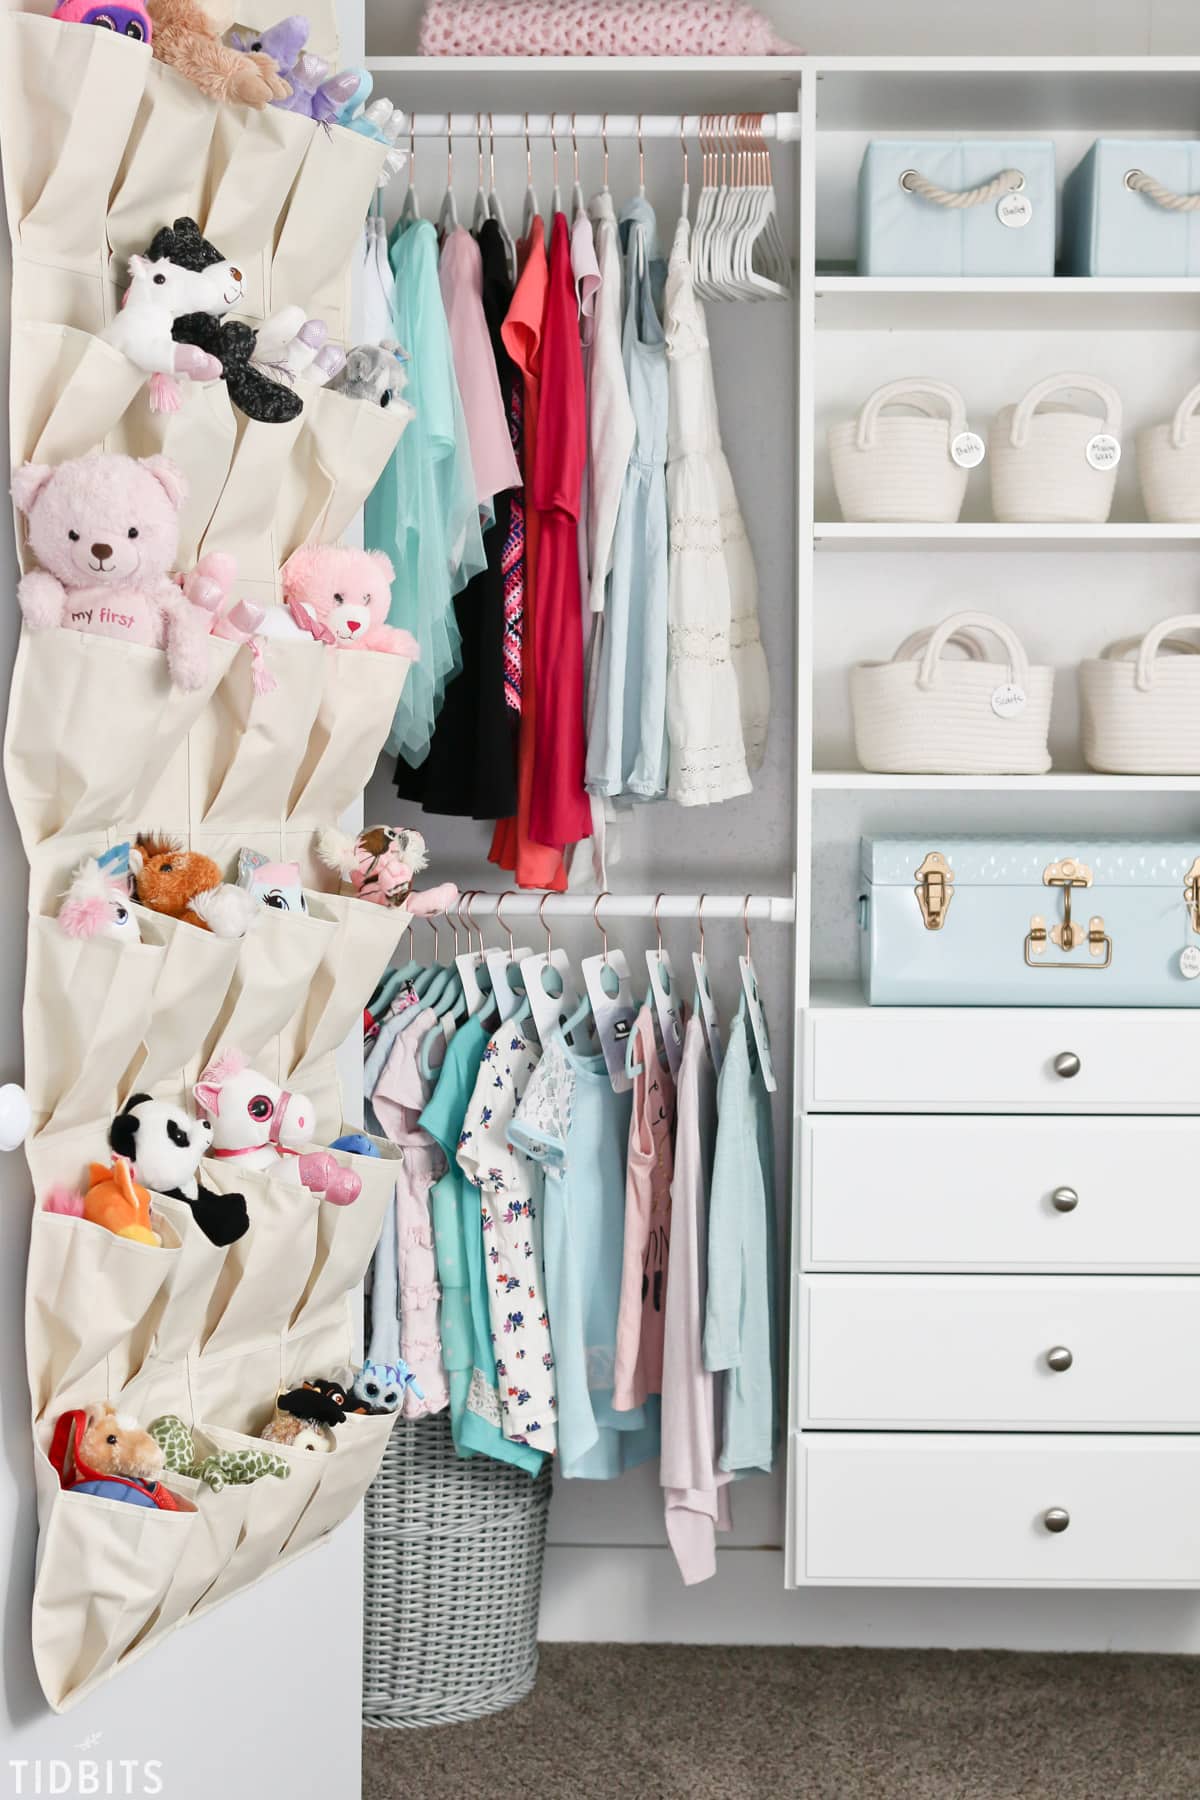
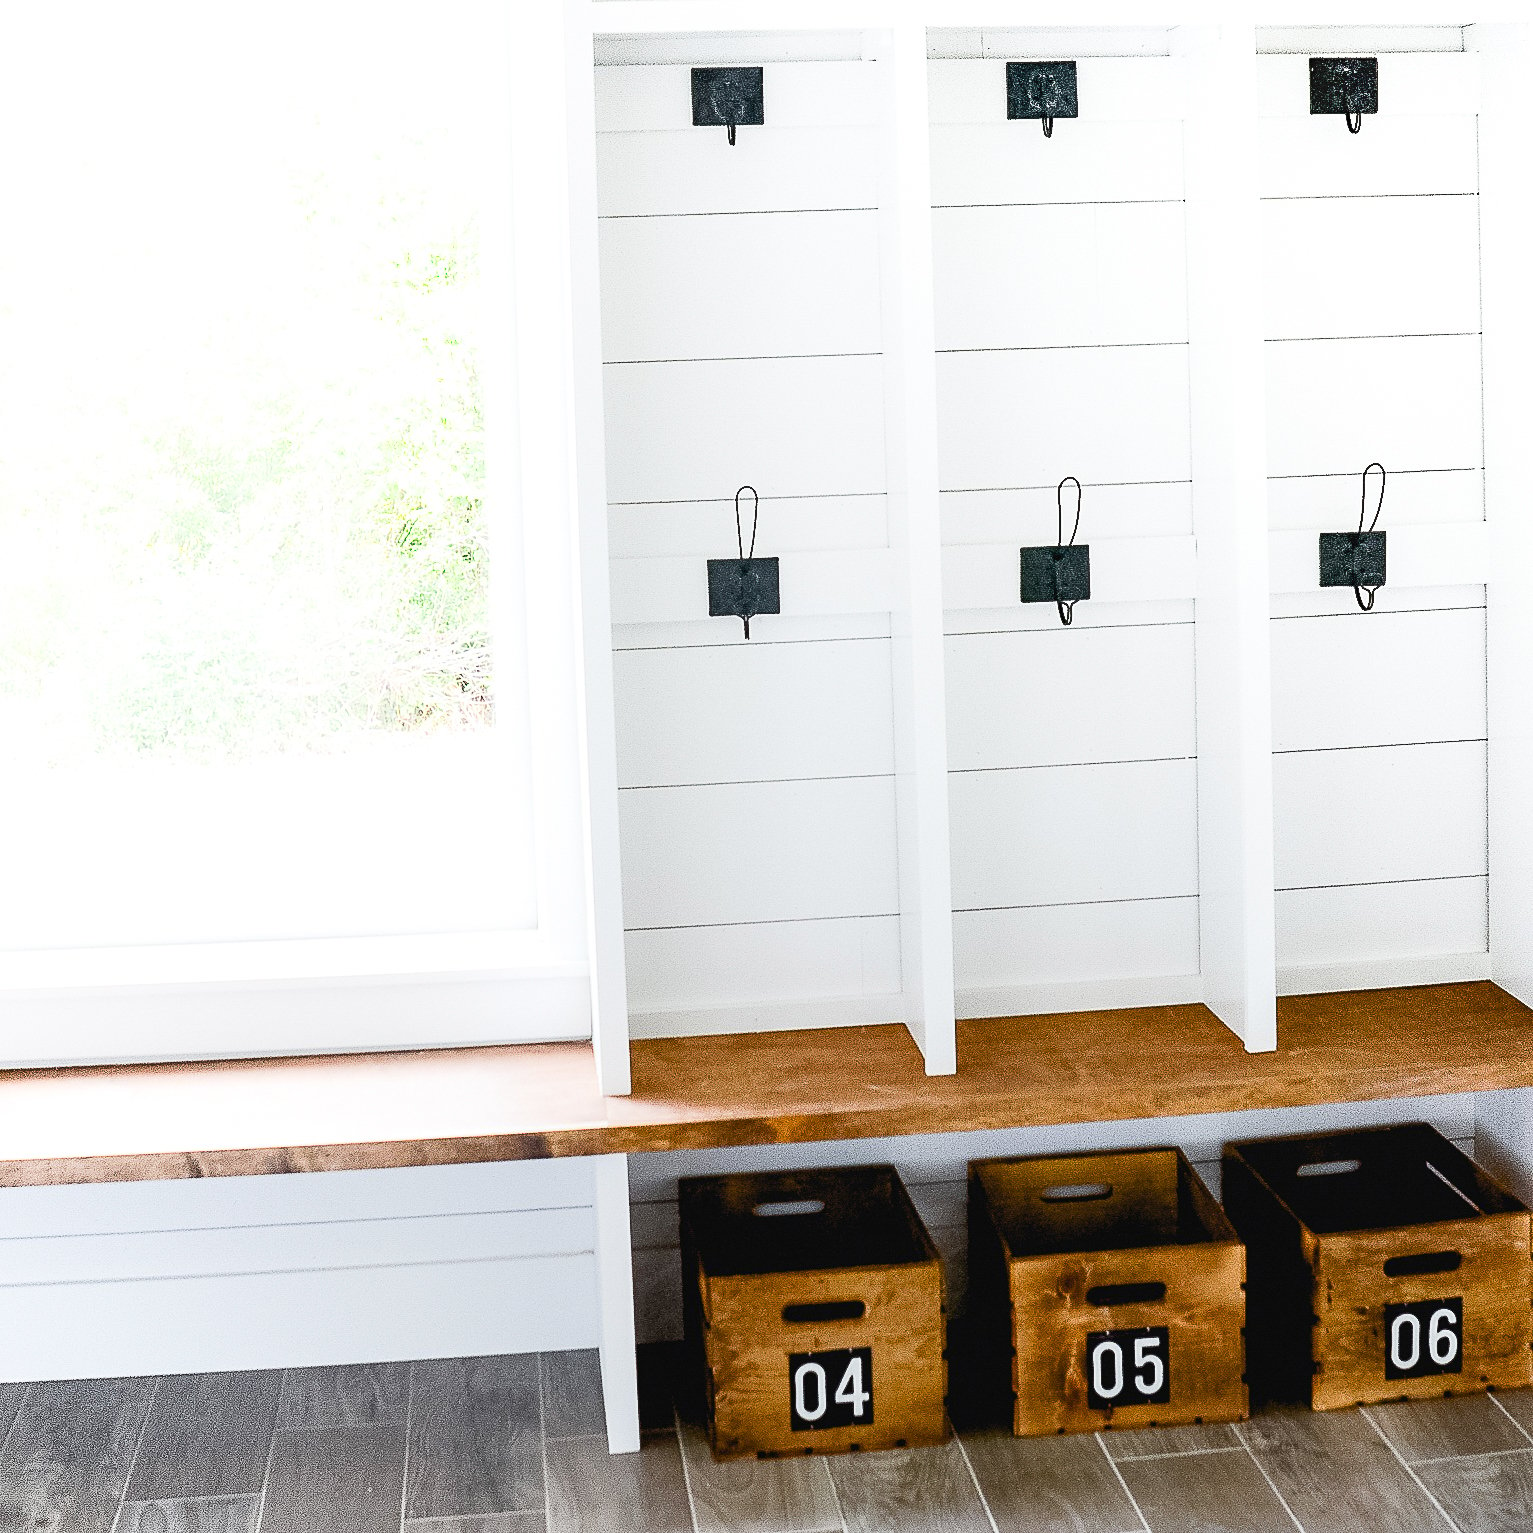
They even got a Kids Closet Organization makeover, which has been wonderful. Be sure to snag your FREE Days of the Week Closet Dividers printable I made up. It saves my mornings!

8 tips for better kids closet organization

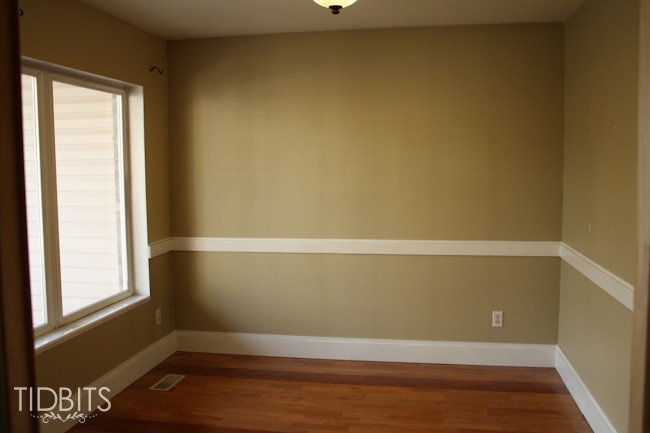
Another favorite makeover we did was my home office. It’s amazing how much more productive I can be when I have an organized and beautiful space for work and family matters.

The before of this space after we moved in:

Girls bedroom before and after tour.

The Home Office After:

Home Office Makeover by TIDBITS

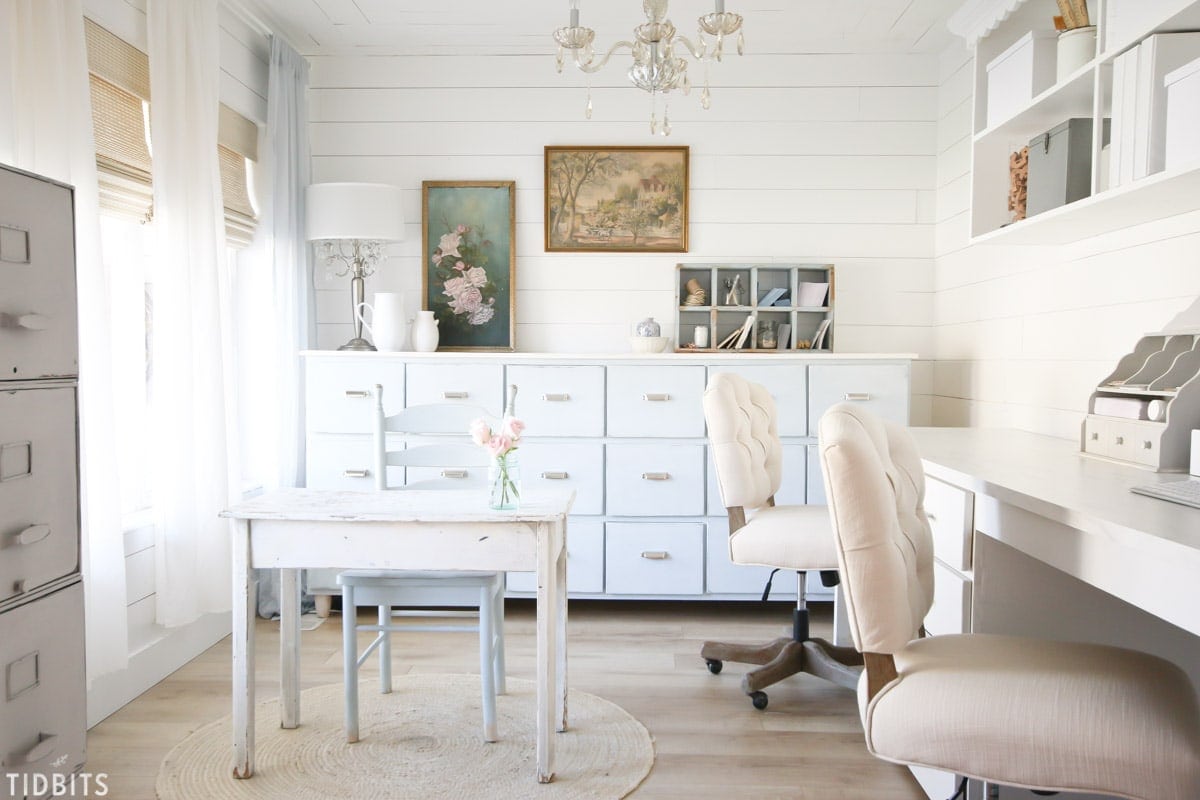
Mr. TIDBITS is the super handy husband who made that desk and 18 drawer Apothecary cabinet. Isn’t she beautiful?!

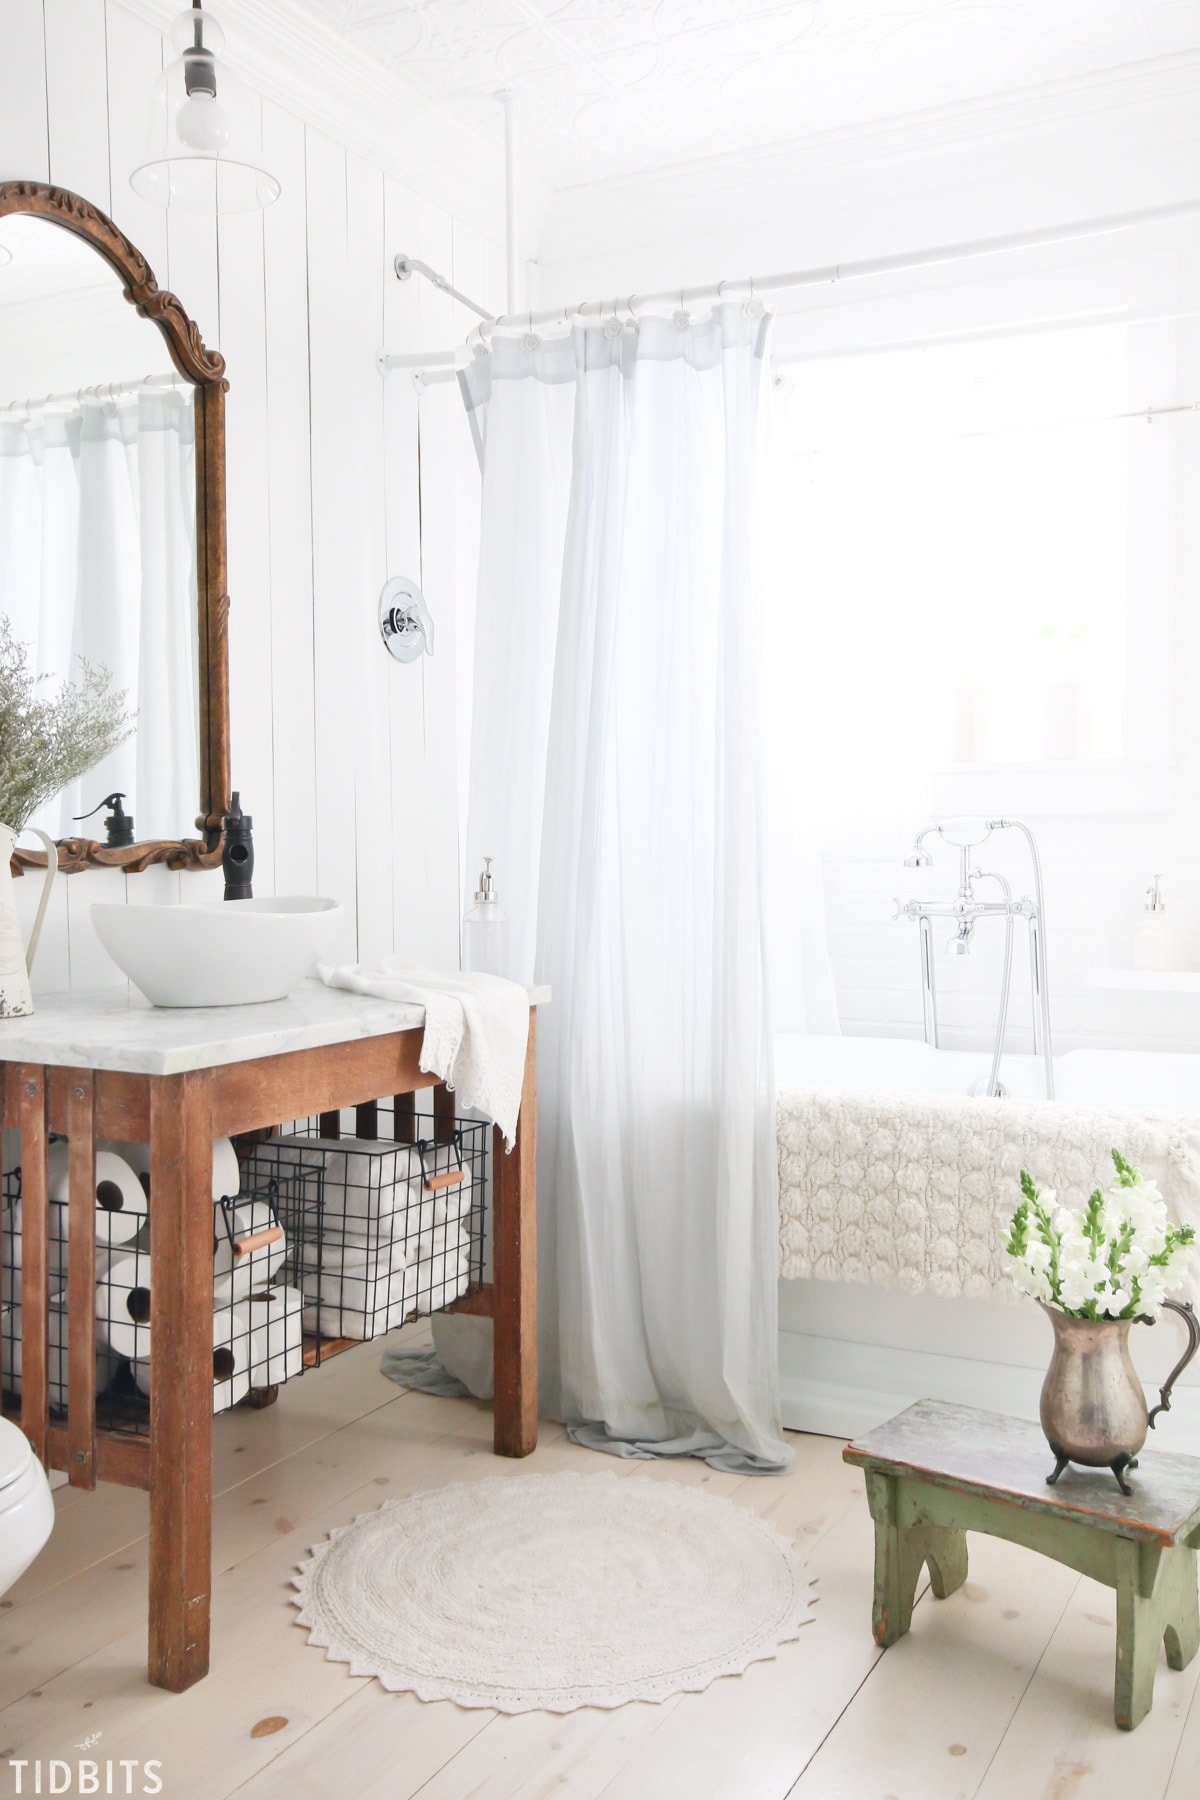
Another favorite transformation was the Master Bathroom.

Master Bathroom Before and After tour.

And here is what the bathroom looked like in my most recent Spring Bathroom Refresh. It’s where I go to relax and renew my mommy powers.

Cottage Farmhouse Spring Bathroom Refresh

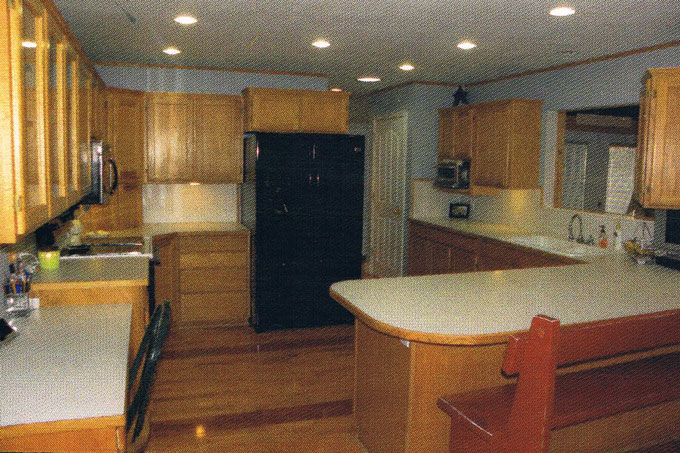
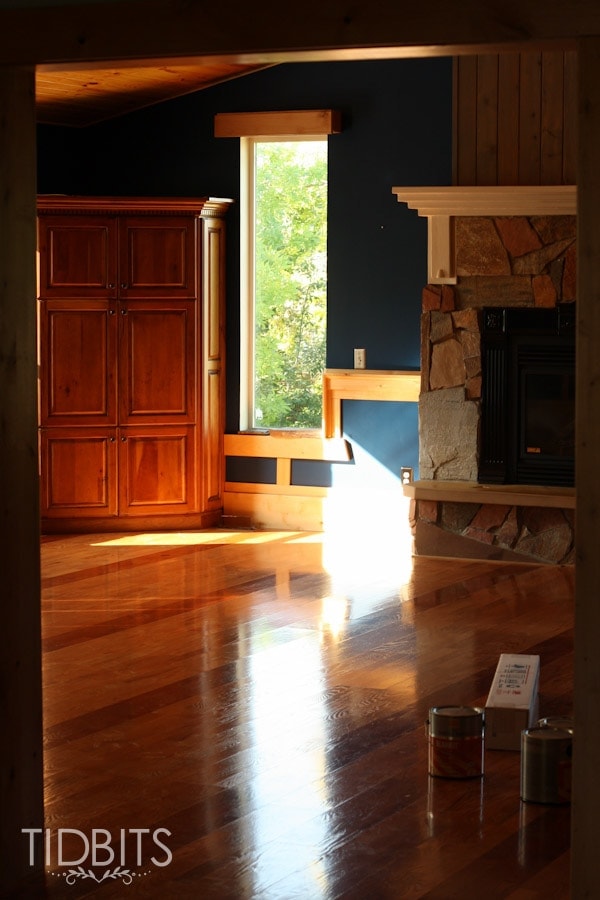
Now if you want a really drastic change, check out what the kitchen looked like when we moved in.

Cottage Kitchen before and after makeover tour.

Lots and lots of DIY work later . . . what our kitchen now looks like after a Spring Kitchen Refresh.

A cottage farmhouse kitchen Spring refresh by TIDBITS

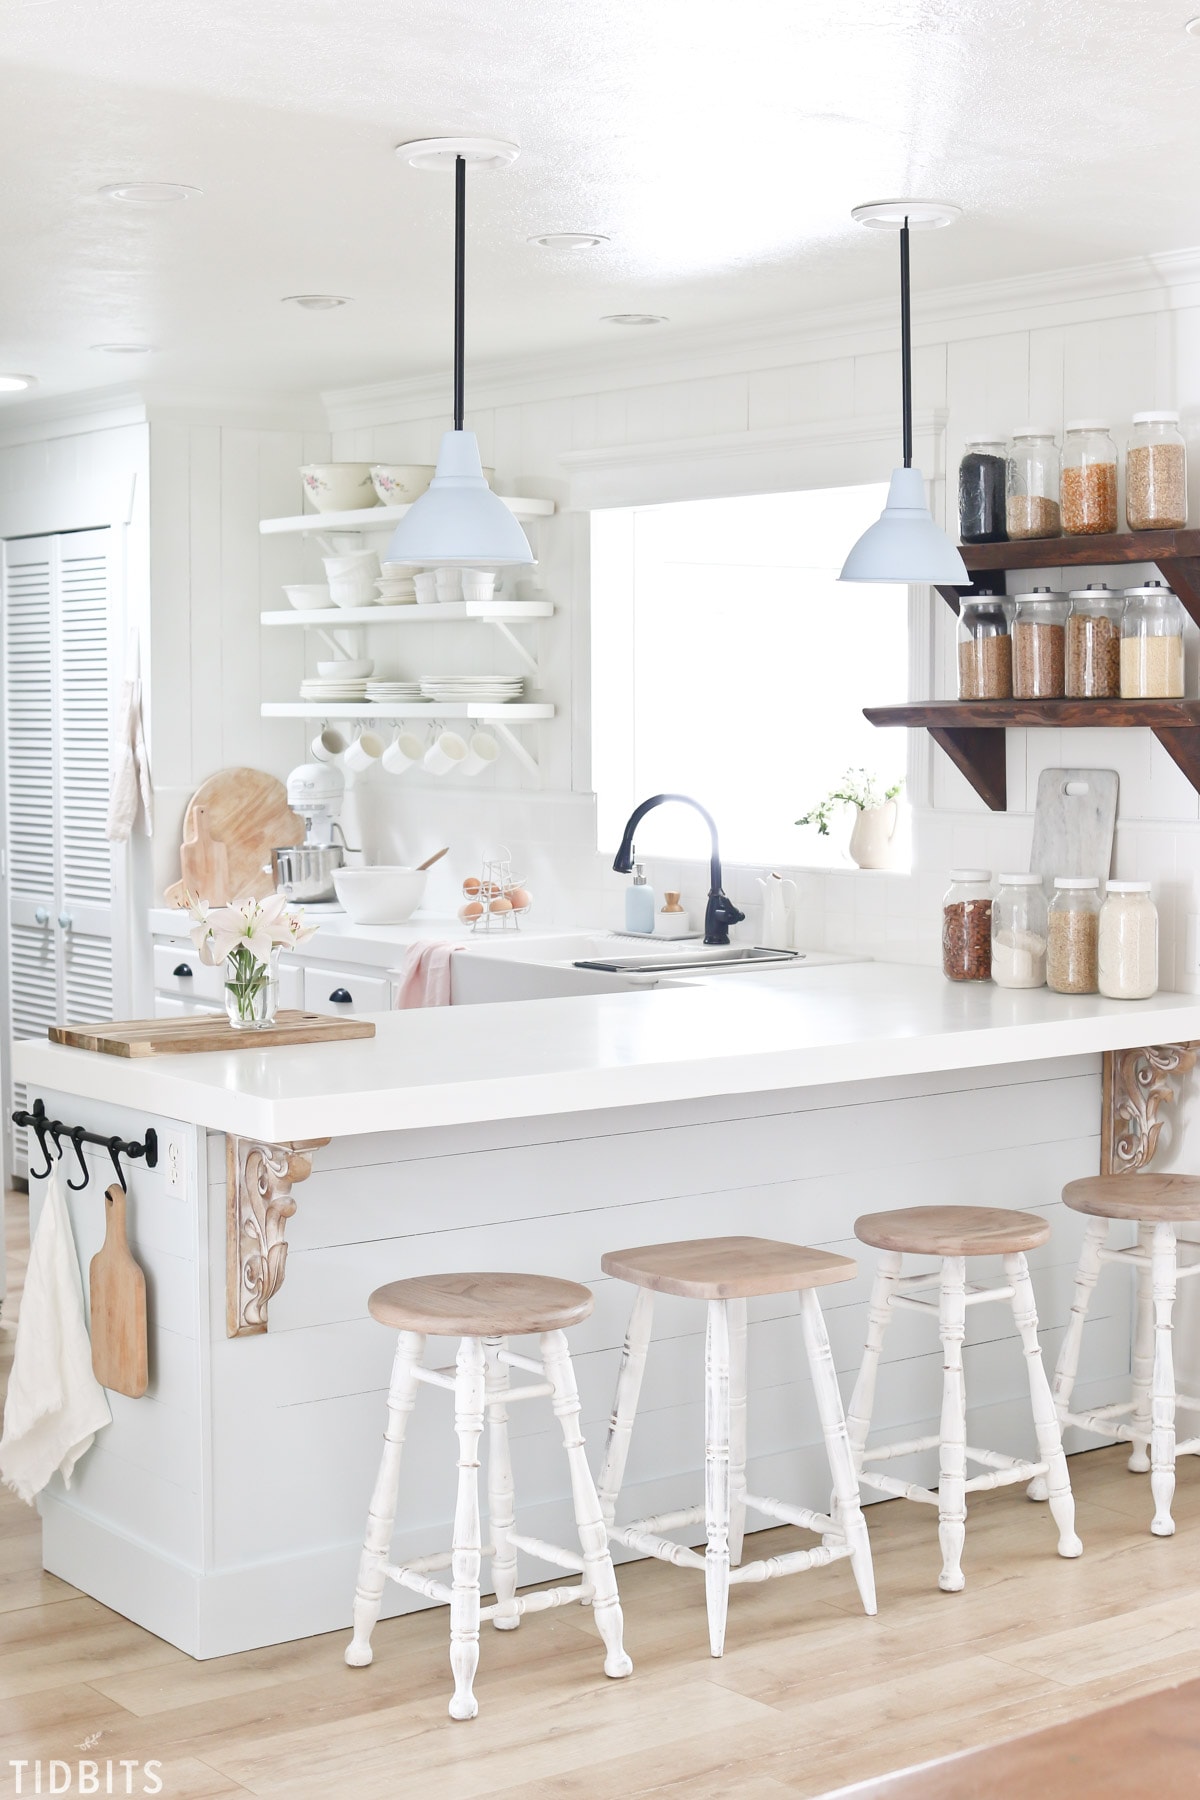
Can you see the hints of Farmhouse in France and Cottage on the Coast?

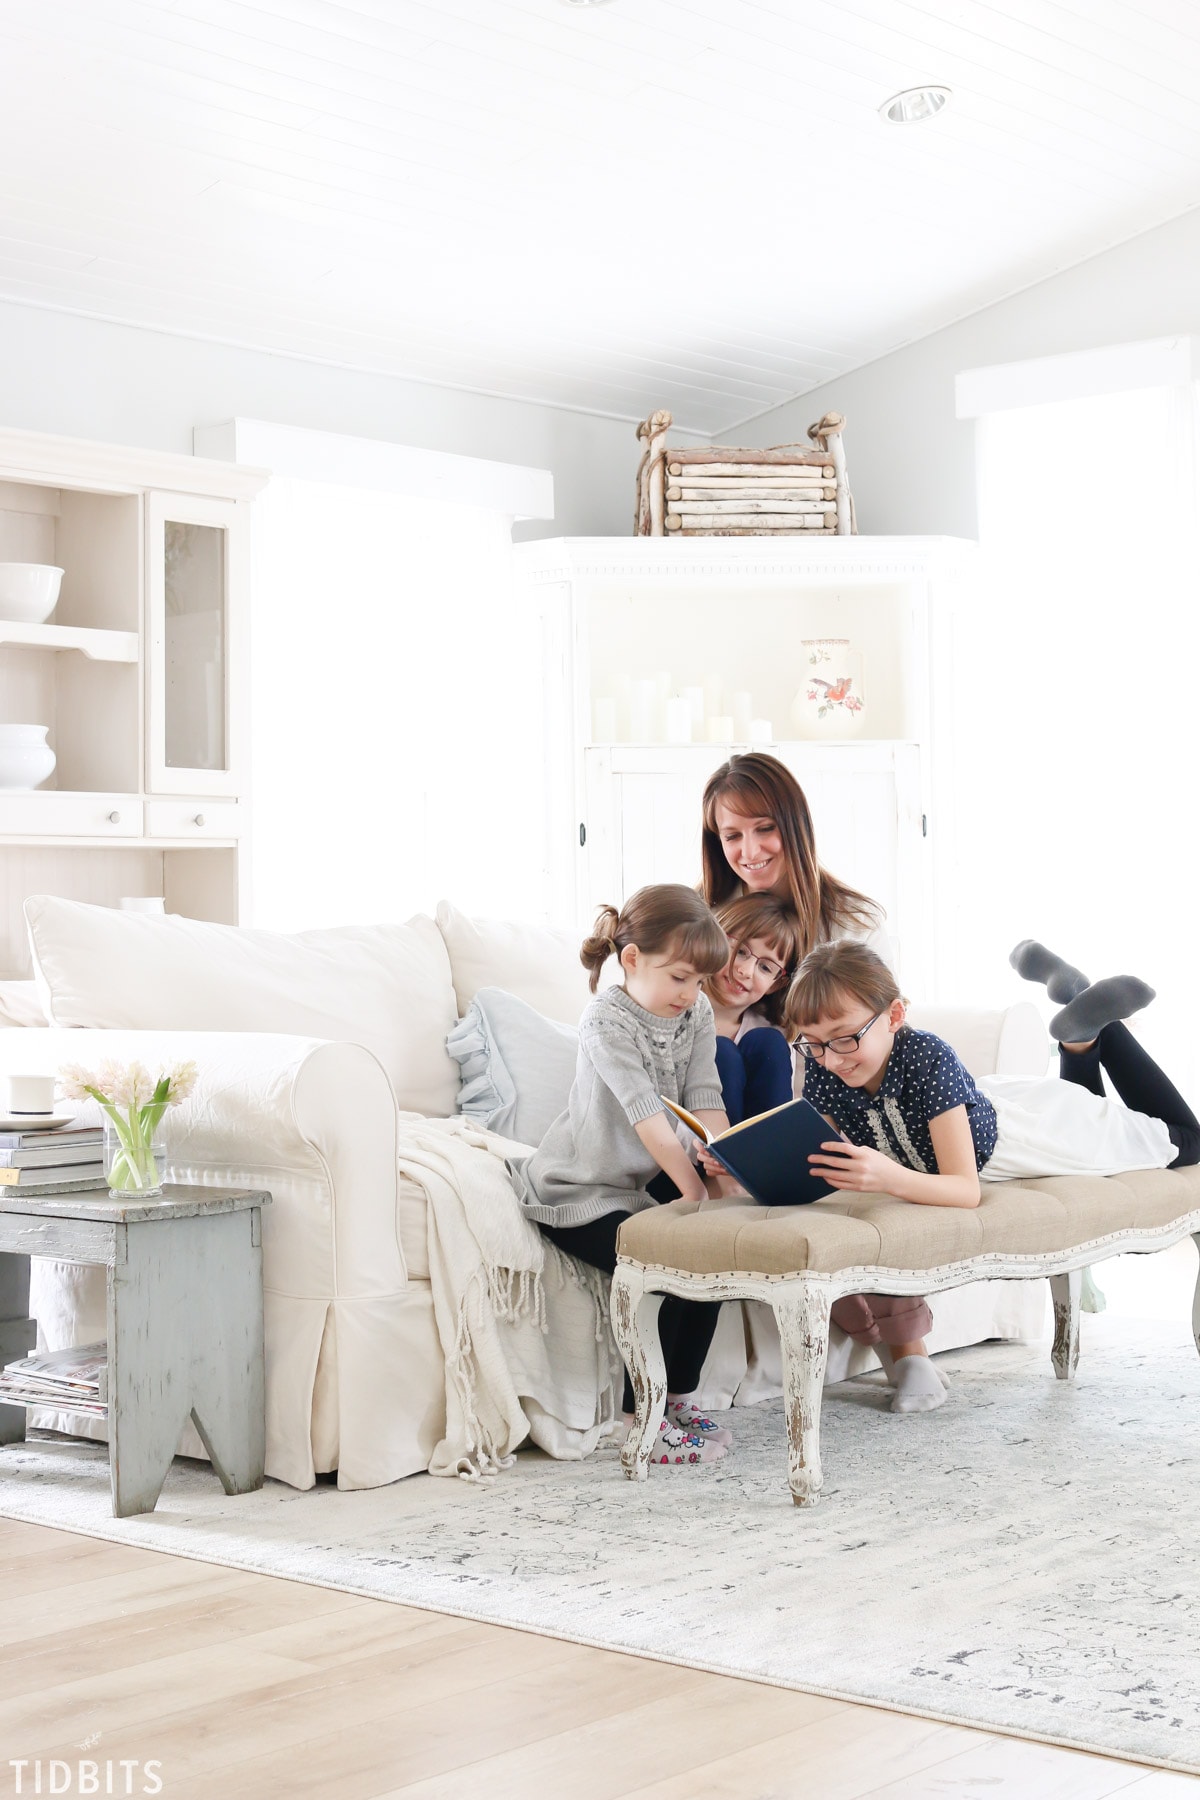
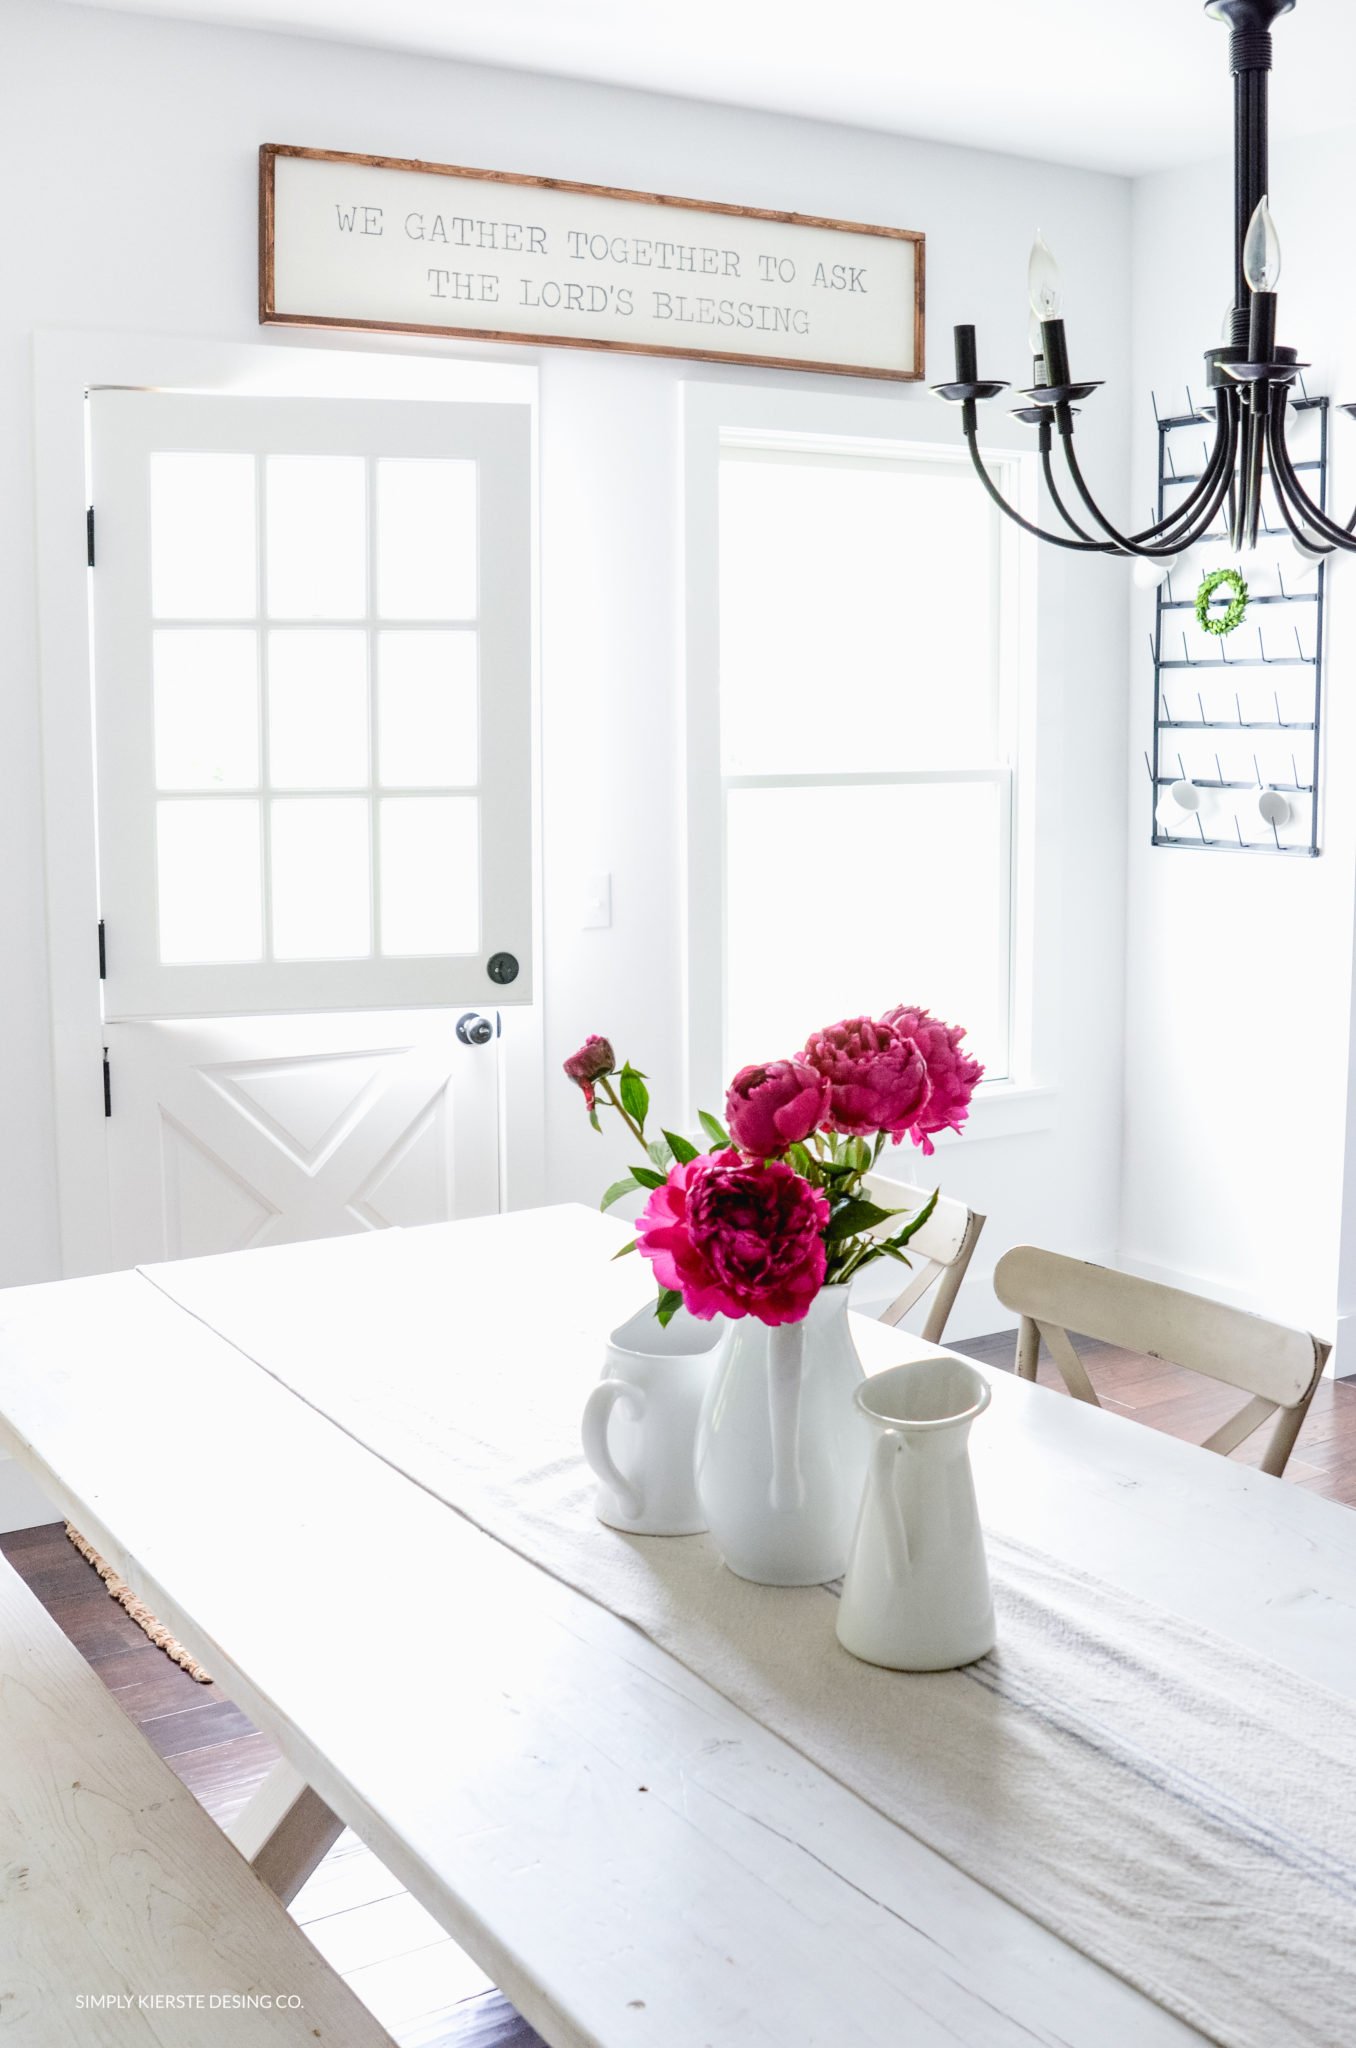
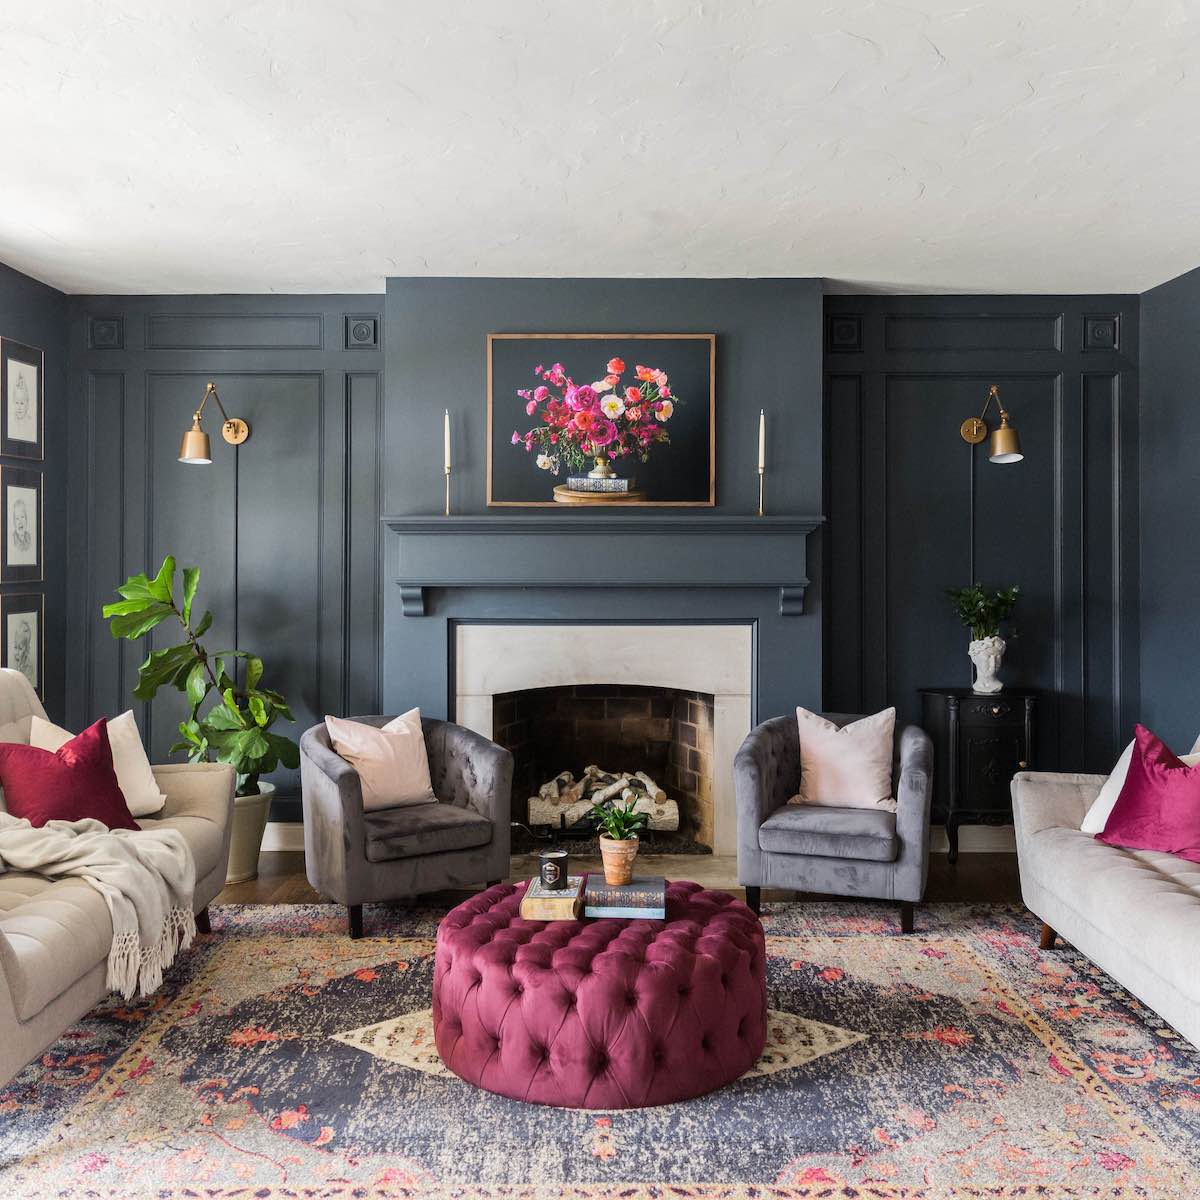
Finally, I’ll leave you with a look at our living room before and after.

Living room before and after tour.

This one took lots and lots of paint to get our current living room look, and is now a light and bright place we love to hang out.

Spring Living Room Home Tour and our new vintage blue rug, by TIDBITS.

Keep in mind, all this took over a 5 year period, and I actually have way more to show! Home wasn’t built in a day 😉

I love doing Seasonal Home Tours as well, so CLICK HERE to check out all my home tour goodies from over the seasons.

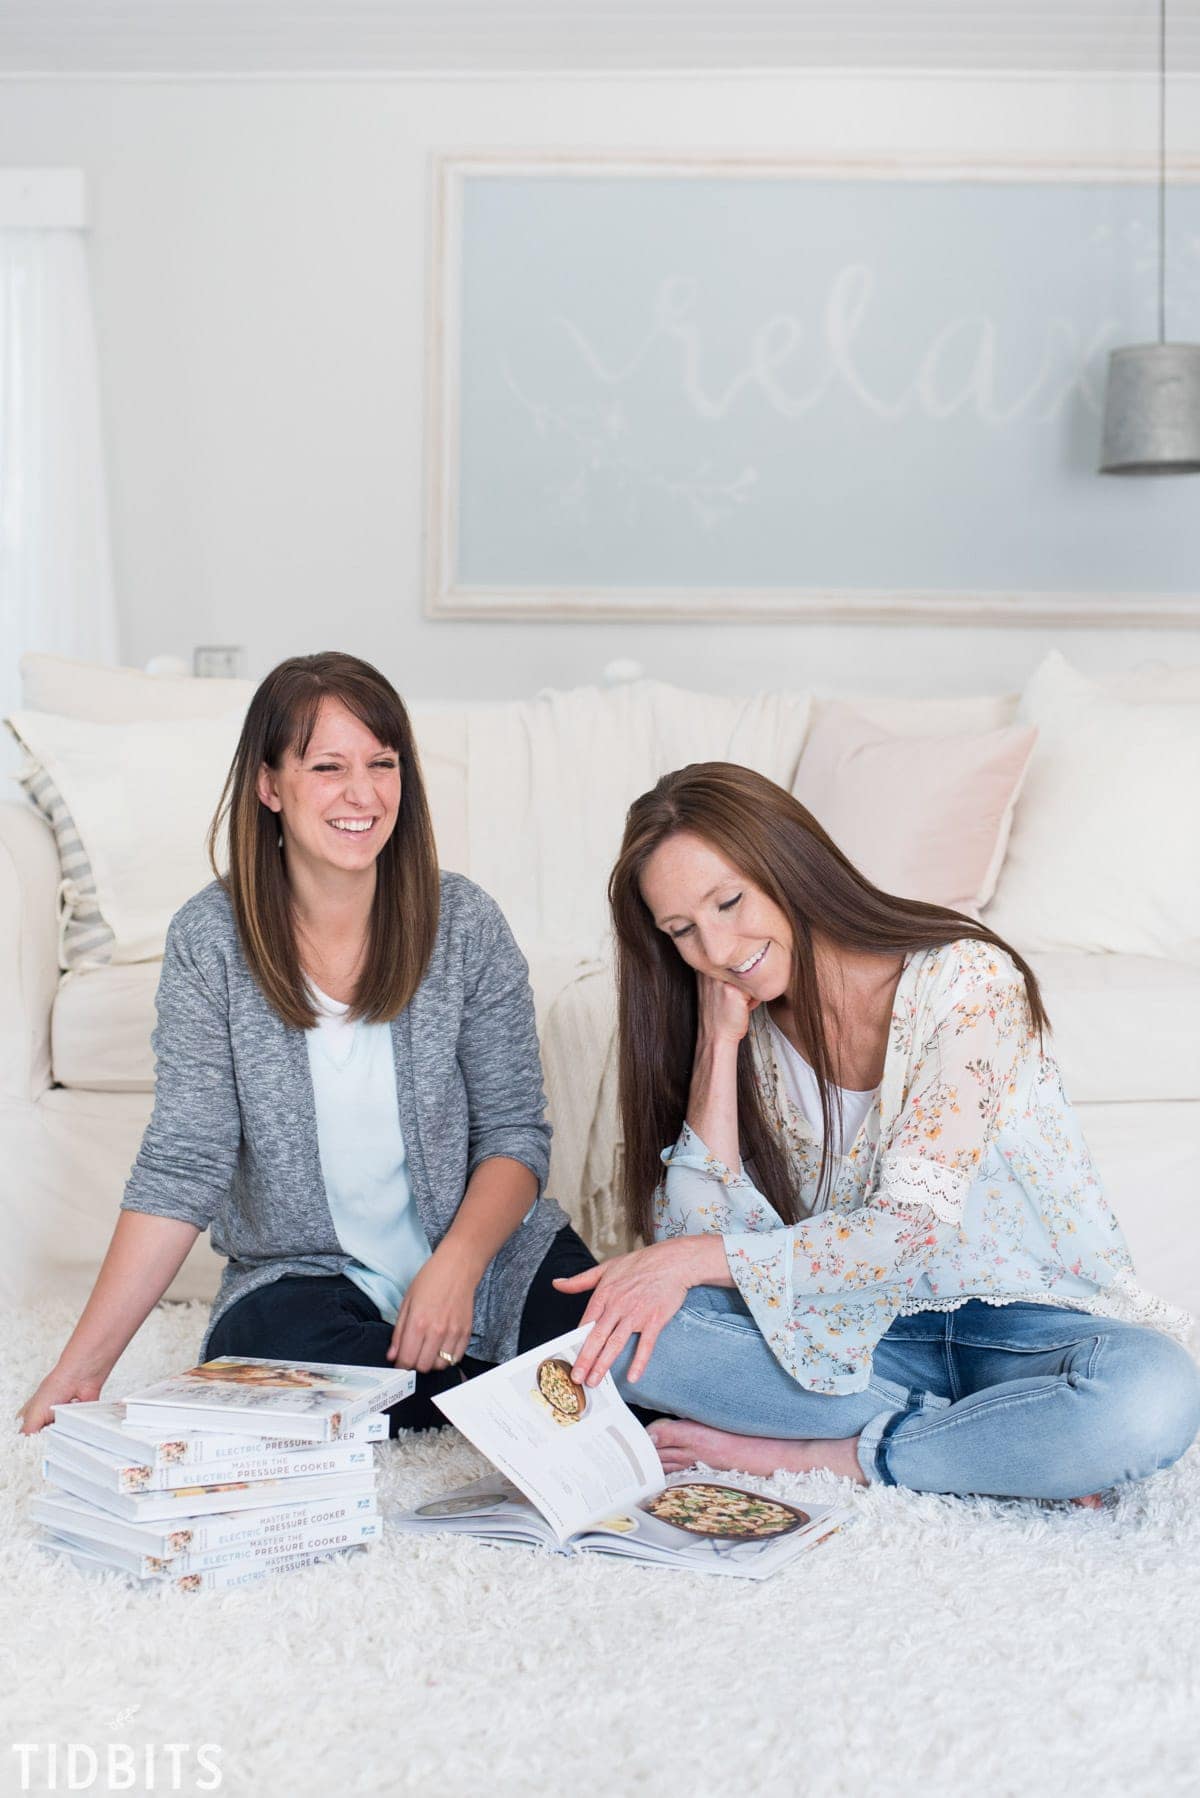
On a more random note, I also wrote an Instant Pot cookbook with my sister Marci, who now runs the food side of TIDBITS. You can also check out that book and how that came to be. I usually consider that my great Sister Makeover 😉

Introducing our cookbook | Master the Electric Pressure Cooker

I’ve enjoyed being here with you today, and sharing a bit of my work. You can also find me on all social networks, my favorite being Instagram and the one I’m pouring a lot of my soul into right now is my YouTube channel.

I hope to get to know you over at TIDBITS! Thanks for having me Sara!

We're On Instagram
I love this chair and side table from @zgallerie that I decided to try it in my office/library. I’m not sure where I love it more - here or my bedroom! It adds so much elegance and charm to the spaces. Use my code SY5 at checkout for 5% off your entire purchase.
Shop My Favorites by commenting LINKS or through the link in my bio #ZGallerie #MyZgallerie #Zgallerie #ModernLuxury #LuxuryInterior

...

31 11
We waited 13 years for this - and our house looks happier with her glow-up!

We went from a drafty single door (with a 90s glass inlay I poorly covered up) to double doors that allows in more light and feel right for our home.

What do you think?

...

90 38
My patio is all ready for warmer weather thanks to the new launch with @livabliss + @galeyalix! I’m LOVING the checkerboard outdoor rug. Comment “PATIO” and I’ll send you the links! #Livabliss #LivablissHome #GaleyALixxLivabliss #HomeDecor #Rugs

...

41 16
I’ve been slowly refreshing our bedroom and recently added this beautiful swivel chair and side table from @zgallerie! They add the perfect elegant modern touch to the space. Use my code SY5 at checkout for 5% off your entire purchase. Shop My Favorites by commenting “LINKS” or through the link in my bio. 
#gifted #ZGallerie #MyZgallerie #Zgallerie #ModernLuxury

...

21 16
What started as a leak turned into my dream bathroom ✨ I partnered with @wayfair and found everything - from checkerboard tile to the vanities, mirrors, and faucets. Comment “LINK” and I’ll send you all my favorite finds! *Shower glass coming soon! #ad #wayfaircreator #homereno

...

70 34
@wayfair is helping us turn a disaster into something beautiful ✨A leak from our upstairs shower led to a full remodel, and I can’t wait to show you the AFTER! Bathroom remodel reveal coming soon. Comment “LINKS” and I’ll send all my Wayfair favorites! #ad #wayfaircreator #wayfair #homereno

...

48 15
*TWO THINGS that make wallpaper removal easy* Wallpaper has come a long way and there’s no need to be scared of it anymore! Before I hang wallpaper, I size the walls and often use pre-pasted SureStrip wallpaper that is activated with water! Comment WALLPAPER for easy to remove wallpaper links!

...

41 29
What a difference pattern can make in a space! 

Are you ready to try wallpaper in your home?

...

131 46
2016 didn’t seem that long ago until I dug through my blog for old home photos. 😳

...

112 13
Dreaming of spring days while winter does its thing.

...

63 14