DIY

Top 5 Posts of 2017

Top 5 Posts of 2017

Happy New Year!  Here’s to 2018 – a chance for a new year (a fresh start) is always exciting!  

Thank you for joining me on my DIY adventure, and I am humbled by your support. Here is a countdown of Sincerely, Sara D.’s top 5 posts of 2017…

No.5 – DIY OPEN SHELVES These shelves are an easy and inexpensive solution for a empty wall that needs something.  They provide form and function – storage that looks pretty.  I added the open shelves to our kitchen nook area.  To see more on these DIY open shelves, click here.

Top 5 Posts of 2017

No.4 – LIVING ROOM MAKEOVER We all have that space that we can’t quite figure out.  This space was our living room, and I finally figured out a design that functioned well for our family and looked good!  I added DIY wall paneling, a new paint color and new furniture.  See all the details on the living room makeover here.

No.3 – LARGE DIY SILHOUETTE ART

I needed artwork for my daughter’s room but did not want to spend a lot (and I only spent $3 on this project).  See how to make this large DIY silhouette art by going here.

No.2 – DIY KITCHEN REMODEL

This kitchen was BY FAR our biggest DIY project to date.  It required months of late nights and weekends, but it was all worth it in the end (and so fun to look at the space and know we built it)!  Go here to see all the details on this DIY kitchen remodel!

No. 1 – BATHROOM REMODEL

This bathroom remodel happened early in the year.  Although it wasn’t a DIY project, it was the first bathroom I have ever designed from scratch, and we love the space.  See all the details on this master bath remodel here.

Blessings for a wonderful new year!

Go create something!

Are you new to my blog? Go HERE to see my home tour and HERE to shop for items I use in our home.

DIY

Installing a Farmhouse Sink

Installing a Farmhouse Sink

We recently remodeled our kitchen and installed BLANCO’S IKON 33 APRON sink in white and wanted to share our experience with installing a farmhouse sink.

Installing a Farmhouse Sink

If you’re not familiar with my blog, we recently finished our DIY kitchen remodel.  You can follow that process from the very beginning by going here.

This was our sink before, and the cabinets were an “L” shape which really restricted traffic flow.

We replaced those cabinets with an island (which opens up the space) and added a gorgeous farmhouse sink from BLANCO.

The kitchen design plan included a farmhouse sink without us realizing all that goes on behind the scenes when installing one. This is the sink cabinet we assembled.  For a traditional sink, the counter typically supports it.  However, a farmhouse sink needs to be installed before the counters.  My husband and I looked at our base and sort of scratched our heads for a bit…

After a ton of online research (blog posts and youtube videos) and conversations with an engineer friend, Steve felt confident to tackle this project. He created a table support using 2x4s.

We also had to cut the front of the sink.  This was stressful because we had one shot.  BLANCO sent a stencil with the sink which helped us know exactly where the stencil should be and marked it.  Then we went back over it with masking tape and marked it again (luckily we could see our line through the masking tape).  The masking tape helps with a sharp, clean cut.

Steve used a jigsaw to cut the front of the cabinet.

After the cabinet front was cut, we sanded and sanded for the perfect fit.

Unfortunately, I ended up sanding a little crooked, but Steve was able to fix my mistake.

All the building and cutting and sanding were worth the effort because our sink is absolutely gorgeous!

The BLANCO IKON is the first apron front sink made of natural granite composite, SILGRANIT material.

This material will not scratch or stain, and is hard-wearing while being easy to clean.

The sink comes in both 30 and 33-inch options as well as four colors – anthracite, cafe, metallic gray, and white.

For increased functionality, there is also the optional Floating Grid available.  It handles the weight of pots and pans and can also be used as a trivet on the countertop.

Thanks so much to BLANCO for their partnership on this kitchen remodel.  Our farmhouse sink is the centerpiece of the remodel, and we fans of BLANCO.  We recently made over our laundry room, and you can see all the details on that HERE!

Go create something!

Are you new to my blog? Go HERE to see my home tour and HERE to shop for items I use in our home.

*This post is a sponsored post by BLANCO.  I take pride in reviewing only products that fit my brand and will be beneficial to my readers. And while this post is sponsored, all the opinions are my own.

Seasonal Decor

Holiday Home Tour

Holiday Home Tour | Room for Tuesday

I am excited to share a simple and gorgeous holiday home tour with you all today.  My friend Sarah is a designer who shares her decor adventures on her blog, Room for Tuesday.

Holiday Home Tour Room For Tuesday

I met Sarah this past fall at a Delta Faucet blogger/designer event here in Indianapolis.  

Sarah is originally from Indiana but now lives in Salt Lake City.

Sarah and her husband (Emmett) are currently renovating their second home, and everything she touches is gorgeous.

Isn’t that fireplace gorgeous?  Sarah designed it and traveled to Georgia to select the North American marble.  You can read about the journey here.

This living room was a recent makeover project of Sarah’s, and you can see all the details (and before pics) here.

Decorating bookshelves can be one of the most difficult projects, but Sarah makes it look effortlessly amazing.

Sarah designed AND made her stockings.  This girl even sews (seriously, what can’t she do?), and you can see her tutorial here.

If you are still working on finishing up your Christmas shopping (like I am), check out Sarah’s stocking stuffer guide here. Sarah’s attention to detail is perfect.  I am in love with everything – including the hardware on her door.

Sarah’s sweet little guy looks so festive and fits right in her holiday tour!

Don’t you want to hug him?!  That sweater is just too much! Sarah is currently in the middle of a kitchen renovation, and I know it is going to be amazing.

Sarah, thanks so much for inviting us into your home for your holiday home tour.  It looks so pretty and calm – despite you being in the middle of a huge kitchen renovation!

See more gorgeous decor inspiration from Sarah on her blog, Room for Tuesday.  She is also on Facebook and Instagram.

Want to see my holiday home tour?  Click here!

Go create something!

Are you new to my blog? Go HERE to see my home tour and HERE to shop for items I use in our home.  

DIY

RTA Cabinets

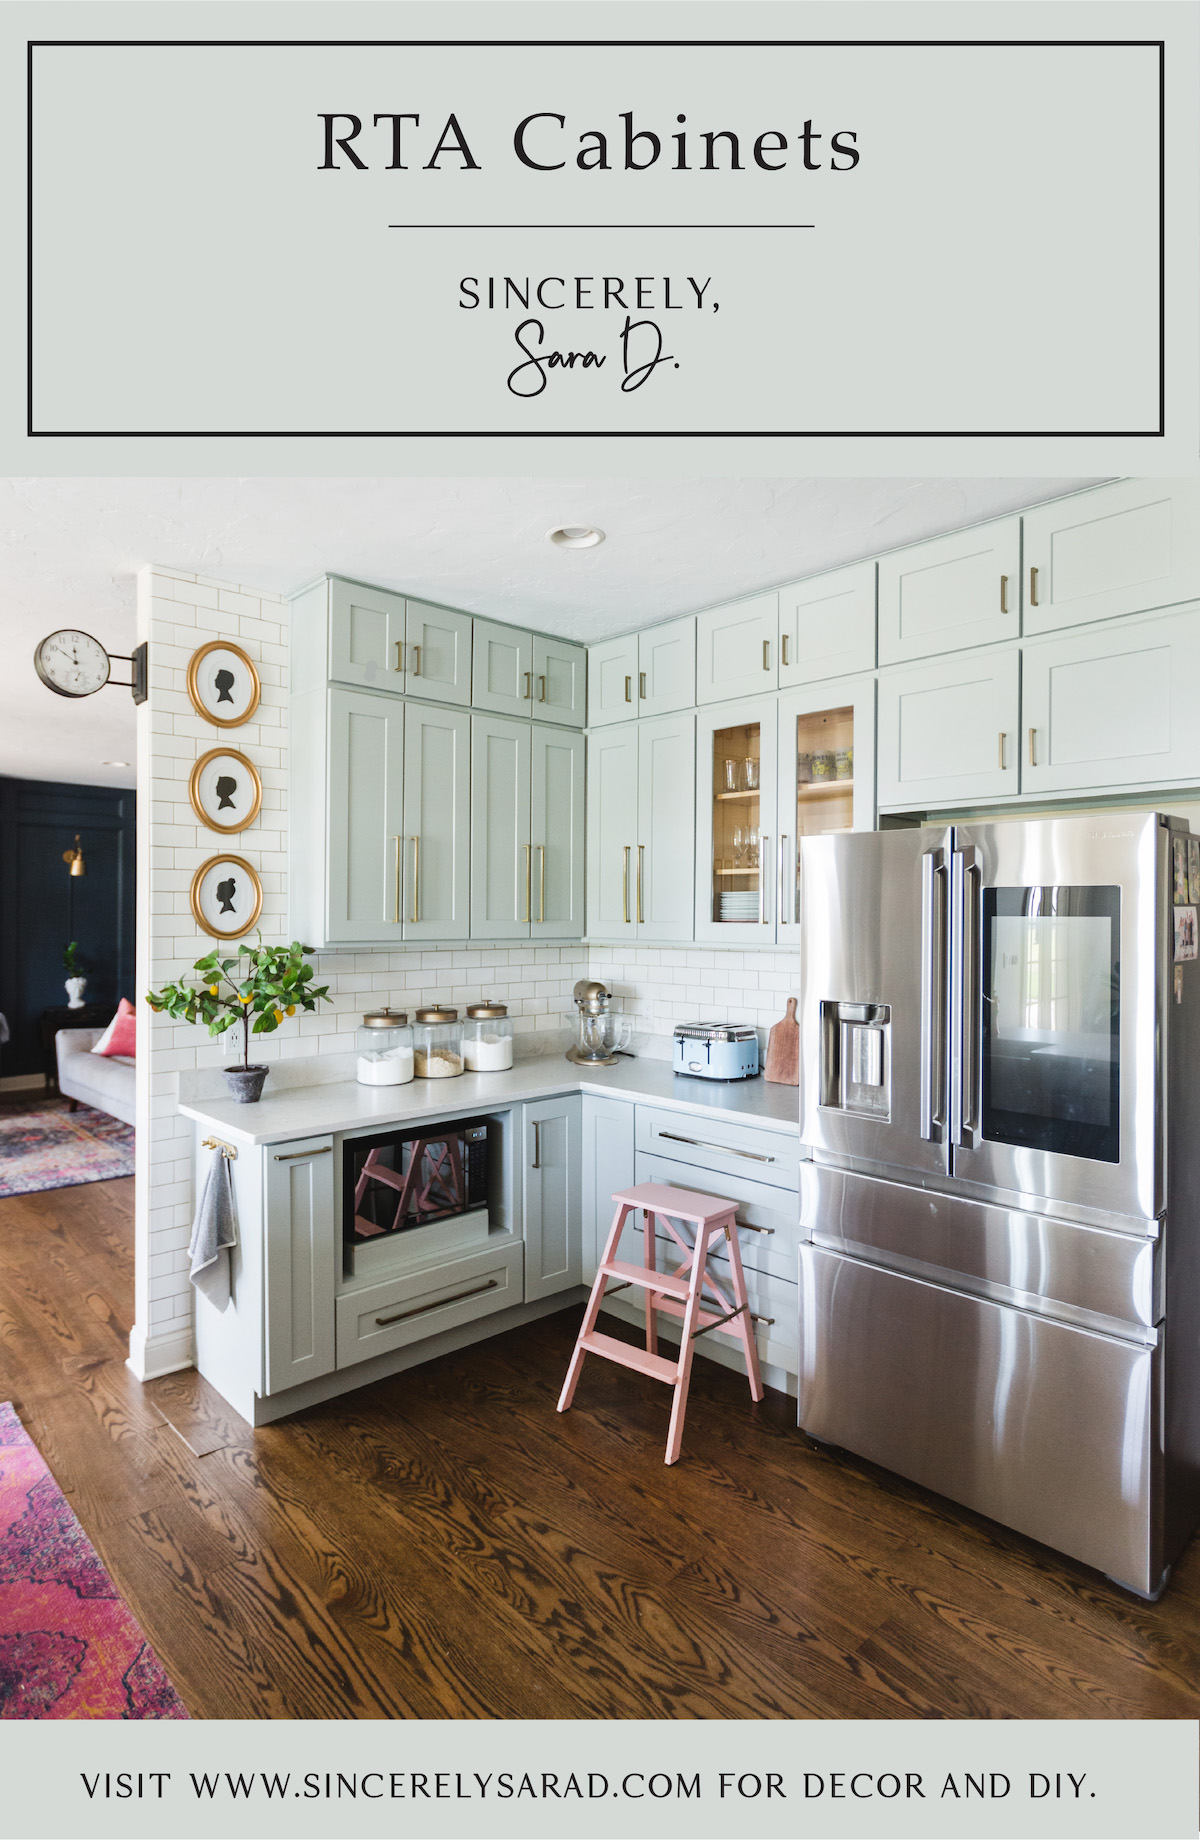
DIY KITCHEN REMODEL AND RTA CABINETS

We used RTA (ready-to-assemble) cabinets in our DIY kitchen remodel.  RTA cabinets can provide a 50% savings from big-box store cabinets and turnaround is fairly quick – usually within two weeks!

DIY Kitchen Remodel and RTA Cabinets

Oh my goodness.  We are DONE with our DIY kitchen remodel and could not be more thankful.  To see more on the reveal I shared last week (and a funny behind-the-scenes video), go HERE.

Our newly designed kitchen functions much better than our old design, and we are in LOVE with how gorgeous the new space is – mainly thanks to our new cabinets from Custom Service Hardware. Our old kitchen was dark, and we hated the layout (not to mention our really old appliances).

I did the best I could updating the space using paint…

However, we love to host big groups in our home and the layout was so frustrating.  The kitchen was closed off from the living room, and there was only one way in and one way out (resulting it lots of traffic issues). When we remodeled the kitchen, we tore down part of the wall between the kitchen and the family room.  Unfortunately we couldn’t remove as much of the wall as we intended due to some water lines we didn’t know were there.  Due to timing and our budget, we kept the wall a little longer than we had originally planned.  I had already ordered my cabinets from Custom Service Hardware, so we just added another base cabinet to fill the space and make it look more intentional.  My plan for the upper space was to add open shelving, but my husband and I panicked at the last minute about drilling into the tile AND possibly hitting the water lines that we now know are there.  I actually like the relief in the extra space, and it provides a little decorating space…

Our lower cabinets in the original kitchen design connected to the sink area in an “L” design.

We opted for an island this time around and moved the dishwasher next to the sink.

The range and stove were separate in the old design.

We added a new stove/range combo using the same hood from before (only painted to look like wood).

We are in love with the new space, but the entire space was DIYed, so it was a process to get to where we are.

I partnered with Custom Service Hardware on the kitchen cabinets and I cannot say enough good things about this company and their people.  I have worked with them in the past and had such an amazing experience with their rolling library ladder.

RTA (READY-TO-ASSEMBLE) CABINET PROCESS

  • Sizes are limited to what is in stock, but the large variety allows for a great layout.
  • The cabinets are delivered via a truck shipment.
  • There are no instructions in the box, but there are plenty of online video tutorials.
  • Assembly takes time, and the first one is always the hardest.  We figured out an assembly groove pretty quickly.
  • Use lots of glue and add a few screws for the best solid cabinet assembly.

I was surprised how quickly my cabinets arrived – I had them within a week of ordering them. Once they arrived, I was asked to check for damage with the delivery driver, and we didn’t find any damage.

After the delivery man left, I freaked out a bit looking at all those (very flat) boxes.

However, my husband and I set up a staging area in the garage and spent our evenings working on the cabinets (thanks to Steve’s parents for helping us assemble some).

The first cabinet really is the hardest, and you will create a system that works for you that makes the process go faster.  We spent just under an hour per cabinet on average – which would have been faster if Steve didn’t spend so much time organizing the screws…

Here’s a video showing the assembly process on one of the upper cabinets:

My parents came to help with the actual hanging of the cabinets.  It’s amazing how not level your home is.  It took some time, but the cabinets were hung over a long weekend.  You can see the process in this video:

RTA (READY-TO-ASSEMBLE) CABINET PRODUCT

  • The color availability is limited, but you can see the product before you buy by ordering sample doors.
  • The finish is very nice, and there are touch-up kits available for any scuffs or dents.
  • The quality is amazing!  We were pleasantly surprised with all the features and sturdiness of the cabinets.
  •  

We did find that hardware was necessary for the cabinets in securing the faceplates of the drawers.  However, we prefer the added touch the hardware provides the cabinets. We went with two separate cabinet series for our kitchen (although they are both shaker in style).  The gray cabinets are the NORWICH SERIES and the white cabinets (the island) are the ESSEX SERIES.

The RTA cabinets offer several fun features such as a hidden trash can.

We love the out-of-site microwave shelf.

And pull-out spice rack.

All the hours spent assembling and hanging the cabinets were time well spent because the finished result is absolutely gorgeous!

Custom Service Hardware also provides matching trim and molding pieces with their various cabinets series.

We are in love with our new kitchen and grateful to Custom Service Hardware on their partnership with this DIY kitchen remodel. Custom Service Hardware provides amazing service, and everyone I spoke with was pleasant and helpful.  However, I have to give a special shout-out to James who walked me through every step of this RTA cabinet process.

Go create something!

Are you new to my blog? Go HERE to see my home tour and HERE to shop for items I use in our home.

Want to follow the kitchen remodel journey? Start here: Week 1 – Demo

*This post is a sponsored post by Custom Service Hardware.  I take pride in reviewing only products that fit my brand and will be beneficial to my readers. And while this post is sponsored, all the opinions are my own.  

Decor

DIY Kitchen Remodel Reveal

I am SO excited – it is time for our DIY kitchen remodel reveal!

DIY kitchen remodel reveal with the home depot

We are SO happy with our new kitchen and incredibly grateful to The Home Depot for the partnership.  This absolutely would never have happened without them!

Back in July, I entered a design competition at a Haven – a DIY home decor blogger conference.  The competition was sponsored by The Home Depot, and they selected our kitchen remodel!

Our kitchen was cramped, and there was only one way in and one way out.  Our appliances were original to the house (20 years old), and didn’t work well.  Our oven burned everything and the fridge was small and opened up to the counter.  It was hard to stand and the sink with the dishwasher open, and we needed to reconfigure the appliance layout. After winning the partnership with The Home Depot, Steve and I got busy planning the remodel.  We had NEVER done a DIY project to this extreme, but we were excited (and extremely naive).

We demolished the kitchen on a Saturday in late September, and I remember walking through the house that afternoon and completely freaking out.  What were we doing?! However, we took the project day by day.

And spent lots of late night and weekends working on the kitchen and forever grateful to friends who helped us along the way!

Everything was done by us except for the floors (we had them refinished), the drywall, and the countertops (they were installed by The Home Depot). Want to see some behind the scene thoughts on this DIY kitchen remodel?

GO HERE to see the DIY Kitchen Remodel Reveal on The Home Depot’s Blog!

  A special thanks to The Home Depot for the partnership on this kitchen.  It would not have happened without you!

Go create something!

Are you new to my blog? Go HERE to see my home tour and HERE to shop for items I use in our home.

Want to follow the kitchen remodel journey?

Week 1 – Demo Week 2 – Dry Wall and Cabinets Week 3 – Floors and Cabinets Week 4 – Painting and Trim Week 5 – Appliances and Farmhouse Sink Prep Week 6, 7 & 8 – Countertops Week 9 – Finishing Touches Find me on Facebook | Instagram | Twitter | Pinterest *This post is a sponsored post by The Home Depot.  I take pride in reviewing only products that fit my brand and will be beneficial to my readers. And while this post is sponsored, all the opinions are my own.      

Seasonal Decor

Simple Christmas Decor

I am excited to be a part of the Seasonal Simplicity Christmas home tour as we share Simple Christmas Decor ideas.  I had to miss the fall blog hop because we were in the middle of a DIY kitchen remodel (to see more on that journey, go HERE)!

If you are here from Making Home Base, welcome!

With all the craziness of the kitchen remodel, my Christmas decor is pretty simple this year.

One of the two Christmas trees is in the family room along with some greenery on the mantel, stockings and a wreath.

The tree is filled with metallic neutral ornaments and little DIY santa photo ornaments.

I absolutely adore putting up these handmade ornaments every year.

The navy walls are new to the space this years and have changed the look of my holiday decor simply by changing the backdrop of the room.

In the kitchen nook, the DIY open shelves are a recent add to the DIY shiplap wall.

The shelves are filled with my kids’ santa pics through the years.  It is pretty obvious how special these photos are to me – I love how you can see them grow from year to year.

Unfortunately now that my 12-year-old is bigger than santa, I’m not sure how much longer the tradition of the pictures with santa will last…

Right off the kitchen, is a cute little hot cocoa bar.

I am a huge fan of my friend Cara’s chalkboard art of Word for Word Chalk Art.

Our second tree is in our library/music room.

This room was my home office, but the piano lost its wall during the kitchen remodel. The $50 painted piano was moved, and I feel so fancy calling the space the music/library room.

The dining room was decorated earlier this fall with greenery that works well for Thanksgiving as well as Christmas (go here to see more on the tablescape and wreaths).

The chalkboard name plates are also a creation by my friend Cara.

Thanks so much for taking the time to tour my home all (simply) decked out for the holidays! Go see Just a Girl and Her Blog for more holiday inspiration!

Monday

The Happy Housie / House by Hoff / at HOME with the barkers / Paint Me Pink / Cherished Bliss

Tuesday

Maison de Pax / House of Wood / Tidy Mom / The Turquoise Home / Rain on a Tin Roof

Wednesday

Jamie Costiglio / Robb Restyle / Bless’er House / Two Twenty One / Place of My Taste

Thursday

Town & Country Living / A Burst of Beautiful / Deeply Southern Home / My Fabuless Life

Friday

Erin Spain / Refresh Restyle / Nina Hendrick / The Wicker House

Making Home Base / Sincerely Sara D. / Just a Girl and Her Blog

Merry Christmas!

Go create something!

Are you new to my blog? Go HERE to see my home tour and HERE to shop for items I use in our home.


Home

Kitchen Cabinet Hardware

When we began our kitchen remodel, I researched new kitchen cabinet hardware from the very beginning.  I wanted hardware that was timeless but had a modern take on traditional.

I have been crushing on golds lately, but I love the look of the softer, more brushed golds.  I looked all over at various kitchen cabinet hardware, and I ultimately came back to Hickory Hardware’s Skylight Collection.  I used this same hardware in my laundry room makeover and they are gorgeous.

They have various sized pulls in their Elusive Golden Nickel.  They are the perfect gold color and blend seamlessly with my stainless steel appliances.

I ordered samples of the various sizes, and it was so helpful to visually see the pulls with the different cabinets.

I labeled the cabinets with the pull sizes so I knew exactly what to order.

Once the hardware arrived, I took my time installing.  I measured several times before drilling the holes – the last thing I wanted to do was have to order new cabinet doors!

I also used a level to measure since cabinet doors are never perfectly straight.

I love the hardware because it’s sophisticated and gorgeous without trying too hard.

The full kitchen reveal with happen next week, so stay tuned!  A special thanks to Hickory Hardware for their partnership on my kitchen remodel!

Go create something!

Are you new to my blog? Go HERE to see my home tour and HERE to shop for items I use in our home.


Want to see the full kitchen remodel journey?  Follow along here:

Week 1 – Demo Week 2 – Dry Wall and Cabinets Week 3 – Floors and Cabinets Week 4 – Painting and Trim Week 5 – Appliances and Farmhouse Sink Prep Week 6, 7 & 8 – Countertops Week 9 – Finishing Touches Find me on Facebook | Instagram | Twitter | Pinterest *This post is a sponsored post by Hickory Hardware.  I take pride in reviewing only products that fit my brand and will be beneficial to my readers. And while this post is sponsored, all the opinions are my own.

Paint

Faux Wood Paint Technique

I asked several of my blog friends for ideas on the best faux wood paint technique.  My friend Lauren of Bless’er House is the one who told me how to create this wood look with paint. For our kitchen remodel, I really wanted to paint our plaster hood to resemble our dark wood floors. I changed Lauren’s tutorial just a bit to make my faux wood a bit darker to match my floors.

 For this Faux Wood Paint Technique tutorial, you will need (affiliate links provided for convenience):

To begin, paint the first layer a medium gray.

My hood already had two layers of chalk-type paint on it.  

For the next layer, dry brush cream or white paint.  If you are unfamiliar with with dry brushing, see the tutorial here.  It is one of the easiest painting techniques!

For the third layer, add a dark gray using the same dry brush technique.  By doing these layers of dry brushing, it will add dimension and eventually mimic wood grain.

Now comes the fun part – waxing!  Add a dark wax to the entire piece.  Make sure you use dark wax (not clear wax) and be very generous with adding it.

The dark wax is what makes the piece mimic the look of wood.  It is amazing how quickly the piece is transformed.

Cover the entire piece with wax, and come back through with a lint-free rag and buff.  Once you buff, you are done!

I am so pleased with the result.  My hood really does resemble our dark wood floors.

If you are interested in following our kitchen remodel journey, go HERE!

Go create something!

Are you new to my blog? Go HERE to see my home tour and HERE to shop for items I use in our home.

Find me on Facebook | Instagram | Twitter Pinterest

Decor

Kitchen Remodel

Kitchen Remodel | Week 9

We can see the finish line on this kitchen remodel!  When we began this project 9 weeks ago, I wasn’t sure we every would finish…

Kitchen Remodel | Week 9

The final touches are happening this week.  I worked on the backsplash over Thanksgiving break, and I am also adding a few open shelves at the end of the top cabinets.

This week I am working on the cabinet hardware from Hickory Hardware.  Obsessive measuring is happening before drilling the holes!

I have made all the design decisions and dealt with the easy DIY projects.  My husband (on the other hand) has had to deal with all the harder, behind-the-scenes projects.  He has learned more about electrical and plumbing projects than he probably ever wanted to know.  We are so grateful to a friend who has helped countless hours along the way.   I know he doesn’t want to be named (both because he is humble, but also because we live in a small town and doesn’t want the constant requests)!

I will be sharing some of the details of the kitchen, but this is the last weekly update!  I remember how I felt that afternoon after demo wondering what in the heck we had just done.  It has been a quite a journey, and we are excited to see the end! A special thanks to The Home Depot for the partnership on this kitchen.  It would not have happened without you! Go create something!

Are you new to my blog? Go HERE to see my home tour and HERE to shop for items I use in our home.

Find me on Facebook | Instagram | Twitter Pinterest

Want to follow the kitchen remodel journey?  Go here to begin: Week 1 – Demo


Home

Updating Kitchen Appliances

During the kitchen remodel, one of the things I was most excited about was updating kitchen appliances.  Watch the video at the end of this post showing why the Samsung Family Hub Refrigerator is so amazing!

I partnered with Home Depot on my kitchen remodel and the most exciting part of the remodel was updating kitchen appliances.  Most of our appliances were original to the house (20 years), so it was definitely time for an upgrade.  Also, we hated the layout of the old appliances.  So the kitchen space was reconfigured, and I CANNOT wait to show you the final reveal next month!

Updating Kitchen Appliances Our appliances were delivered a few weeks ago, and the delivery guys were fast and incredibly nice (read more about the delivery here).

They did not leave a single mark or scratch on the newly refinished floors.

We instantly fell in love with the Samsung microwave, oven, dishwasher, and Family Hub Refrigerator.  It has only been a few weeks, but we are so happy with them! This home was built 20 years ago, and most of the appliances were original to the house.  The microwave was the one appliance upgraded when we bought the house, but it was simple and not too exciting.

The Microwave: We ordered the Samsung Countertop Microwave in Stainless Steel with Shiny Mirror Design and placed it in a lower cabinet.

This microwave offers some unique features:

  • Shiny Mirror Design: Convenience in a Unique, Modern Design.
  • PowerGrill with Round Rack and Ceramic Plate: Allows for Crispy Food.
  • Ceramic Enamel Interior: The ceramic enamel interior is scratch-resistant and easy to clean.

The Dishwasher: I am a little too efficient with washing dishes which means I am not a rinser, so it was important that we found a powerful dishwasher that would compensate for my lack of pre-cleaning.

After researching dishwashers, we selected the Samsung 24 Inch Top Control Dishwasher in Stainless Steel with Stainless Steel Tub and Waterfall Wash System.

This dishwasher makes sure dishes are squeaky clean:

  • WaterWall: Delivers remarkable cleaning results and doesn’t leave any food or residue on dishes.
  • AutoRelease Door: The door opens automatically to dry dishes faster.
  • 3rd Rack with FlexTray: Wash cutlery and large utensils with a third rack that saves plenty of space for other items, with a FlexTray that makes for easy unloading.

I never figured out our old oven.  All cookies or other baked goods ended up flat and burned!  We also had a separate oven and stovetop, and we wanted to combine them for more efficient use of space.

I love the look of a gas range, but we did not want to add a gas line as part of the remodel, so we stuck to an electric oven and ordered the gorgeous Flex Duo Slide-In Double Oven Electric Range with Self-Cleaning Convection Oven in Stainless Steel.

This Samsung Double Oven is smarter than me:

  • Flex Duo: Offers the ability to cook two dishes at different temperatures at the same time (perfect for the holidays)!
  • Blue LED Knobs: The design is top of the line with bright signature blue LED knobs that help you know when your cooktop is on.
  • WiFi: Provides the ability to preheat the oven remotely from your mobile device.

Our little fridge was old and VERY outdated.  I tried to make it look cooler by painting it with chalkboard paint, and we had our weekly calendar on it which we used all the time.  But it was time to upgrade the fridge and the calendar!

We kicked that little old thing to the garage and replaced it with the MOST GORGEOUS fridge you’ve ever seen: the Family Hub 4-Door French Door Smart Refrigerator in Stainless Steel!

The refrigerator is absolutely amazing and offers so much more than my chalkboard calendar fridge:

  • Food management: Create shopping lists send them to your mobile device to make shopping easier. The three built-in cameras can be viewed while in the store as a quick reminder to see if anything is missing.
  • Family Connection: Keep track of family calendars to help manage busy everyday lives. Instead of sticking photos all over the fridge with magnets, this fridge has photo sharing, which keeps the fridge looking clean and less cluttered.
  • Entertainment: Listen to music while in the kitchen with Pandora and other music stations. Connect to the web or search for recipes!

The Samsung Family Hub Refrigerator is a true all-in-one appliance that is the center of the kitchen, and the one I am most excited about while we were updating kitchen appliances.

Watch this video to see how our entire family uses the fridge: 

I know they are just appliances, and even I’m surprised at how happy they make me!  We are so thankful for our gorgeous new appliances and are VERY close to finishing the kitchen.  The final reveal happens next month – stay tuned! Thanks so much to The Home Depot for the partnership! Go create something!

Are you new to my blog? Go HERE to see my home tour and HERE to shop for items I use in our home.

Find me on Facebook | Instagram | Twitter Pinterest  

Decor

Kitchen Remodel

Kitchen Remodel | Week 6, 7 & 8

I am so behind on updates, but today I am sharing the latest of our Kitchen Remodel – Week 6, 7, and 8!

Kitchen Remodel | Week 6, 7 & 8

If you are following our remodel journey, go here to see Week 9 – Finishing Touches! Steve and I had scheduled a vacation to Mexico with some friends WAY before we knew the kitchen remodel was going to happen (and I shared a gorgeous colorful surf town we visited HERE). Although the timing seemed crazy, it really was the best thing for us.  We have spent all our free time working on this remodel, and doing that can be a little crazy for a marriage.  Taking a break was SO good!  We are refreshed and ready to tackle this kitchen – especially now that the finish line is in sight! This week was a big week because our countertops from The Home Depot were installed!

Installation was easy and quick (under two hours) and the installers were great.

We went with a quartz that looks like marble called Pearl Jasmine from Silestone.

I was more than happy to sit back and watch rather than DIY this project.

I cannot express to you how excited we are to have countertops, and they are absolutely gorgeous!  We went with the suede finish to try and mimic the marble look as much as possible.

More to come! Go create something!

Are you new to my blog? Go HERE to see my home tour and HERE to shop for items I use in our home.

Find me on Facebook | Instagram | Twitter Pinterest *This post is a sponsored post by The Home Depot.  I take pride in reviewing only products that fit my brand and will be beneficial to my readers. And while this post is sponsored, all the opinions are my own.

Home

Mexican Vacation: Sayulita

While on our Mexican vacation, we spent time exploring the colorful surf town of Sayulita.

Trip to Mexico. Exploring the colorful and beautiful surf town of Sayulita.

In the middle of the kitchen remodel, Steve and I took a break and traveled to Mexico with some friends.  We had planned this trip way before we knew the remodel was actually going to happen, and right before the trip I questioned our plans.  The timing seemed all wrong, but the Mexican vacation (and exploring Sayulita) ended up being the best thing – both for our sanity and our marriage! Remodels are rough enough but when the DIY factor is added in, it can be just plain awful.  We have spent all our free time on projects, so it was such a blessing to have some time to relax and not worry about the next DIY project… While in Mexico, we spent a day at the gorgeous and colorful surf town of Sayulita.  It is about a 45 minute drive from Nuevo Vallarta (near Puerta Vallarta). Mexican Vacation Exploring Sayulita The sites and sounds of this beach town are definitely worth exploring. The streets leading to the beach are lined with markets and shops selling the most gorgeous and colorful things.

The beach itself is pretty, but it is a dark sand and seems to be fairly rocky.  However, the water was warm and the waves are so fun!

Surfers are everywhere and surf lessons are offered to anyone willing to try.  However, the undertow is pretty strong and being a good swimmer is definitely a requirement.

The streets of Sayulita are lined with festive, colorful buntings.

Cute little shops line the streets and are surrounded by open markets.

I was in complete awe of the gorgeous and colorful handmade goods.  I felt like a kid in the candy store – I wanted it all (but unfortunately ran out of cash pretty quickly).

The textures and patterns are absolutely stunning.

The colors are so vibrant and alive.

I found a gorgeous handmade shirt for me and a dress for my daughter.

Even the buildings boast the beautiful colors and patterns.


Sayulita is refreshing and so inspiring.

Inspiration is everywhere.  There are artists crafting their crafts right on the streets.

If you ever have the opportunity to visit Sayulita in Mexico, I highly encourage it!

Go create something!

Are you new to my blog? Go HERE to see my home tour and HERE to shop for items I use in our home.

Find me on Facebook | Instagram | Twitter Pinterest  

We're On Instagram
I love this chair and side table from @zgallerie that I decided to try it in my office/library. I’m not sure where I love it more - here or my bedroom! It adds so much elegance and charm to the spaces. Use my code SY5 at checkout for 5% off your entire purchase.
Shop My Favorites by commenting LINKS or through the link in my bio #ZGallerie #MyZgallerie #Zgallerie #ModernLuxury #LuxuryInterior

...

32 11
We waited 13 years for this - and our house looks happier with her glow-up!

We went from a drafty single door (with a 90s glass inlay I poorly covered up) to double doors that allows in more light and feel right for our home.

What do you think?

...

90 38
My patio is all ready for warmer weather thanks to the new launch with @livabliss + @galeyalix! I’m LOVING the checkerboard outdoor rug. Comment “PATIO” and I’ll send you the links! #Livabliss #LivablissHome #GaleyALixxLivabliss #HomeDecor #Rugs

...

41 16
I’ve been slowly refreshing our bedroom and recently added this beautiful swivel chair and side table from @zgallerie! They add the perfect elegant modern touch to the space. Use my code SY5 at checkout for 5% off your entire purchase. Shop My Favorites by commenting “LINKS” or through the link in my bio. 
#gifted #ZGallerie #MyZgallerie #Zgallerie #ModernLuxury

...

21 16
What started as a leak turned into my dream bathroom ✨ I partnered with @wayfair and found everything - from checkerboard tile to the vanities, mirrors, and faucets. Comment “LINK” and I’ll send you all my favorite finds! *Shower glass coming soon! #ad #wayfaircreator #homereno

...

70 34
@wayfair is helping us turn a disaster into something beautiful ✨A leak from our upstairs shower led to a full remodel, and I can’t wait to show you the AFTER! Bathroom remodel reveal coming soon. Comment “LINKS” and I’ll send all my Wayfair favorites! #ad #wayfaircreator #wayfair #homereno

...

48 15
*TWO THINGS that make wallpaper removal easy* Wallpaper has come a long way and there’s no need to be scared of it anymore! Before I hang wallpaper, I size the walls and often use pre-pasted SureStrip wallpaper that is activated with water! Comment WALLPAPER for easy to remove wallpaper links!

...

41 29
What a difference pattern can make in a space! 

Are you ready to try wallpaper in your home?

...

131 46
2016 didn’t seem that long ago until I dug through my blog for old home photos. 😳

...

112 13
Dreaming of spring days while winter does its thing.

...

63 14